BBC Microbit
![]()


BBC micro:bit
Water Sensor
Introduction
This page is the result of testing two different water/moisture sensors that can be connected to the micro:bit. Jamie had just ordered one of these and he helped with me to test both of these sensors.
The first sensor looks like this,
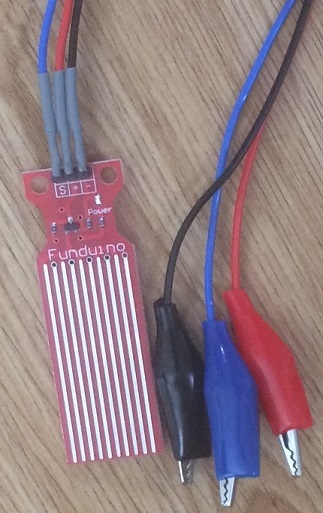
The red circuit board can be dipped in a glass of water, all the way up to where the writing is. It should give a different reading depending on how far up the board the water line goes.
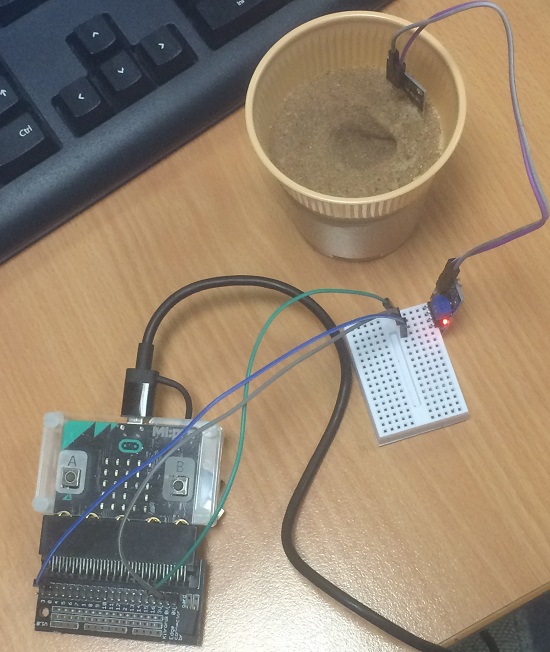
The second sensor is a soil moisture sensor. It is designed to be buried in soil. In this photograph, the sensor is placed in a cup of sand.
Hooking Up
Water Level Sensor
The first sensor came with crocodile clips. The red cable is attached to the plus on the circuit board and must be clipped to the 3V pin. The black cable is attached to minus on the circuit board and must be clipped to GND on the micro:bit. The blue cable is attached to the S or signal pin on the circuit board. You clip this one to pin 0 or one of the other GPIO pins.
Soil Moisture Level Sensor
The second sensor didn't come with the crocodile clips. In the photograph above, you can see that I've used an edge connector and a solderless breadboard to connect up the sensor. There are 4 pins here. The ones you want to connect are VCC to 3V, GND to GND and A0 to pin 0 or one of the other GPIO pins.
Programming
If you are using the Mu editor, open the REPL console window to see the output from this simple program. You can use the same program to see the readings you get with either of the sensors.
from microbit import *

while True:
    a = pin0.read_analog()
    print(a)
    sleep(50)
Testing - Water Sensor
To test the water sensor, Jamie and I got a cup of water. We got a reading of 1 when nothing was touching the sensor. Touching on the sensor changed the reading by about 20 or 30. This is because of the moisture in our skin. Breathing on the sensor sent the reading up to 100 or so before it slowly fell. Dipping the tip of the sensor in the water got a reading of a couple of hundred. with the water level any higher we got a reading between 250 and 500 or so.
The reading did get larger as the water level got higher but it was hard to make out exact levels from the readings even with the water level being increased gradually and leaving time for the sensor to settle. We could get a very clear sense of wet and dry though. Jamie wrote a block editor program to display this on the micro:bit matrix.
Testing - Soil Moisture Sensor
With this sensor, we took a cup of dryish sand. We poured water in, a little at a time, and watched as the reading varied.
Challenges
- The soil moisture sensor that we used is not a particularly robust product. One way to prolong its life is to make sure it is not always receiving power. Instead of connecting the power connection to 3V, connect it to a GPIO pin. When you want to take a reading, turn it on and wait a few seconds. Turn it off again as soon as you have taken the reading you need. A button press it a good way to trigger this process.
- The reading you get from the soil moisture sensor depends on the amount of moisture it detects. You can explore the link between the reading and the amount of water added if you design a good experiment. Think about the things that make a difference to your reading, like the amount of and type of soil, where you pour the water. The variable in your experiment is the amount of water. You need to run the experiment many times with different volumes of water. Everything else in your experiment needs to be the same each time you take a reading. In between each trial, wipe and dry the sensor and your container. Take the same volume of fresh sand that you use in each trial and add the water. Mix the sand and water thoroughly before taking a reading with the sensor in the same part of the cup each time. Record all of your results in a table. If you use a spreadsheet, you can plot a graph from the results. If you start with small quantities of water and gradually increase, you should get to a point where the senor cannot detect any further change. At this point, you have done enough trials.
- The water sensor varies a tiny amount when you touch it. It should be affected by how sweaty the person's fingers are. See if a basic lie detector could be made on the assumption that someone will give a higher reading if they are not telling the truth.