BBC Microbit
![]()


BBC micro:bit
DIY MIDI Out
Introduction
MIDI stands for Musical Instrument Digital Interface. It is a technical standard or rather a set of standards for describing electrical connections between musical instruments, computers and other related equipment. With some relatively cheap equipment, we can make the micro:bit use this standard to communicate using the MIDI protocol. This allows us to play notes and noises using either a PC or a musical instrument that accepts MIDI input.
Equipment
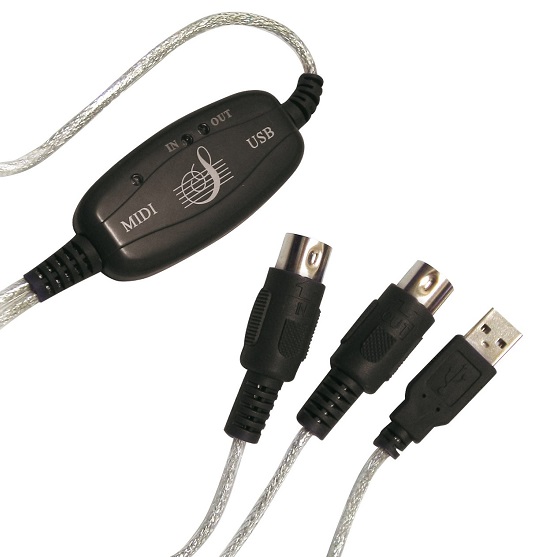
If you are going to do this with a PC, you need something to make the MIDI connection to your PC over USB. I used a USB MIDI-IN/MIDI-OUT cable. This very one, in fact. It works happily in Windows without any special drivers. It currently costs under £3 at some online retailers.
You also need a 5 pin MIDI PCB mount connector. These are widely available among online retailers and in the high street shops that sell electronics for hobbyists.

2 resistors are needed for the connection. A 10 Ohm and a 33 Ohm resistor are needed.
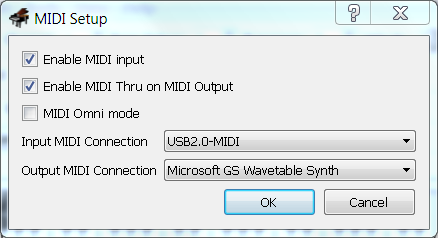
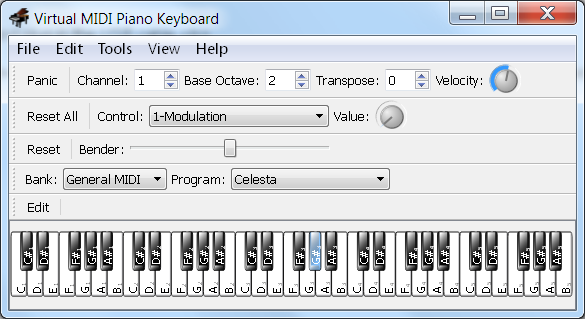
In order to hear the notes, you will need to install some software to your PC. I used Virtual Midi Piano Keyboard to view/hear the MIDI playing. Once installed, you will need to make sure that you set up the software to receive MIDI input. With the USB adapter connected and drivers installed (automatic usually), go to the Edit menu and choose MIDI Connections. Complete as shown below,
I also changed the base octave setting in the main window to 2. The code will then play all of the notes you can see on the screen with all other settings at their default values.
Circuit
This is based on the electrical specification for MIDI connectors published by the MIDI Manufacturer's Association, a non-profit trade association of companies who make products that use MIDI technology. If you look online for this, most of the things you will find will be based on 5V microcontrollers and, when a 3V3 microcontroller like the micro:bit is used, people often use a separate 5V supply. The standard does not require this. So here, is a 3V3 MIDI out circuit, following the standard.
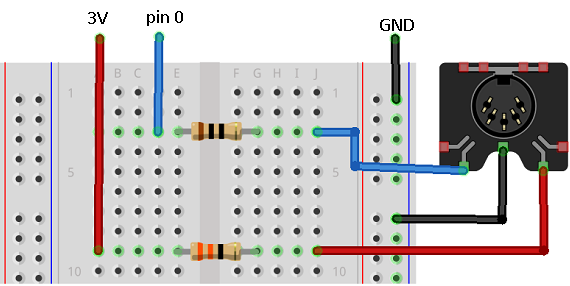
The resistor at the top of the diagram is a 10 Ohm resistor. It connects pin 0, our signal line, to the connector. The second resistor is a 33 Ohm resistor. This connects our 3V3 supply to the connector.
Test Program
Here's a quick test. Flash it to the micro:bit and then make sure VMPK is open with the correct settings.
from microbit import *


MIDI_NOTE_ON  = 0x90
MIDI_NOTE_OFF = 0x80
MIDI_CHAN_MSG = 0xB0
MIDI_CHAN_BANK = 0x00
MIDI_CHAN_VOLUME = 0x07
MIDI_CHAN_PROGRAM = 0xC0

def midiSetInstrument(chan, inst):
    if chan>15:
        return
    inst-=1
    if inst>127:
        return
    msg = bytes([MIDI_CHAN_PROGRAM | chan, inst])
    uart.write(msg)


def midiNoteOn(chan, n, vel):
  if chan>15:
        return
  if n>127:
        return
  if vel>127:
       return
  msg = bytes([MIDI_NOTE_ON | chan, n, vel])
  uart.write(msg)


def midiNoteOff(chan, n, vel):
  if chan>15:
        return
  if n>127:
        return
  if vel>127:
        return
  msg = bytes([MIDI_NOTE_OFF | chan, n, vel])
  uart.write(msg)


def Start():
    uart.init(baudrate=31250, bits=8, parity=None, stop=1, tx=pin0)


Start()
while True:
    for j in range(1,20):
        midiSetInstrument(0,j)
        for i in range(60,69):
            midiNoteOn(0,i,127)
            sleep(500)
            midiNoteOff(0,i,127)
            sleep(100)
    sleep(1000)
If you don't hear any sound at this point, there are several possible reasons. Your first check is to look at the USB adapter. The one I used has a yellow/green LED that blinks when it receives a MIDI signal. If that is not blinking, you can't hear anything because no MIDI is being sent. This could be that you haven't set up the circuit correctly, have a jumper in the wrong place or have the whole thing back to front.
If the LED on the adapter is blinking then the problem is with the settings you have for the software. MIDI messages are being sent, just not being processed correctly.
MIDI Note Table
The following table lists the hexadecimal values for MIDI notes.
| Musical Note | Hex Value |
|---|---|
| C(-1) | 00 |
| C#(-1) | 01 |
| D(-1) | 02 |
| D#(-1) | 03 |
| E(-1) | 04 |
| F(-1) | 05 |
| F#(-1) | 06 |
| G(-1) | 07 |
| G#(-1) | 08 |
| A(-1) | 09 |
| A#(-1) | 0A |
| B(-1) | 0B |
| C0 | 0C |
| C#0 | 0D |
| D0 | 0E |
| D#0 | 0F |
| E0 | 10 |
| F0 | 11 |
| F#0 | 12 |
| G0 | 13 |
| G#0 | 14 |
| A0 | 15 |
| A#0 | 16 |
| B0 | 17 |
| C1 | 18 |
| C#1 | 19 |
| D1 | 1A |
| D#1 | 1B |
| E1 | 1C |
| F1 | 1D |
| F#1 | 1E |
| G1 | 1F |
| G#1 | 20 |
| A1 | 21 |
| A#1 | 22 |
| B1 | 23 |
| C2 | 24 |
| C#2 | 25 |
| D2 | 26 |
| D#2 | 27 |
| E2 | 28 |
| F2 | 29 |
| F#2 | 2A |
| G2 | 2B |
| G#2 | 2C |
| A2 | 2D |
| A#2 | 2E |
| B2 | 2F |
| C3 | 30 |
| C#3 | 31 |
| D3 | 32 |
| D#3 | 33 |
| E3 | 34 |
| F3 | 35 |
| F#3 | 36 |
| G3 | 37 |
| G#3 | 38 |
| A3 | 39 |
| A#3 | 3A |
| B3 | 3B |
| C4 | 3C |
| C#4 | 3D |
| D4 | 3E |
| D#4 | 3F |
| E4 | 40 |
| F4 | 41 |
| F#4 | 42 |
| G4 | 43 |
| G#4 | 44 |
| A4 | 45 |
| A#4 | 46 |
| B4 | 47 |
| C5 | 48 |
| C#5 | 49 |
| D5 | 4A |
| D#5 | 4B |
| E5 | 4C |
| F5 | 4D |
| F#5 | 4E |
| G5 | 4F |
| G#5 | 50 |
| A5 | 51 |
| A#5 | 52 |
| B5 | 53 |
| C6 | 54 |
| C#6 | 55 |
| D6 | 56 |
| D#6 | 57 |
| E6 | 58 |
| F6 | 59 |
| F#6 | 5A |
| G6 | 5B |
| G#6 | 5C |
| A6 | 5D |
| A#6 | 5E |
| B6 | 5F |
| C6 | 60 |
| C#7 | 61 |
| D7 | 62 |
| D#7 | 63 |
| E7 | 64 |
| F7 | 65 |
| F#7 | 66 |
| G7 | 67 |
| G#7 | 68 |
| A7 | 69 |
| A#7 | 6A |
| B7 | 6B |
| C8 | 6C |
| C#8 | 6D |
| D8 | 6E |
| D#8 | 6F |
| E8 | 70 |
| F8 | 71 |
| F#8 | 72 |
| G8 | 73 |
| G#8 | 74 |
| A8 | 75 |
| A#8 | 76 |
| B8 | 77 |
| C9 | 78 |
| C#9 | 79 |
| D9 | 7A |
| D#9 | 7B |
| E9 | 7C |
| F9 | 7D |
| F#9 | 7E |
| G9 | 7F |
Programming - Tune
Let's use the notes to make a tune.
from microbit import *

MIDI_NOTE_ON  = 0x90
MIDI_NOTE_OFF = 0x80
MIDI_CHAN_MSG = 0xB0
MIDI_CHAN_BANK = 0x00
MIDI_CHAN_VOLUME = 0x07
MIDI_CHAN_PROGRAM = 0xC0

tune = [0x3C, 0x3C, 0x43, 0x43, 0x45, 0x45, 0x43, 0x41, 0x41, 0x40, 0x40, 0x3E, 0x3E, 0x3C]
beats = [1, 1, 1, 1, 1, 1, 2, 1, 1, 1, 1, 1, 1, 2]
tunelength = 14
paws = 300


def midiSetInstrument(chan, inst):
    if chan>15:
        return
    inst-=1
    if inst>127:
        return
    msg = bytes([MIDI_CHAN_PROGRAM | chan, inst])
    uart.write(msg)

def midiSetChannelVolume(chan, vol):
  if chan>15:
        return
  if vol>127:
        return
  msg = bytes([MIDI_CHAN_MSG | chan, MIDI_CHAN_VOLUME, vol])
  uart.write(msg)

def midiSetChannelBank(chan, bank):
  if chan>15:
        return
  if bank>127:
        return
  msg = bytes([MIDI_CHAN_MSG | chan, MIDI_CHAN_BANK, bank])
  uart.write(msg)

def midiNoteOn(chan, n, vel):
  if chan>15:
        return
  if n>127:
        return
  if vel>127:
       return
  msg = bytes([MIDI_NOTE_ON | chan, n, vel])
  uart.write(msg)

def midiNoteOff(chan, n, vel):
  if chan>15:
        return
  if n>127:
        return
  if vel>127:
        return
  msg = bytes([MIDI_NOTE_OFF | chan, n, vel])
  uart.write(msg)


def Start():
    uart.init(baudrate=31250, bits=8, parity=None, stop=1, tx=pin0)
    midiSetInstrument(0,10)

Start()

while True:
    for i in range(0, tunelength):
        midiNoteOn(0, tune[i], 127)
        sleep(beats[i]*paws)
        midiNoteOff(0, tune[i], 127)
        sleep(paws/10)
    sleep(3000)
Drum Kit
In General MIDI, channel 10 has the percussion instruments. Percussion instruments and sound effects are notes in a channel rather than separate instruments.
Here is the code for a bass drum and snare on the micro:bit buttons,
from microbit import *

MIDI_NOTE_ON  = 0x90
MIDI_NOTE_OFF = 0x80
MIDI_CHAN_MSG = 0xB0
MIDI_CHAN_BANK = 0x00
MIDI_CHAN_VOLUME = 0x07
MIDI_CHAN_PROGRAM = 0xC0


def midiSetInstrument(chan, inst):
    if chan>15:
        return
    inst-=1
    if inst>127:
        return
    msg = bytes([MIDI_CHAN_PROGRAM | chan, inst])
    uart.write(msg)


def midiNoteOn(chan, n, vel):
  if chan>15:
        return
  if n>127:
        return
  if vel>127:
       return
  msg = bytes([MIDI_NOTE_ON | chan, n, vel])
  uart.write(msg)
  return


def midiNoteOff(chan, n, vel):
  if chan>15:
        return
  if n>127:
        return
  if vel>127:
        return
  msg = bytes([MIDI_NOTE_OFF | chan, n, vel])
  uart.write(msg)


def Start():
    uart.init(baudrate=31250, bits=8, parity=None, stop=1, tx=pin0)

Start()
lastA = False
lastB = False
bass = 0x24
snare = 0x26

while True:
    a = button_a.is_pressed()
    b = button_b.was_pressed()
    if a==True and lastA==False:
        midiNoteOn(9,bass,127)
    elif a==False and lastA==True:
        midiNoteOff(9,bass,127)
    if b==True and lastB==False:
        midiNoteOn(9,snare,127)
    elif b==False and lastB==True:
        midiNoteOff(9,snare,127)
    lastA = a
    lastB = b
    sleep(10)
Challenges
- Getting a MIDI tune playing nicely is a good start. Study the last program. You have two lists defined at the start. One lists the notes, the other lists the number of beats each note should be played.
- Using the 3 touch inputs, perhaps with some play-doh, you could make more of a drum kit. Add some external arcade buttons on the input pins and you are getting there.
- You can play more than one instrument more easily if you set them up on different channels. Try this out, maybe by working out how to play something sounding like a chord.
- Anything that gives you analog readings can be used as the note selector for your instruments. The level of precision in your device will impact upon your instrument.
- There is a lot more to MIDI than just this. Hunt around a little more and you will find out how to do more stuff, maybe some drums.
- You can get the micro:bit to kick out a drum beat at the BPM you want and then jam over the top of it by pressing the keys for the notes in VMPK. If you play the piano a bit or are a little bit musical, you'll work out a way to make a nice sound.