BBC Microbit
![]()


BBC micro:bit
Serial Output - Debugging
Introduction
The PXT code editor has a library of blocks covering the use of hardware serial connections from the micro:bit. Although this information can be directed to digital pins, its default route is through a USB connection. One issue with the micro:bit is that, by itself, it's not easy to make information readable at speed. Sometimes you want to know the numbers that are produced by sensors in order to fine tune a program. This page shows a way you can tell what kinds of numbers you are working with and not have to catch them as they scroll across a screen large enough to display one character at a time.
The micro:bit does not need any drivers to work on a PC. It normally shows up for you like a removable disk. In order to communicate properly with the micro:bit on a Windows PC, you will need to install the serial driver. You can find this here. Clearly, you can only do this if the driver is present on your PC or you can install it yourself (because you are using your own computer).
Programming
This is pretty easy to do. This program takes a reading of the values for all 3 axes of the accelerometer on the micro:bit. It sends that information via the serial port.
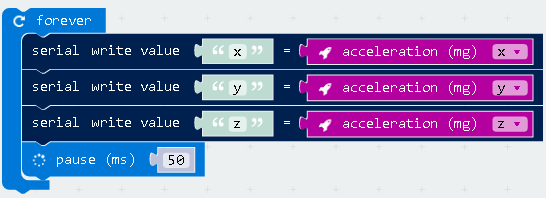
basic.forever(() => {
    serial.writeValue("x", input.acceleration(Dimension.X))
    serial.writeValue("y", input.acceleration(Dimension.Y))
    serial.writeValue("z", input.acceleration(Dimension.Z))
    basic.pause(50)
})
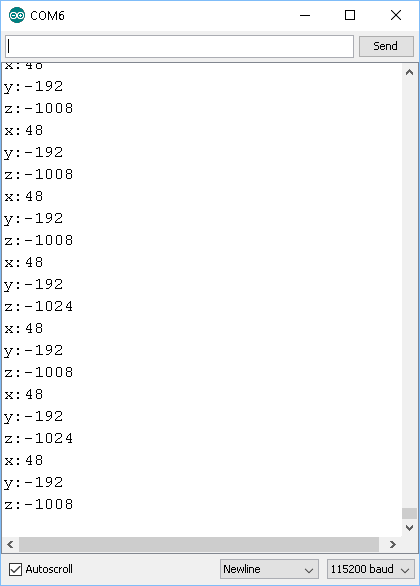
The simulator in the editor shows you what is being sent at the left of the screen. These are values from the simulator, not the micro:bit. To see those, we need to use some software that can read the information. The Arduino IDE is the simplest thing I reach for reading this kind of information. You can follow the instructions to make your own monitor in Visual Basic. It's relatively simple to do and you can add features to it if you are prepared to spend some time on your programming. With the Arduino IDE, you'll need to select the port you want to monitor by going to the Tools menu - usually it's the highest number that will be the micro:bit. You open the Serial Monitor by clicking on the magnifying glass top right of the application. Set the baud rate to 115200 as you see in the screenshot and you should see something like this,
Challenges
- Using the serial connection is a gateway technology. This isn't really the page for that. It's more of a tool for you to use. If you have an analog sensor, your readings don't fit nicely on the display and scrolling numbers are slow to output. You can glance at a screen and read the real-time information. If you can see the changes in the numbers as you control what the sensor is sensing (eg introducing and removing light), you can make judgements about your program. The challenge for is to make use of information gathered this way to crack how to program with a sensor you are not so confident with or to help you choose between different sensors if you have that luxury.
- One interesting challenge is to see if you can use serial output of accelerometer readings to work out how the gestures are programmed. One way to do this is to create events for the gestures using the standard input blocks. Then you write the serial values of the accelerometer and the compass in the event, as well as writing the event type. Tilt the micro:bit like a weirdo for a while and then examine the data values you received. For extra challenge, do a shedload of this. Get the output format right and you'll be able to create values that can be copied into a spreadsheet and analysed pretty efficiently. If you can then write code to reproduce the gestures without using the built-in events, you are doing pretty well. With small modifications, you can alter the way the gestures have to be performed and create custom gestures to use in your programs.