BBC Microbit
![]()


BBC micro:bit
Piano For micro:bit
Introduction
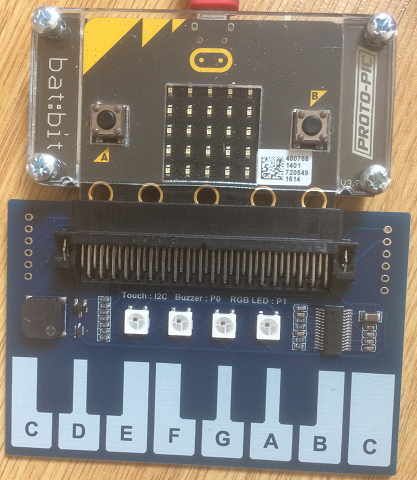
The Piano for micro:bit board is a micro:bit accessory made by the electronics company Waveshare. The board features an edge connector, a buzzer and 4 Neopixels. There are also 13 copper pads laid out as a full octave piano keyboard. The input is controlled by a TTP229 capacitive touch IC which you interact with over I2C. There are also some solderable pins to break out pins 0 to 2, the power, I2C and SPI pins.
The board is pretty easy to interact with and the touch input pretty reliable in the quick experiements that I have done.
Pin Connections
- The buzzer is connected to pin 0.
- The Neopixels are connected to pin 1.
- The touch input IC is connected to the I2C pins.
Programming
The TTP229 is configured by connecting the pins of the chip in specific combinations. This is all done on the board. The following is a simple class to test the touch input.
from microbit import *

class Piano():
    def __init__(self):
        self.last = 0

    def read(self):
        arr = i2c.read(0x57,2)
        return arr[0]+arr[1]*256

p = Piano()

while True:
    r = p.read()
    print('{:013b}'.format(r),r)
    sleep(50)
The read method returns a 16 bit integer representing the states of the touch pads. The highest 3 place values will be 0. Looking at this in an REPL window, you can see that the IC supports multi-touch. Since we can only play a single note with the buzzer, a workaround for single-touch is to accept only the leftmost touch. This is done below,
from microbit import *

class Piano():
    def __init__(self):
        self.last = 0

    def read(self):
        arr = i2c.read(0x57,2)
        return arr[0]+arr[1]*256

    def read_left(self):
        r = self.read()
        d = list(reversed([r >> i & 1 for i in range(12,-1,-1)]))
        if r>0:
            return d[0:13].index(1)
        else:
            return -1
p = Piano()

while True:
    print(p.read_left())
    sleep(50)
The read_left() method returns an integer corresponding to the pad touched (0 to 12, left to right). If no pad is touched, it returns -1. This is enough information to get a more playable piano, where the notes are held for as long as the player is touching the pad.
Playable Piano
If we start playing a note everytime we get a positive reading on a pad, the result will be clicky, with the frequency of the clicks coming from the updates. To avoid this, we use a follower variable called last. This way, we only start a note if there is a change in the pad state compared to the previous reading.
The stock code for this board plays notes of the same length each time. That doesn't make a particularly playable instrument. You need to be able to vary the length of your notes to perform. Seth's virtuoso performances on this version will live long in memory.
from microbit import *
import music


class Piano():
    def __init__(self):
        self.last = 0

    def read(self):
        arr = i2c.read(0x57,2)
        return arr[0]+arr[1]*256

    def read_left(self):
        r = self.read()
        d = list(reversed([r >> i & 1 for i in range(12,-1,-1)]))
        if r>0:
            return d[0:13].index(1)
        else:
            return -1


p = Piano()
notes = [523,554,587,622,659,698,740,784,
        831,880,932,988,1047]
last = -1
while True:
    n = p.read_left()
    if n==-1:
        music.stop(pin0)
    elif n!=last:
        music.pitch(notes[n],-1,pin0, False)
    last = n
    sleep(10)
The notes list holds the frequencies we want to play, from lowest to highest.
MIDI Piano
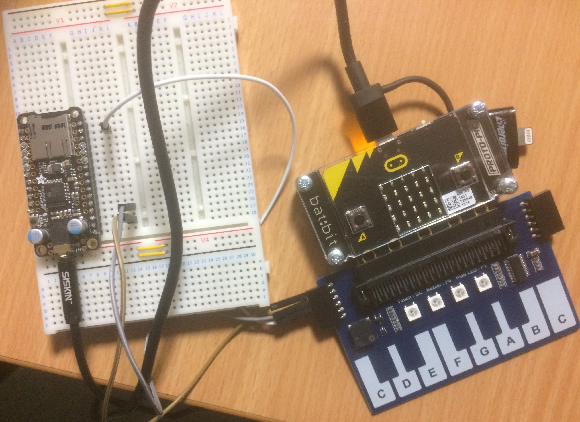
I soldered some right-angled female headers to the breakout pins. This gives access to the power lines and to some GPIO. I only need one pin to send a UART MIDI signal. The buzzer is alright but it would be nice to play something that sounds a little more pleasant.
In the following photograph, I am using an Adafruit Music Maker FeatherWing. This is made for the Adafruit Feather boards, which run at the same voltage as the micro:bit. I soldered over a jumper on the board to enable the MIDI mode. I made 3 connections (power, ground and signal) following the pinout information on Adafruit's site. This board uses the VS1053 Codec which contains the synthesiser needed to make the MIDI noise. It also has a convenient headphone jack already on the board. The cable coming out of the FeatherWing (left side of the photo) is the audio cable, connecting to amplified speakers on a PC.
from microbit import *
import music


class Piano():
    def read(self):
        arr = i2c.read(0x57,2)
        return arr[0]+arr[1]*256

    def read_left(self):
        r = self.read()
        d = list(reversed([r >> i & 1 for i in range(12,-1,-1)]))
        if r>0:
            return d[0:13].index(1)
        else:
            return -1

VS1053_BANK_DEFAULT = 0x00
VS1053_BANK_MELODY = 0x79
MIDI_NOTE_ON  = 0x90
MIDI_NOTE_OFF = 0x80
MIDI_CHAN_MSG = 0xB0
MIDI_CHAN_BANK = 0x00
MIDI_CHAN_VOLUME = 0x07
MIDI_CHAN_PROGRAM = 0xC0

def midiSetInstrument(chan, inst):
    if chan>15:
        return
    inst-=1
    if inst>127:
        return
    msg = bytes([MIDI_CHAN_PROGRAM | chan, inst])
    uart.write(msg)
    return

def midiSetChannelVolume(chan, vol):
  msg = bytes([MIDI_CHAN_MSG | chan, MIDI_CHAN_VOLUME, vol])
  uart.write(msg)
  return

def midiSetChannelBank(chan, bank):
  msg = bytes([MIDI_CHAN_MSG | chan, MIDI_CHAN_BANK, bank])
  uart.write(msg)
  return

def midiNoteOn(chan, n, vel):
  msg = bytes([MIDI_NOTE_ON | chan, n, vel])
  uart.write(msg)
  return

def midiNoteOff(chan, n, vel):
  msg = bytes([MIDI_NOTE_OFF | chan, n, vel])
  uart.write(msg)


def Start():
    uart.init(baudrate=31250, bits=8, parity=None, stop=1, tx=pin2)
    sleep(50)
    midiSetChannelBank(0, VS1053_BANK_MELODY)
    midiSetInstrument(0, 80) #ocarina
    midiSetChannelVolume(0, 127)

Start()
p = Piano()
last = -1
while True:
    n = p.read_left()
    if n==-1:
        midiNoteOff(0,60+last,127)
    elif n!=last:
        midiNoteOff(0,60+last,127)
        midiNoteOn(0,60+n,127)
    last = n
    sleep(10)
The code is pretty messy here. I did a quick copy and paste of the playable piano code and my VS1053 codec code. The main difference is that the MIDI notes are consecutive integers, which makes the main code loop a lot easier. In this example, I used the Ocarina, which makes a lovely sound. This gives a much nicer sound and lets you try out all sorts of instruments.
Challenges
- The Neopixels could be set to respond to the key presses. Assuming the single-touch mode described above, you could have the Neopixels show the binary equivalent of the key being touched. Keep the brightness down as low as you can to avoid seeing spots.
- If you have headers soldered to the board for the additional breakouts, start with a few buttons to do octave changes.
- Make a version of the Simon game with notes being remembered rather than coloured lights.
- Use the keyboard for password entry. Start with similar logic to Simon, looking for a sequence of button presses. Then work out how to tell apart presses of different durations for a more complex system.