BBC Microbit
![]()


BBC micro:bit
Piano HAT CAP1188
Introduction
The Piano HAT is a Raspberry Pi accessory made by Pimoroni. It uses two CAP1188 capacitive touch sensors for a total of 16 capacitive touchpads. A full octave of touchpads is laid out as a piano keyboard. There are LEDs which light up as you touch each input.
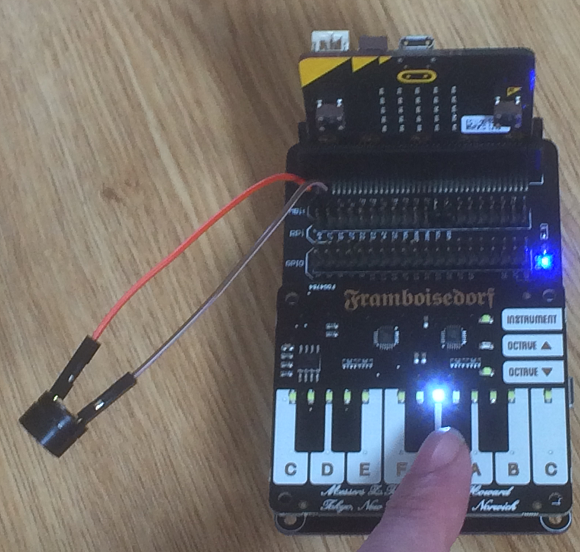
Here is a shot of it in action on a 4Tronix Bit:2:Pi. The jumper wires are connected to a piezo buzzer with its + connected to pin 0 and its minus connected to pin 1.
The Piano HAT costs £15. This is less than the cost of the 2 CAP1188 breakout boards that you'd need to get the same number of inputs. Even by Pimoroni standards, the PCB design is amazing. It is nice to find that it can be made to work with the micro:bit.
Circuit
Using the Bit:2:Pi, you just need to make sure that you have the jumpers set for pins 19 and 20. You also need to provide the 5V from a separate source. On the Bit:2:Pi, you can use USB or the battery pack. You might also want to use some stand-offs and fix the HAT to the Bit:2:Pi.
Pin Connections
| Connection | Raspberry Pi | micro:bit |
|---|---|---|
| Power 5V | 5V | 5V |
| Power 3V3 | 3V3 | 3V |
| Ground | GND | GND |
| Data | Pin 2 | Pin 20 |
| Clock | Pin 3 | Pin 19 |
Programming
I'd had a few goes at hooking up CAP1188 boards to the micro:bit without much success. After getting the Touch pHAT to work, I thought it was worth another go. These programs don't cover much of the functionality of the sensors but they get you started.
This was the program I wrote first. I worked through the settings in the Pimoroni library. I started with the class for the sensor and tested it with the two different sensors, using the different i2c addresses that you see in second class. The second class was just a quick way to make a convenient object for later programs.
from microbit import *

class cap1188:
    def __init__(self, ADDR):
        self.ADDRESS = ADDR
        for i in range(8):
            self.write_reg(0x30 + i, 0x06)
        self.write_reg(0x72,0xff)
        self.write_reg(0x1F,0x60)
        self.write_reg(0x20,0x38)
        self.write_reg(0x44,0x60)

    def write_reg(self,reg,value):
        i2c.write(self.ADDRESS, bytes([reg,value]), repeat=False)

    def read(self):
        self.write_reg(0,0)
        i2c.write(self.ADDRESS,  b'\x03', repeat=False)
        data = i2c.read(self.ADDRESS,1,repeat=False)
        return data[0]

class piano_hat():
    def __init__(self):
        self.a = cap1188(0x28)
        self.b = cap1188(0x2b)

    def read(self):
        x = self.a.read()
        y = self.b.read()
        if x>0:
            y = 0
        data = list(reversed([x >> i & 1 for i in range(7,-1,-1)]))
        data += list(reversed([y >> i & 1 for i in range(7,-1,-1)]))
        return data


piano = piano_hat()

while True:
    reading = piano.read()
    if sum(reading)>0:
        print(reading)
    sleep(10)
This gave me the data I wanted. The if statement isn't quite enough to apply the non-multitouch directive - it removes the data but doesn't stop the LED. This could be sorted with a little more work.
This next program was the basic piano/buzzer setup to make the piano 'playable', after a fashion. I used the pitches for the octave C5 to C6.
from microbit import *
import music

class cap1188:
    def __init__(self, ADDR):
        self.ADDRESS = ADDR
        for i in range(8):
            self.write_reg(0x30 + i, 0x06)
        self.write_reg(0x72,0xff)
        self.write_reg(0x1F,0x60)
        self.write_reg(0x20,0x38)
        self.write_reg(0x44,0x60)

    def write_reg(self,reg,value):
        i2c.write(self.ADDRESS, bytes([reg,value]), repeat=False)

    def read(self):
        self.write_reg(0,0)
        i2c.write(self.ADDRESS,  b'\x03', repeat=False)
        data = i2c.read(self.ADDRESS,1,repeat=False)
        return data[0]

class piano_hat():
    def __init__(self):
        self.a = cap1188(0x28)
        self.b = cap1188(0x2b)

    def read(self):
        x = self.a.read()
        y = self.b.read()
        if x>0:
            y = 0
        data = list(reversed([x >> i & 1 for i in range(7,-1,-1)]))
        data += list(reversed([y >> i & 1 for i in range(7,-1,-1)]))
        return data


piano = piano_hat()

# pin1 is GND
pin1.write_digital(0)

notes = [523,554,587,622,659,698,740,784,
        831,880,932,988,1047]
last = -1
while True:
    reading = piano.read()
    a = reading[0:13]
    n = -1
    if sum(a)>0:
        n = a.index(1)
        if n!=last:
            music.pitch(notes[n],-1,pin0, False)
    else:
        music.stop(pin0)
    last = n
Challenges
- Implement the octave change functionality that was not included in the example.
- You could use this keyboard with either of the two MIDI projects on this site. Matching the noteOn and noteOff messages to the touch and release of the pads is not too tricky. If you tweak the code to give you the sensor readings as binary patterns, you could write an efficient routine for managing this. The 'change instrument' button then becomes a nice feature.
- You could attach a speaker to the pins and have the notes sung out loud. You could make it say the names of the notes in the correct pitch. It might be more fun to write the program so that you can easily change the word that is sung.
- The datasheet for the CAP1188 has a reasonably clear explanation of the registers and values you use to specify the behaviour you want. Explore what else you can do with the chip to make better use of the Piano HAT.
- You could make a memory game based on musical notes. Rather than copy and extend the basic Simon idea, maybe go for small music phrases, groups of notes.
- Consider a different application for the large number of inputs that you now have.