BBC Microbit
![]()


BBC micro:bit
Bitkit - Colour Sensing
Introduction
The micro:car has a colour sensor at the front. This allows you to be a little more inventive with your line following applications.
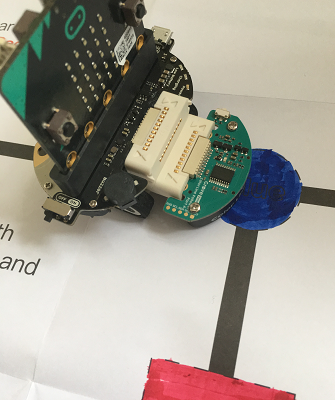
The image shows the car moving autonomously on one of the tracks that come with the kit. I have used the markers from the kit to colour in some sections of the track. You can see a blue circle, a red rectangle and, just off the bottom of the image, is a green circle.
The following program code uses the Drive and FollowLine procedures previously developed to follow a black line and do something when different coloured sections are reached. When the car reaches a blue circle, it makes a 90° turn to the right. When it reaches the red rectangle, it stops for a few seconds. When it reaches a green circle, it makes a 90° turn to the left.
from microbit import *

def Drive(lft,rgt):
    ld, rd = 0, 0
    if lft<0:
        ld = 0xff
        lft += 255
    if rgt<0:
        rd = 0xff
        rgt += 255
    i2c.write(0x28,bytes([1,lft,ld,rgt,rd]))

def Follow_line():
    i2c.write(0x27,b'\x02')
    ln = i2c.read(0x27,1)[0]
    drv = [(0,0),(255,255),(255,255),
    (63,255),(0,255),(255,63),(255,0)]
    lt,rt = drv[ln]
    Drive(lt,rt)
    sleep(20)

def Colour():
    i2c.write(0x27,b'\x01')
    return i2c.read(0x27,4)[0]

while True:
    c = Colour()
    # check for red(2), green(3), blue(4)
    if c>=2 and c<=4:
        # colour event
        if c==2:
        # stop for 2 seconds (red)
            Drive(0,0)
            sleep(2000)
            Drive(255,255)
            sleep(1000)
        elif c==3:
        # turn left (green)
            Drive(255,255)
            sleep(750)
            Drive(0,255)
            sleep(1800)
            Drive(255,255)
            sleep(500)
        elif c==4:
        # turn right (blue)
            Drive(255,255)
            sleep(750)
            Drive(255,0)
            sleep(1800)
            Drive(255,255)
            sleep(500)
    else:
        Follow_line()
The key to this is the Colour function. To get a colour reading, we write a 1 to the colour sensor. We then read back 4 bytes and look at the value of the first byte. The number returned tells us which colour was sensed,
- Black
- Red
- Green
- Blue
- Another Colour
This feature of the micro car is pretty cool. Notice that the values you can get from a reading correspond to the 3 colour channels plus black. This is easiest to work out with a colour sensor. Other colours are a little more tricky to read reliably - but not impossible...