BBC Microbit
![]()


BBC micro:bit
Lighting The Way (PXT)
Introduction
'Neopixels' is a term used by the company Adafruit to describe chainable RGB LEDs that come with a constant current driver. You can control a decent number of neopixels using a single GPIO pin and they tend to be wonderfully bright. Since we are running these from battery power, rather than power from the micro:bit, we can afford to run them a little brighter than we might normally do.
There are 12 neopixels on the Bit:Bot, 6 of them on each side. They are helpfully numbered on the PCB from 0 to 11, no excuses for not lighting the correct ones.
The neopixels are connected to pin 13.
Programming
In order to use the Neopixel blocks, you need to add the library. You do this by clicking the settings link (cog button at the right of the menu). Choose import package and add the NeoPixel library.
The following blocks are used to light all of the Neopixels in a single colour.
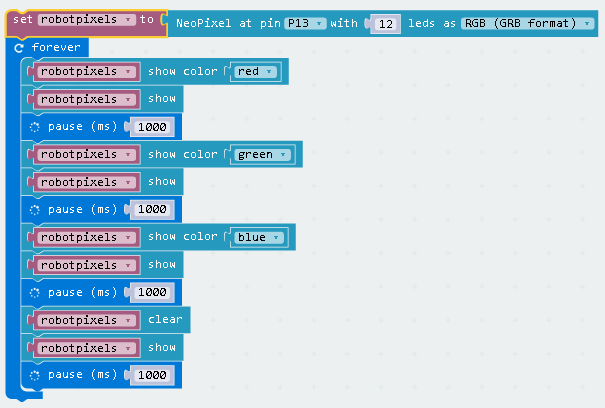
The JavaScript for this is,
let robotpixels = neopixel.create(DigitalPin.P13, 12, NeoPixelMode.RGB)
basic.forever(() => {
    robotpixels.showColor(neopixel.colors(NeoPixelColors.Red))
    robotpixels.show()
    basic.pause(1000)
    robotpixels.showColor(neopixel.colors(NeoPixelColors.Green))
    robotpixels.show()
    basic.pause(1000)
    robotpixels.showColor(neopixel.colors(NeoPixelColors.Blue))
    robotpixels.show()
    basic.pause(1000)
    robotpixels.clear()
    robotpixels.show()
    basic.pause(1000)
})
You can light the pixels individually. This program lights the first and last pixels. They are numbered from 0 to 11.
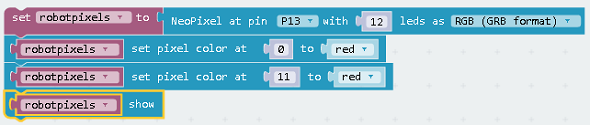
The JavaScript for this is,
let robotpixels = neopixel.create(DigitalPin.P13, 12, NeoPixelMode.RGB)
robotpixels.setPixelColor(0, neopixel.colors(NeoPixelColors.Red))
robotpixels.setPixelColor(11, neopixel.colors(NeoPixelColors.Red))
robotpixels.show()
You can monkey around with the brightness. The brightness you set is applied to future changes to a pixel. That's why the red is being repeatedly set here.
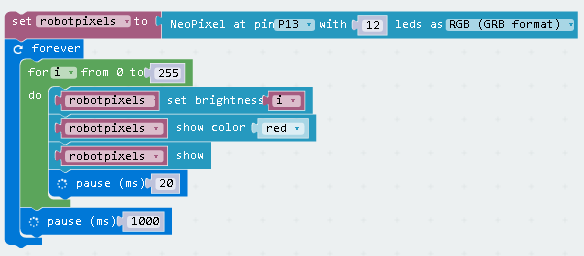
JavaScript for that,
let robotpixels = neopixel.create(DigitalPin.P13, 12, NeoPixelMode.RGB)
basic.forever(() => {
    for (let i = 0; i <= 255; i++) {
        robotpixels.setBrigthness(i)
        robotpixels.showColor(neopixel.colors(NeoPixelColors.Red))
        robotpixels.show()
        basic.pause(20)
    }
    basic.pause(1000)
})
There are a few built-in functions that can be used to make some nice effects with the strip of lights. Here are a few - there are more to play with.
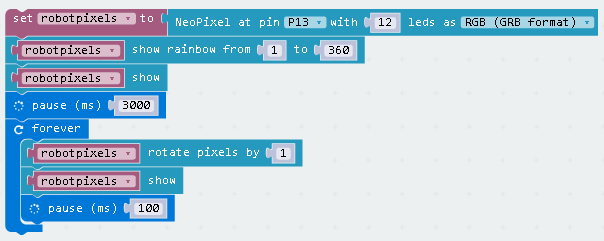
JavaScript for that,
let robotpixels = neopixel.create(DigitalPin.P13, 12, NeoPixelMode.RGB)
robotpixels.showRainbow(1, 360)
robotpixels.show()
basic.pause(3000)
basic.forever(() => {
    robotpixels.rotate(1)
    robotpixels.show()
    basic.pause(100)
})
Challenges
- An obvious starting point is in synchronising lights and movement. Using the functions in the library and your own routines, you can get different lights to indicate the direction in which you are driving the motors. You could light up a different number of lights on each fin depending on how quicky you are driving the motor on that side. You could use colour to indicate the direction of the motor too.
- Mood lamp.
- Using different shades of red, you can make a heartbest effect. This looks just as good if you use a different colour. What you are looking for is a range of shades of the same colour with the edges of the strip being dimmer than the centre. Make the pixels glow brighter by differing amounts depending on their location in the strip.