BBC Microbit
![]()


BBC micro:bit
Just A micro:bit
Introduction
The exercises on this page are designed to be completed with just a micro:bit, no additional components. They start off pretty easy and are designed to get you into using the micro:bit.
Keep a record of the programs that you write. You can take screenshots of the blocks of your program. This makes a useful set of resources to help you with your future programs and projects.
Task 1
Copy and test the following program. Then read the explanation below.
from microbit import *

while True:
    display.show("A")
    sleep(500)
    display.clear()
    sleep(500)
There are 7 lines of code (including the blank line). Each line can be explained as follows,
- This line imports the microbit library.
- Blank lines sometimes help to make code readable.
- This loop will repeat infinitely.
- Displays the letter 'A' on the matrix.
- Pauses for 500 milliseconds.
- Clears the display.
- Pauses for 500 milliseconds
Lines 4-7 are indented. Code that is part of a repetition structure is indented like this.
Task 2
You can turn pixels on and off by using their coordinates. The following code sets each one of the pixels on the top row (y=0) to full brightness (9).
from microbit import *

for x in range(5):
    display.set_pixel(x,0,9)
    sleep(500)
The set_pixel method works as follows,
display.set_pixel(x, y, b)
There are 3 arguments. The first two arguments specify the column (x) and the row(y). The last value is the brightness of the pixel and should be a number from 0-9.
Adapt the program so that the middle row of pixels is turned on instead of the top row.
Task 3
Adjust the code from the previous task so that it lights up the pixels of the first column instead of the first row.
Task 4
Use 2 loops, one for the x coordinate and one for the y coordinate. Turn on each of the pixels, one at a time, going row by row.
Task 5
The same thing that you did for the previous task, but light up the pixels column by column.
Task 6
By setting a pixel's brightness to 0, you turn it off. Copy your code from Task 5 and add code so that the pixels are turned off. To turn them off in reverse order, you will need a loop to count backwards. An example of this would be,
for x in range(4,-1,-1):
Task 7
Write a program to make the centre pixel blink on and off every half a second.
Task 8
Write a program to make each of the pixels of the display blink on and then off. It should look like the blinky pixel is travelling around the whole matrix.
Task 9
Using the display.set_pixel() method, write the most efficent program that you can to display the following sequence of lit pixels.
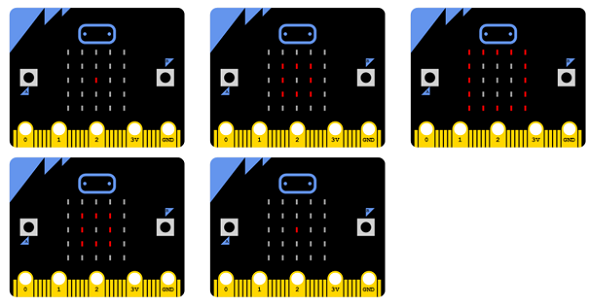
Task 10
In the first task/example, the display.show() method was used to show a character. This method needs to be used with strings.If you wanted to display an integer value, you would need to convert it to a string, like this,
display.show(str(x))
In this example, the variable x would have a stored integer value. Use this powerful piece of information to get the micro:bit to do a count from 0 to 9, with a second's gap between each number being displayed. Use a for loop that counts from 0 to 9. Your display.show statement should display the number stored in the variable.
Task 11
Do a countdown from 9 to 0. After the countdown is complete, show the text Lift Off. Look back at Task 6 to remind you how to make a loop count backwards.
Task 12
Study the following code,
from microbit import *

num = 0
while True:
    if button_a.was_pressed():
        display.show(str(num))
        sleep(250)
        display.clear()
    sleep(50)
Adapt the program so that the number shown is increased by 1, each time the A button is pressed. Look for the line of code here that means 'when the A button was pressed'. Increase the value of the variable num at this point. If it is equal (==) to 10, make it equal to 0. Then display the number.
Task 13
Write a program that uses both of the buttons. Make it so that the user can increase the number by pressing the B button and decrease it by pressing the A button. Make sure that the number never gets lower than 0 and never higher than 9.
Task 14
Write a program to count the number of times the A button was pressed before the B button was pressed. Pressing the B button should cause the micro:bit to display the number of presses, wait a second, clear the display and reset the button press count to 0.
Task 15
Copy and test the following program,
from microbit import *

x = 0
y = 0

while True:
    display.set_pixel(x,y,0)
    if button_a.was_pressed():
        x -= 1
    if button_b.was_pressed():
        x += 1
    x = max(0, min(x, 4))
    display.set_pixel(x,y,9)
    sleep(20)
The variables x and y store the coordinates of a pixel in the LED matrix. By pressing the A and B buttons, the user can move the pixel left and right.
Line 12 is used to make sure that the value of x cannot fall outside of the range 0-4.
Adapt the program so that you can also move up and down (change the value of y). You will need the following changes. Write your new code in between lines 12 and 13.
- Add a line dy = accelerometer.get_y().
- If dy is greater than 300, add 1 to y.
- If dy is less than -300, subtract 1 from y.
- Add a line to make sure that the value of y cannot fall outside of the range 0 to 4.
Task 16
Look back at Task 15 and reflect on how you could get input corresponding to movement in 4 directions. Write a program that displays an arrow on the display that corresponds to the direction being chosen by a user.
There are built-in images for arrows:
display.show(Image.ARROW_N)
The direction of the arrow matches a point on the compass. Use N,E,S,W for Up, Right, Down, Left.
When a direction is chosen, display the arrow that matches, wait for half a second and then clear the display.
Task 17
On the micro:bit, pins 0, 1 and 2 are 'touch pins'. That means that if you touch the GND pin at the same time as one of the touch pins, you can detect that in your program. For example,
from microbit import *

while True:
    if pin0.is_touched():
        display.set_pixel(0,0,9)
    else:
        display.set_pixel(0,0,0)
    if pin1.is_touched():
        display.set_pixel(4,0,9)
    else:
        display.set_pixel(4,0,0)
    sleep(10)
This program lights or unlights pixels depending on whether pin0 or pin1 have been touched. Adapt the program to capture a touch on any of the three touch pins. Display the following images,
- Pin0 Image.HAPPY
- Pin1 Image.HEART
- Pin2 Image.FABULOUS
When the pins are not being touched, display Image.MEH.
Task 18
In the following program, a list of images is used to create an animation.
from microbit import *

imgs = [
    Image('90000:00000:00000:00000:00000:'),
    Image('90000:09000:00000:00000:00000:'),
    Image('90000:09000:00900:00000:00000:'),
    Image('90000:09000:00900:00090:00000:'),
    Image('90000:09000:00900:00090:00009:')
]
display.show(imgs, delay=500,loop=True)
Use the same technique to design your own animation of around a dozen images.
Task 19
The following program shows how you can define an image and then move it around the display. In this case, the image consists of a single pixel, set to full brightness.
from microbit import *

im = Image('00000:00000:00900:00000:00000:')
display.show(im)
sleep(500)

while True:
    im = im.shift_up(1)
    display.show(im)
    sleep(500)
    im = im.shift_right(1)
    display.show(im)
    sleep(500)
    im = im.shift_down(1)
    display.show(im)
    sleep(500)
    im = im.shift_left(1)
    display.show(im)
    sleep(500)
Adapt/rewrite the program so that user is in control of the movement of the image. Use the A and B buttons for left/right movement and the y axis of the accelerometer for up/down movement. Include a delay after registering each movement.
Task 20
With a list of images, it is possible to select one of them randomly. In this program, the faces of a die have been defined in the list. One is chosen at random.
from microbit import *
import random

faces = [Image('00000:00000:00900:00000:00000:'),
        Image('00009:00000:00000:00000:90000:'),
        Image('00009:00000:00900:00000:90000:'),
        Image('90009:00000:00000:00000:90009:'),
        Image('90009:00000:00900:00000:90009:'),
        Image('90009:00000:90009:00000:90009:')]
rolled = random.choice(faces)
display.show(rolled)
Use this technique to write a ROCK, PAPER, SCISSORS program in MicroPython. When the user presses a button, perform a short animation or countdown before displaying a random image (either Rock, Paper or Scissors).
Task 21
The starting point for this task is your moving dot program from Task 15. Adapt the program so that the dot is blinking. You are using an infinite loop in your program and the dot is being redrawn every time the loop repeats. You need to work out how to make sure that the dot is only drawn every other repetition. One way to do this is to store a variable called ticks. Before the loop, assign the value 0 to this variable. Each repetition, add one to it. The decision to display or not to display the dot can be based on the value of the ticks variable. If the variable stores an even number, draw the dot, otherwise don't. Use the modulus operator to establish whether or not the variable stores an even number. The modulus operator in Python is %.
Task 22
Copy and test the following program,
from microbit import *
import random

class Asteroid():
    def __init__(self, x, y):
        self.x = x
        self.y = y

    def update(self):
        self.y = self.y + 1
        self.x += random.randint(-1,1)
        self.x = max(0,min(self.x,4))
        if self.y==5:
            self.y=0
            self.x=random.randint(0,4)

    def draw(self):
        display.clear()
        display.set_pixel(self.x,self.y,9)

a = Asteroid(0,0)

while True:
    a.draw()
    a.update()
    sleep(250)
This program contains a class. A class is an abstract data structure. It defines how we want an object to behave and the information that we need to store about the object. In this program, the variable a is called an instance of the Asteroid object. Look at the lines of code inside the while loop. These are the lines that make the magic happen.
Your task is to adapt the program so that the dot moves from left to right. This means making changes in the UPDATE method. Instead of increasing y by 1, increase x by 1. Instead of adding a random number to x, add a random number to y. Make sure that the y value cannot fall outside of the 0-4 range.