BBC Microbit
![]()


BBC micro:bit
Driving The Motors (PXT)
Introduction
The first thing that you'll want to do with a robot vehicle is make it move. To do this we need to send the correct electrical signals to the motors.
Programming
The motors are connected to the micro:bit on the following pins,
- LFT Motor: PWM pin 0, DIR pin 8
- RGT Motor: PWM pin 1, DIR pin 12
When you want to drive the motors, you start by using digital write on the IDR (direction pins) with a 0 for forwards and a 1 for backwards. You then use analog write on the PWM pins to set the speed of the motor.
For example, to go forwards at full speed for 2 seconds and then stop, you would use,
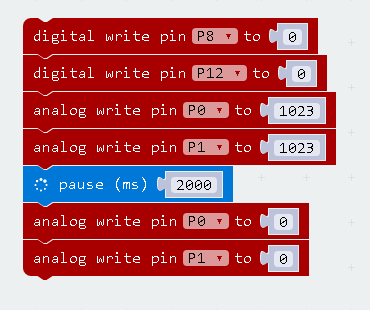
You can write a value from 0 to 1023 in the write_analog statements. The higher your value, the quicker you move forwards. This would be a little under 80% speed.
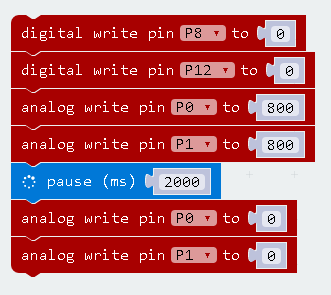
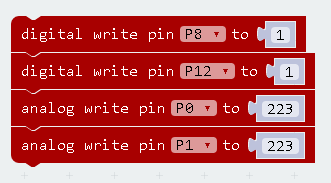
To reverse, first write a 1 to the direction pins of each motor. Then write a value from 0 to 1023 like before. This time, however, the smaller your number, the quicker you go backwards. Subtract your speed from 1023 to get the value you write. If we want to reverse at '800', the same speed backwards as we just went forwards, we would write,
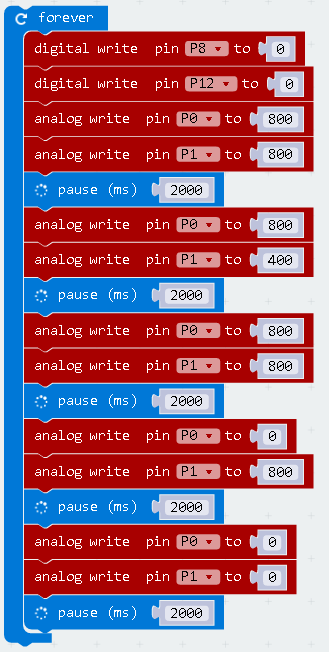
You can chain your movements together in a long string of blocks like this,
If you press the JavaScript link in the editor, you will see the JavaScript equivalent of our blocks. The PXT editor converts automatically between the languages.
basic.forever(() => {
    pins.digitalWritePin(DigitalPin.P8, 0)
    pins.digitalWritePin(DigitalPin.P12, 0)
    pins.analogWritePin(AnalogPin.P0, 800)
    pins.analogWritePin(AnalogPin.P1, 800)
    basic.pause(2000)
    pins.analogWritePin(AnalogPin.P0, 800)
    pins.analogWritePin(AnalogPin.P1, 400)
    basic.pause(2000)
    pins.analogWritePin(AnalogPin.P0, 800)
    pins.analogWritePin(AnalogPin.P1, 800)
    basic.pause(2000)
    pins.analogWritePin(AnalogPin.P0, 0)
    pins.analogWritePin(AnalogPin.P1, 800)
    basic.pause(2000)
    pins.analogWritePin(AnalogPin.P0, 0)
    pins.analogWritePin(AnalogPin.P1, 0)
    basic.pause(2000)
})
Adding some comments (shown here in red), you can see how to write out the JavaScript statements to make the robot move as you would like. If you want to do a lot of specific movements in a chain, you will find it easier to write the program in this view of the editor. You can copy and past lines of code and edit the numbers to make the process a lot quicker. Comments help to make your code easier for you and others to follow.
basic.forever(() => {
    // Set up direction pins for forward motion
    pins.digitalWritePin(DigitalPin.P8, 0)
    pins.digitalWritePin(DigitalPin.P12, 0)
    // forwards
    pins.analogWritePin(AnalogPin.P0, 800)
    pins.analogWritePin(AnalogPin.P1, 800)
    basic.pause(2000)
    // slow turn right
    pins.analogWritePin(AnalogPin.P0, 800)
    pins.analogWritePin(AnalogPin.P1, 400)
    basic.pause(2000)
    // forwards
    pins.analogWritePin(AnalogPin.P0, 800)
    pins.analogWritePin(AnalogPin.P1, 800)
    basic.pause(2000)
    // sharp left turn
    pins.analogWritePin(AnalogPin.P0, 0)
    pins.analogWritePin(AnalogPin.P1, 800)
    basic.pause(2000)
    // coast/stop
    pins.analogWritePin(AnalogPin.P0, 0)
    pins.analogWritePin(AnalogPin.P1, 0)
    basic.pause(2000)
})
Challenges
- Take the last example and adapt it to have the car move in a repeating pattern that takes it back to its starting point.
- Set up an obstacle course with a start and an end point. Write a program that drives the Bit:Bot to the finish in the quickest time. You will notice that full speed is not always the quickest route to victory in a complicated obstacle course.
- You can still make things appear on the LED matrix when using the robot. When you are chaining a series of actions together, you can change the display to show what you intended your code to do. For simple movements, this can be an arrow pointing in the direction of travel. For other manoeuvres, you will need to design your own images.
- Experiment with the numbers you write in the analog write statements. Work out how long it takes to travel a given distance and how to turn 90° on the spot. Work out your own routines to drive fowards and backwards your chosen unit. Write two more for your left and right rotations. Use your functions to make it easier to write programs that send the robot on long planned routes. If you know how the car is going to move in small units, you will reduce the amount of trial and error needed to get the robot to follow a long route.