BBC Microbit
![]()


BBC micro:bit
7 Segment Fun
Introduction
The photograph shows a 4 digit 7-segment display connected to the micro:bit.
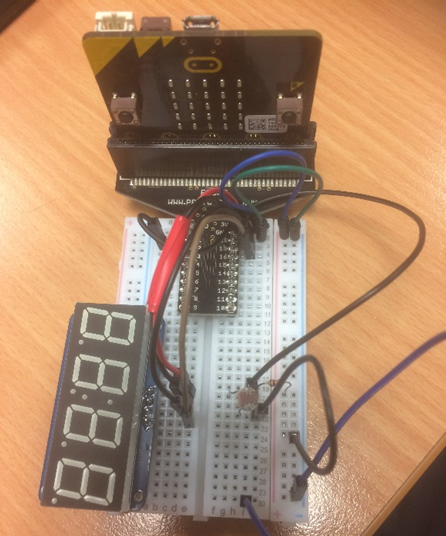
A light sensor has also been connected in this photograph.
After a little testing, the idea will be to display the readings from the sensor (0-1024) on the 7-segment display.
The 7-segment display is mounted on a circuit board which contains a component to help drive the LEDs on the display. We will need a library of code to help with this device.
The Code Library
Other than the last 4 lines of the following (which show you how to make a number appear on the display), you will need to copy the following code in every program you write that uses the display.
from microbit import *

class backpack:
    ADDRESS             = 0x70
    BLINK_CMD           = 0x80
    CMD_BRIGHTNESS      = 0xE0
    # Digits 0 - F
    NUMS = [0x3F, 0x06, 0x5B, 0x4F, 0x66, 0x6D, 0x7D,
        0x07, 0x7F, 0x6F, 0x77, 0x7C, 0x39, 0x5E, 0x79, 0x71]

    def __init__(self):
        self.buffer = bytearray([0]*16)
        i2c.write(self.ADDRESS,b'\x21')
        # 0 to 3
        self.blink_rate(0)
        # 0 to 15
        self.set_brightness(15)
        self.update_display()

    def set_brightness(self,b):
        i2c.write(self.ADDRESS,bytes([self.CMD_BRIGHTNESS | b]))

    def blink_rate(self, b):
        i2c.write(self.ADDRESS,bytes([self.BLINK_CMD | 1 | (b << 1)]))

    def write_digit(self, position, digit, dot=False):
        # skip the colon
        offset = 0 if position < 2 else 1
        pos = offset + position
        self.buffer[pos*2] = self.NUMS[digit] & 0xFF
        if dot:
            self.buffer[pos*2] |= 0x80

    def update_display(self):
        data = bytearray([0]) + self.buffer
        i2c.write(self.ADDRESS,data)

    def print(self,value):
        if value<0 or value>9999:
            return
        sdig =  '{:04d}'.format(value)
        dts = [int(x) for x in sdig]
        for i,d in enumerate(dts):
            self.write_digit(i,d)

    def clear(self):
        self.buffer = bytearray([0]*16)
        self.update_display()


# declare an instance
f = backpack()

# example - write a 4 digit number to the display
f.print(1234)
# this statement makes the changes appear on the display
f.update_display()
Task 1
Write a program that uses a FOR loop to count upwards from 0 to 9999, displaying each number on the display. You probably want to keep the delay between each number reasonably small but make sure that you still get to see the numbers.
Task 2
Write a program that displays a 0 on the display. Pressing the B button should increase the number by 1. Pressing the A button should decrease the number by 1. Add code to ensure that the count cannot be lower than 0 or higher than 9999.
Task 3
Write a program that displays readings from an axis of the accelerometer on the display.
The display is not set up to show negative numbers. To make things easier, you can convert your reading to the absolute value (ignoring negative signs) by using something like the following,
x = abs(accelerometer.get_x())
Tilt the micro:bit and look at the values you get. Try out the other axes (y and z) to see how moving the micro:bit affects the results that you get.
Task 4
Write a program that reads from the light sensor. This is an analog sensor, so you need something like,
reading = pin1.read_analog()
The variable reading will store the value we want to write to the display. You need to take readings repeatedly, so this is going to need to be embedded in a while True loop.
Task 5
Depending on the amount of ambient light in the room, you should get sensor readings from about 150 to about 700. If you add a buzzer to the circuit, you could use the sensor reading as the pitch for a note played on the buzzer. Multiply the reading by 2 if the pitch is a little too low.
Then, you should be able to control a whiny noise by moving your hand around above the sensor, changing the amount of light that it receives.
Task 6
Find another sensor to connect in place of the light sensor. Look uaround the site to find how to build the circuit and how to take readings. Display those readings on the display to learn the range of values you receive from the sensor you have chosen. (Flex sensor, Potentiometer, Soft Potentiometer).