BBC micro:bit
Noughts & Crosses
Introduction
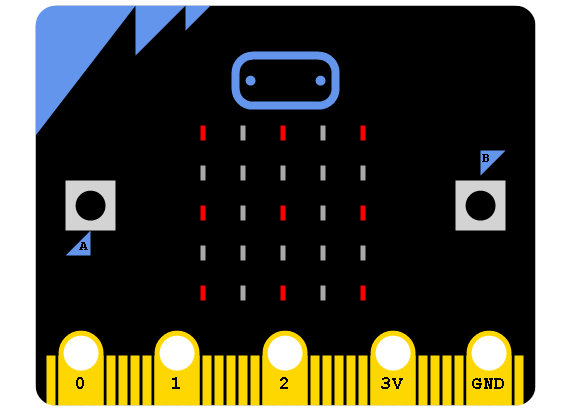
This project began with the idea of using a part of the LED matrix to represent a Noughts & Crosses grid. I wanted to make a quick game that you could play against the micro:bit. The grid is represented with the following LEDs on the matrix.

A bright pixel is a player's symbol. The darker (but still on) pixels are the computer's moves. Flashing LEDs show the 'cursor' when selecting a move.
To keep the game simple, the player always goes first. The computer makes its moves according to a set of programmed 'rules' that could easily be adapted. The player presses the A button to move a flashing dot through the grid positions. Pressing the B button selects the spot.
micro:bit Only
This was my first quick and dirty version. It's not the way I'd normally go about programming the game but it gave me a playable version.
from microbit import *
import random

board = [0]*9

def DrawGame(t, s):
    img = Image('00000:'*5)
    for i,b in enumerate(board):
        x,y = GetSpotXY(i)
        img.set_pixel(x,y,b)
    x,y = GetSpotXY(s)
    if t==1:
       img.set_pixel(x, y, 9)
    return img

def GetSpotXY(s):
    return (s % 3) * 2, (s // 3) * 2

def GetPlayerMove():
    wait = True
    spot = 0
    tick = -1
    while wait:
        tick +=1
        tick = tick % 2
        if button_a.was_pressed():
            spot += 1
        elif button_b.was_pressed():
            if board[spot] == 0:
                board[spot] = 7
                wait = False
        spot = spot % 9
        # update screen
        i = DrawGame(tick, spot)
        display.show(i)
        sleep(100)

def CheckWin(p):
    for i in range(0,3):
        if board[i*3]==p and board[i*3+1]==p and board[i*3+2]==p:
            return True
        if board[i]==p and board[i+3]==p and board[i+6]==p:
            return True
    if board[0]==p and board[4]==p and board[8]==p:
        return True
    if board[2]==p and board[4]==p and board[6]==p:
        return True
    return False

def GetComputerMove(turn):
    frees = [i for i in range(9) if board[i]==0]
    if turn>4:
        # check for winning move
        for m in frees:
            board[m]=3
            if CheckWin(3):
                return m
            board[m]=0
    # block opponent win
    for m in frees:
        board[m]=7
        if CheckWin(7):
            board[m]=3
            return m
        board[m]=0
    # play centre
    if board[4]==0:
        board[4]=3
        return 4
    # play a corner
    corners = [i for i in frees if i==0 or i==2 or i==6 or i==8]
    if len(corners)>0:
        m = random.choice(corners)
        board[m]=3
        return m
    # play anywhere else
    m = random.choice(frees)
    board[m]=3
    return m


while True:
    turn = -1
    win = False
    board = [0]*9
    while win==False and turn<8:
        turn += 1
        GetPlayerMove()
        if turn>3:
            win = CheckWin(7)
        if win:
            display.scroll("Winner")
        else:
            if turn<7:
                turn += 1
                GetComputerMove(turn)
                i = DrawGame(0,0)
                display.show(i)
                sleep(1000)
                if turn>4:
                    win = CheckWin(3)
                    if win:
                        display.scroll("Loser")
            else:
                display.scroll("Draw")
    sleep(250)
The while loop at the bottom of the listing houses the main game loop. The player goes first, then the computer and so on. The player and computer moves are coded separately and some aspects could be blended together a little better.
The GetSpotXY() function turns an integer from 0 to 8 into matrix pixel coordinates. For most of the programming logic it is easy to understand the board positions as integers from 0 to 8. When it comes to the display, we need to map those onto the correct corner and centre-edge pixels by xy coordinate.
| Position | x | y |
|---|---|---|
| 0 | 0 | 0 |
| 1 | 2 | 0 |
| 2 | 4 | 0 |
| 3 | 0 | 2 |
| 4 | 2 | 2 |
| 5 | 4 | 2 |
| 6 | 0 | 4 |
| 7 | 2 | 4 |
| 8 | 4 | 4 |
When you use a 2 dimensional data structure in a program, the computer is still going to store the data in a single long sequence. The compiler/interpreter does the translation for you. To see how to do it by hand, start by copying the data from the above table into a spreadsheet. The aim is then to write a formula for each column that can turn the position into the row and column numbers.
The x values repeat in a cycle of length 3 and go up in 2s. Having a common difference of 2 says we will be multiplying by 2. The repeating cycle of length 3 tells us we will be finding the remainder when we divide our position by 3. So, to get the x coordinate you,
- Find the remainder of the position divided by 3.
- Multiply the result by 2.
The y values are in groups of 3. This tells us that we will be doing integer/floor division (rounding down answers) by 3. The difference of 2 between each group means that we have to multiply our answer by 2. So,
Divide the position by 3 and round the result down to the nearest whole number. Multiply the result by 2.
When you are doing this kind of mapping for a microcontroller it's often possible to put all of the values into a spreadsheet and write formulas that you fill down. You can quickly spot if you are getting the wrong result.
At the end of all of that reasoning, the result is a single line function that allows us to work with a list of integers, simplfiying the board structure in our program.
The GetComputerMove() function is the set of rules for the computer. The computer's logic is not flawless and it can be quite easy to draw with it. There is an approach that increases the chance of a win but it isn't a giveaway. With a little bit of thought, a draw can always be enforced in the game.
Remote Wireless Keyboard
The first version provided a few minutes of entertainment and a nice pass-around challenge for the living room. I forgot about it for a while, thinking about using bi-colour LEDs or 9 LEDs of each colour, along with 9 buttons. Then I found out that you could connect a wireless remote keyboard to the micro:bit (see other pages in this section). I have a remote where the number buttons are nicely placed for comfortable single-hand play. Rather than improve the core code, I just slapped in some code to read from the remote (see other page for circuit details). The nicer input method made for a game that was a little less fiddly to play.
from microbit import *
import random

# keyboard functions
def get_num_chars():
    i2c.write(0x29,b'\x01')
    data = i2c.read(0x29,1)[0]
    return data

# first character only
def read_buf():
    n = get_num_chars()
    i2c.write(0x29,b'\x00')
    data = i2c.read(0x29,n)
    return data[0]

# draws the game field
board = [0]*9
def DrawGame():
    img = Image('00000:'*5)
    for i,b in enumerate(board):
        x,y = GetSpotXY(i)
        img.set_pixel(x,y,b)
    return img

def GetSpotXY(s):
    return (s % 3) * 2, (s // 3) * 2

def GetPlayerMove():
    #global board
    wait = True
    while wait:
        if get_num_chars()>0:
            data = read_buf()
            data = data - 48
            if data>0 and data<10:
                if board[data-1] == 0:
                    board[data-1] = 9
                    wait = False
    # update screen
    i = DrawGame()
    display.show(i)
    sleep(100)

def CheckWin(p):
    for i in range(0,3):
        if board[i*3]==p and board[i*3+1]==p and board[i*3+2]==p:
            return True
        if board[i]==p and board[i+3]==p and board[i+6]==p:
            return True
    if board[0]==p and board[4]==p and board[8]==p:
        return True
    if board[2]==p and board[4]==p and board[6]==p:
        return True
    return False

def GetComputerMove(turn):
    frees = [i for i in range(9) if board[i]==0]
    if turn>4:
        # check for winning move
        for m in frees:
            board[m]=3
            if CheckWin(3):
                return m
            board[m]=0
    # block opponent win
    for m in frees:
        board[m]=9
        if CheckWin(9):
            board[m]=3
            return m
        board[m]=0
    # play centre
    if board[4]==0:
        board[4]=3
        return 4
    # play a corner
    corners = [i for i in frees if i==0 or i==2 or i==6 or i==8]
    if len(corners)>0:
        m = random.choice(corners)
        board[m]=3
        return m
    # play anywhere else
    m = random.choice(frees)
    board[m]=3
    return m

while True:
    turn = -1
    win = False
    board = [0]*9
    while win==False and turn<8:
        turn += 1
        GetPlayerMove()
        if turn>3:
            win = CheckWin(9)
        if win:
            display.scroll("Winner")
        else:
            if turn<7:
                turn += 1
                GetComputerMove(turn)
                i = DrawGame()
                display.show(i)
                sleep(1000)
                if turn>4:
                    win = CheckWin(3)
                    if win:
                        display.scroll("Loser")
            else:
                display.scroll("Draw")
    sleep(250)
Deluxe Version With Display
The last iteration of this project nailed the input, making the games quicker. It still takes people quite a few goes before they work out a route to a win and not everyone has the sticking power to think it through. After seeing a larger group of people use the project, the display proves a little awkward to read, particularly if the micro:bit is in an acrylic case. Even youngsters needed to kneel down to play. For the luxury gaming experience, a different approach to the display was needed.
I went for the Nokia 5110 LCD. After reading Martin Allen's code using SPI, I decided not to repeat the bitbanging I used when I first tried out the display. That makes the updates much quicker. I've only done enough for the basic game here - the matrix is still used to say the outcome of the game.
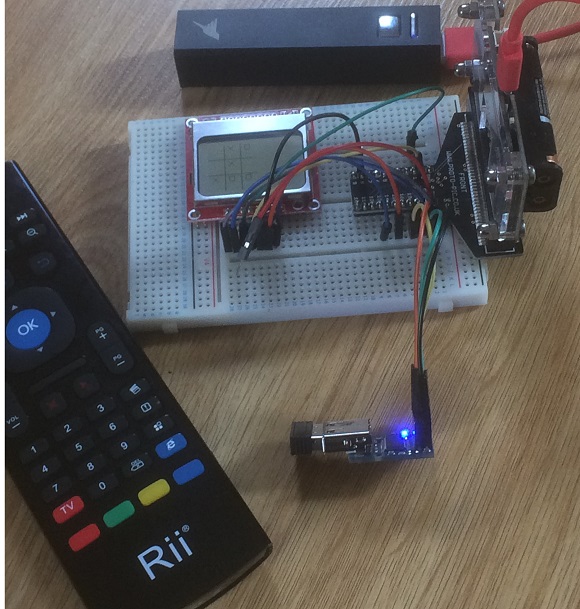
The whole setup is shown below. The buttons 1 - 9 on the remote are used to make moves in the game.

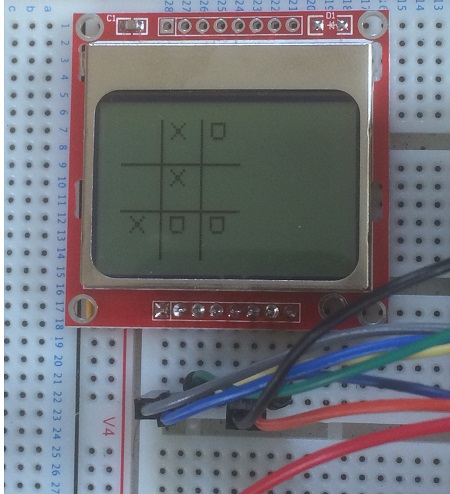
Here is a close-up of the display. The wire at the bottom of the photograph is the backlight. It is disconnected for the photograph. The display is still really easy to read. I haven't put a huge effort into the symbols or the positioning and went easy on myself when programming this.

The USB host board is connected to the i2c pins on the micro:bit, as well as to 3V and GND. The pins on the display are connected as follows,
| LCD Pin | micro:bit Pin |
|---|---|
| RST | pin 0 |
| CE | pin 1 |
| DC | pin 8 |
| DIN | pin 15 |
| CLK | pin 13 |
| VCC | 3V |
| BL | 3V |
| GND | GND |
You can leave out the connection for the backlight and still find the display quite visible.
from microbit import *
import random

# keyboard functions
def get_num_chars():
    i2c.write(0x29,b'\x01')
    data = i2c.read(0x29,1)[0]
    return data

# first character only
def read_buf():
    n = get_num_chars()
    i2c.write(0x29,b'\x00')
    data = i2c.read(0x29,n)
    return data[0]


def LWrt(dc, data):
    pin8.write_digital(dc)
    pin1.write_digital(0)
    spi.write(data)
    pin1.write_digital(1)

# Draw Game Board
def LDraw():
    data = bytearray(504)
    x = b'\x42\x24\x18\x18\x24\x42'
    o = b'\x3E\x42\x42\x42\x42\x3E'
    col = 16
    # draw symbols on board
    for i in range(9):
        s = GetSpot(i)
        for ii in range(6):
            if board[i]==0:
                data[ii+s] = o[ii]
            elif board[i]==1:
                data[ii+s] = x[ii]
    # draw columns of board
    for i in range(6):
        data[col] = 255
        data[col+16] = 255
        col += 84
    # draw rows of board
    for i in range(48):
        data[i+84] |= 128
        data[i+252] |= 128
    LWrt(1, data)

def GetSpot(s):
    return (4 + ((s % 3)*16)) + (168 * (s//3))


#Send a COMMAND instruction
def LCommand(value):
    LWrt(0,value)

def GetPlayerMove():
    wait = True
    while wait:
        if get_num_chars()>0:
            data = read_buf()
            data = data - 48
            if data>0 and data<10:
                if board[data-1] == -1:
                    board[data-1] = 1
                    wait = False
    # update screen
    LDraw()
    sleep(100)

def CheckWin(p):
    for i in range(0,3):
        if board[i*3]==p and board[i*3+1]==p and board[i*3+2]==p:
            return True
        if board[i]==p and board[i+3]==p and board[i+6]==p:
            return True
    if board[0]==p and board[4]==p and board[8]==p:
        return True
    if board[2]==p and board[4]==p and board[6]==p:
        return True
    return False

def GetComputerMove(turn):
    frees = [i for i in range(9) if board[i]==-1]
    if turn>4:
        # check for winning move
        for m in frees:
            board[m]=0
            if CheckWin(0):
                return m
            board[m]=-1
    # block opponent win
    for m in frees:
        board[m]=1
        if CheckWin(1):
            board[m]=0
            return m
        board[m]=-1
    # play centre
    if board[4]==-1:
        board[4]=0
        return 4
    # play a corner
    corners = [i for i in frees if i==0 or i==2 or i==6 or i==8]
    if len(corners)>0:
        m = random.choice(corners)
        board[m]=0
        return m
    # play anywhere else
    m = random.choice(frees)
    board[m]=0
    return


# Set up SPI interface
spi.init(baudrate = 328125, sclk = pin13, mosi = pin15)
pin0.write_digital(0)
pin0.write_digital(1)
LCommand(b'\x21\xBF\x04\x14\x0C\x20\x0C')
while True:
    turn = -1
    win = False
    board = [-1]*9
    LDraw()
    while win==False and turn<8:
        turn += 1
        GetPlayerMove()
        if turn>3:
            win = CheckWin(1)
        if win:
            display.scroll("Winner")
        else:
            if turn<7:
                turn += 1
                GetComputerMove(turn)
                LDraw()
                sleep(1000)
                if turn>4:
                    win = CheckWin(0)
                    if win:
                        display.scroll("Loser")
            else:
                display.scroll("Draw")
    sleep(250)
Starting with SPI library as a base, I took out all of the code that I didn't need as well as a fair few of the comments. I then tweaked the clear function to make it always draw the whole game board. There is a page on this display in this section that explains how the 504 bytes match the pixels on the display. The GetSpotXY function was modified to give the address of the first byte that needs to be written when displaying a symbol. A similar principle was used to work out the formula. The vertical lines are added by setting the relevant bytes to 255, the horizontal lines are done by using a logical OR operation with 128 to set the largest bit to 1.
The Nokia display works quite well for making a board game. The trick is find the easiest way to draw the board. In my version, the spacing is pretty compromised in order to make it easy to define and draw the symbols for the player characters.
Thoughts
Each of these projects proves the concept without exhasuting all of the possibilities or addressing the fundamental issue of only being able to play the game one way (player first). There are better ways to manage the data structure for the board to make the win checking and computer moves easier to program.
The project with the display could be improved a lot. Drawing a line through the winning move would be nice, along with enough characters defined to display the end game message and instructions for starting off.
This project was about making a one-player game. With 2 or even 3 micro:bits, you could make a 2 player version. 3 micro:bits provides you with a really interesting scenario where you could use one of the micro:bits to manage the game, with the other two concerned with connecting and sending/receiving the information needed about the game and moves. The display could be connected to the host. When a player looks to 'connect', by pressing a button on their micro:bit whilst near to the host, it sends the player a randomly generated string of characters. The string of characters can be used so that the host can know which micro:bit is going to act on its radio signals. Your protocols need to be thought through carefully, but you can make a nice gaming experience for a couple of players this way.
There are a handful of small board games that could be reenacted on the micro:bit matrix. Varying brightness and blinking pixels is enough to distinguish 2 player's pieces, as long as the pieces are all the same. A blinking LED can represent a cursor. Start by researching games like 3 Men's Morris and follow the links to related games until you land on something you think you can start to program.
For programming projects like this, or like the Simon game, the game logic can seem a bit intimidating to program but often ends up being a lot easier to do when you've made the first few steps. If you work on the data structure to store the game or board state, then how you display that, then the main user interactions and do those things separately as functions, you can often write quite simple logic for the main game loop. Once you have something working, then you refine your code to remove duplciation and wasted space before adding your whizzbang features and extra experiments.

