BBC Microbit
![]()


BBC micro:bit
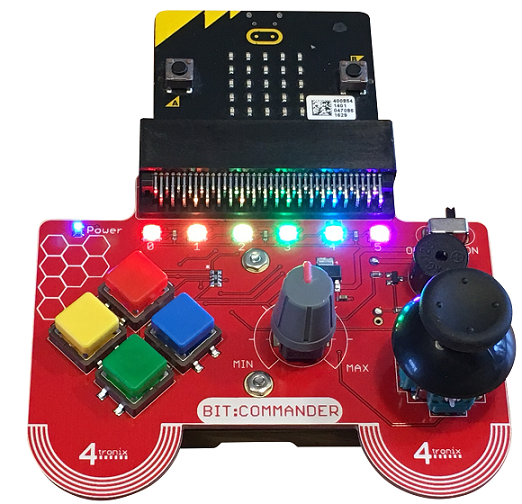
Bit:Commander Bit:Bot Controller
Introduction
This is a quick conversion of the existing code to make a usable controller for the Bit:bot. Both of these products are from 4tronix. They also do a robot car called the Robo:bit, which is based on a motor controller board that can be used in a 4tronix kit and separately. Since these have the same pin connections and driver for the motors, they can all be driven using this code. The robo:bit board works really well and gives a ready made power solution for the motors, leaving connections that can be used for other things. Jamie and Harry have mounted and remounted it many times on several platforms.
The micro:bit is a usable controller by itself. Having only two buttons, you are reliant on the accelerometer, though. This is reasonable fun but not as precise as you feel you want. Even with this very simple code, the Bit:Commander gives a much better experience of driving the car.
A robot car is a cool thing to make. When you first do it, you tend to forget about the control. It's cool making it follow lines, avoid obstacles or move in pre-programmed patterns. Well, it is until you want to drive the car into your friend's feet, switch on the lights and make the speaker say 'Get out of my way'. That's when you need fine control and some extra inputs.
The other thing about the robot cars, even when the motors have identical ratings, it doesn't take a lot for them to drive a little off-straight. You can hard code some compensation for this into your program. If you have remote control of the car, you don't need to, you compensate for any drift by simply steering.
Sending
Minor changes from the code on the Bit:bot radio page.
# Bit:bot controller. Simple modification of existing script for sending.

from microbit import *
import radio

chnl = 10
radio.config(channel=chnl)
radio.on()


while True:
    a = pin12.read_digital()
    b = pin14.read_digital()
    dx = pin1.read_analog()
    if  a and dx<150:
        # forwards left
        display.show(Image.ARROW_NW)
        radio.send("NW")
    elif a and dx>850:
        # forwards right
        display.show(Image.ARROW_NE)
        radio.send("NE")
    elif b and dx<150:
        # backwards left
        display.show(Image.ARROW_SW)
        radio.send("SW")
    elif b and dx>850:
        # backwards right
        display.show(Image.ARROW_SE)
        radio.send("SE")
    elif b:
        #backwards
        display.show(Image.ARROW_S)
        radio.send("S")
    elif a:
        # forwards
        display.show(Image.ARROW_N)
        radio.send("N")
    sleep(20)
Receiving
This code is unchanged.
from microbit import *
import radio

chnl = 10
radio.config(channel=chnl)
radio.on()

def Drive(lft,rgt):
    pin8.write_digital(0)
    pin12.write_digital(0)
    if lft<0:
        pin8.write_digital(1)
        lft = 1023 + lft
    if rgt<0:
        rgt = 1023 + rgt
        pin12.write_digital(1)
    pin0.write_analog(lft)
    pin1.write_analog(rgt)

while True:
    s = radio.receive()
    if s is not None:
        if s=="N":
            Drive(800,800)
        elif s=="S":
            Drive(-800,-800)
        elif s=="NE":
            Drive(800,200)
        elif s=="NW":
            Drive(200,800)
        elif s=="SE":
            Drive(-800,-200)
        elif s== "SW":
            Drive(-200,-800)
    else:
        Drive(0,0)
    sleep(20)
The code is deliberately left very simple here. Now that there are some extra inputs, there is more choice about how to drive the car. A nice idea would be to use the stick and vary the speed based on the stick position. The buttons could be used for left and right. You could use some of the other controls to put the Bit:bot into line or light following mode, flash some lights or beep the beep horn on the Bit:bot.