BBC Microbit
![]()


BBC micro:bit
Temperature Sensor
Introduction
If the temperature reading from the chip surface doesn't satisfy you, you can connect a tmp36 temperature sensor. This is a relatively cheap component. The only real advantage of using this is that you can move the reading away from the main circuit board.
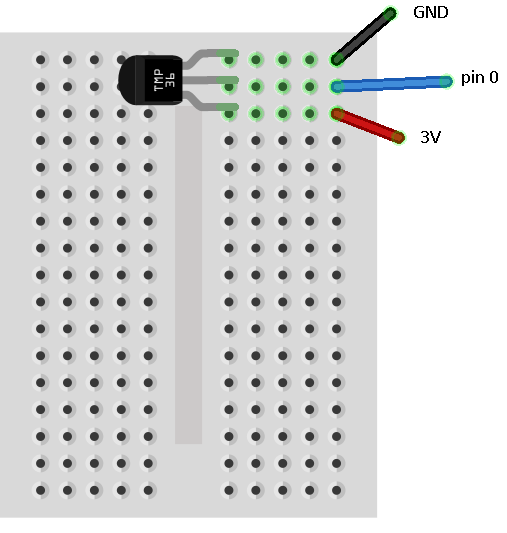
Circuit
It's a very simple circuit that you need for this sensor.
Programming
We need to use the datasheet for the tmp36 to be able to convert readings into temperatures. This graph is the key item,
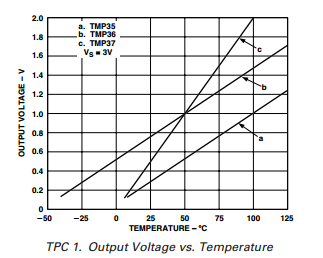
The first thing we need to do is work out what voltage we are reading from the sensor. Our power output on the micro:bit is 3.3V and, when we read our inputs, we get a figure from 0 - 1023. To convert this into millivolts, we need to multiply our reading by 3300/1024.
The graph shows us that, at 0°, the voltage reading should be 0.5V or 500mv. We subtract this number from our reading.
Finally, we can see on the graph that each volt in the reading represents 100°. Dividing by 10 on our figures will gives us a celsius reading.
from microbit import *

while True:
    x = pin0.read_analog()
    x = x * (3300/1024)
    print("Voltage" + str(x))
    c = (x-500) /10
    print("TempC:" + str(c))
    sleep(100)
This test program will output the information on the serial port. You need to press the REPL button if you are using the Mu application or use a terminal emulator if not.
Challenges
As with the built-in sensor, you could find a much more interesting way to display this information than this program. You could also use the temperature and its changes over time as a trigger for some other action on the micro:bit. That might be to turn a light on or off, or to sound an alarm. Alternatively, work out a set of suitable 5x5 icons to display according to the temperature reading you are getting at any time.