BBC Microbit
![]()


BBC micro:bit
Neopixel Remote
Introduction
This is less of an exercise and more of a write-up of a project that was undertaken by Andreas and Charlie during one of our lessons. They were experimenting with the following circuit, consisting of a single Neopixel. The project started with making a program to generate and display a random colour on the Neopixel. That was extended to allow the user to press a button to read the amount of red, green and blue used in the colour. That allowed a partner to recreate the randomly chosen colour on their micro:bit. Finally, code was developed to send the colour via the radio. This page includes those programs and some extension tasks to take the project further.
You need two of these circuits, with 2 micro:bits, two people, to replicate this project.
Neopixel programs need you to add the Neopixel package to the code editor. You do this by clicking on Advanced, then Add Package. Choose the Neopixel package and you get an extra section in the code window, full of Neopixel blocks.
The first block in the Neopixel library is used to setup a strip of Neopixels. In this circuit, we only used a single LED and set up the strip accordingly. Adjust this one block and you can use the same approach with other Neopixel products.
The Circuit
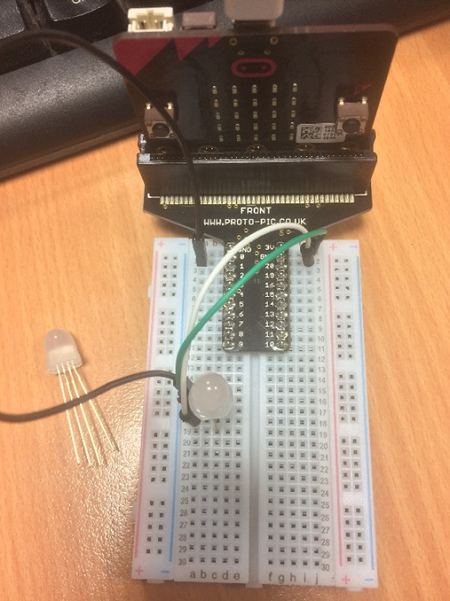
The photograph shows a single Neopixel LED on the breadboard.
A Neopixel is an LED package that contains a red, green and blue LED. They can be chained together but you'd need a separate power supply with more than a couple of them.
You can see one of the LEDs next to the breadboard. It has 4 legs and one of them (3rd from the left in this photo) is noticeably longer than the others.
If you place one of these on the table as you see in this photo, the legs of the LED package correspond to,
- DATA IN - connect to pin0
- VCC - connect to 3V
- GND - connect to GND
These LEDs are likely to burn out if connected the wrong way around - if you build the circuit yourself, show your teacher before connecting.
The Sender
The next 3 images are all from the same sending program. Explanations are added for each part.
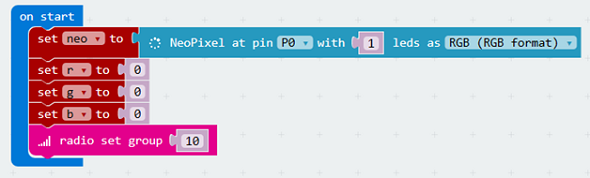
- The first statement sets up our strip of Neopixels.
- The variables r, g and b are used to store the 3 values we use to make our colour.
- The radio group needs to be set at this point.
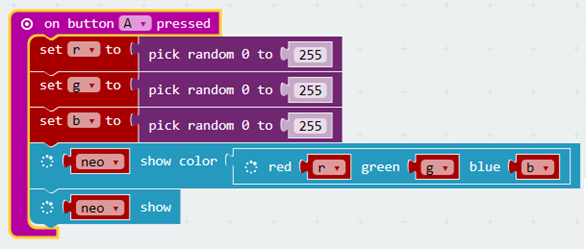
- The 3 colour variables are set to random values in the range 0-255.
- The colour is set across the whole strip of Neopixels.
- The last line is needed to write the changes we have requested to the Neopixel.
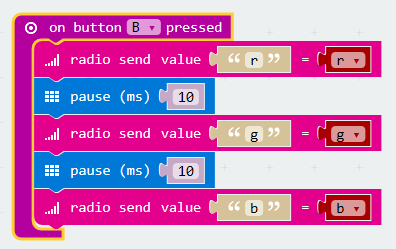
- When the B button is pressed, the values stored by the 3 variables are sent by radio.
- We are sending a name/value pair so that the receiving code knows which colour channel we are setting.
- The small pause between each value being sent improves the reliability of the transmission.
The Receiver
The receiver has the same circuit as the sender and sets it up the same way,
The blocks for receiving and applying the colour are as follows,
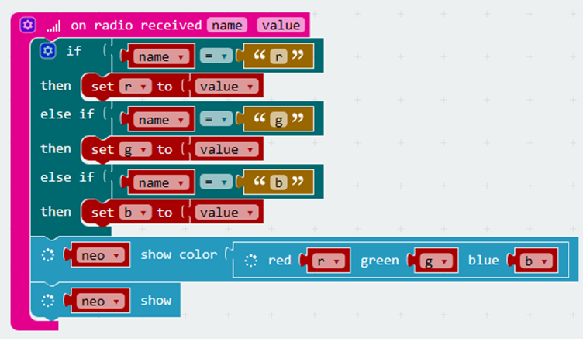
- There are several events for this, all configurable. We need to receive a name/value pair.
- When you use this block, name and value are variables you can use inside this block that store the name and value received.
- The name is checked using an IF statement and the appropriate variable is set to the value received.
- The colour of the Neopixel is updated each time information about a colour channel is received.
Testing
Andreas and Charlie tested this circuit by using battery power on the micro:bit that was doing the sending. The first test was to have the two circuits right next to each other, to prove that the colours were identical. Then, Charlie took the sender to different parts of the room and to the room next door. Finally, he went outside and looked into the classroom through the window, held up his micro:bit and successfully sent the colour to Andreas inside the classroom.
Extensions
The code shown on the two previous pages is cut down a lot from the original work completed by Andreas and Charlie in class. As a result, there are plenty of ways that you can add to the program or change the way that it works.
Task 1
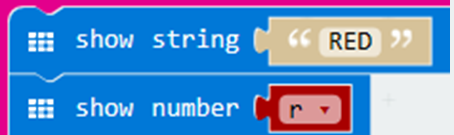
Andreas and Charlie started their project by generating a random colour on a micro:bit. Their next step was to output the red, green and blue values on the LED matrix. This code was removed from the previous pages to make them easier to read. When the B button is pressed on the sending micro:bit, output the values for r, g and b to the LED matrix. You need to include some text for this to be readable. For example,
Task 2
There is no reason why you have to have one micro:bit sending and one receiving. You can make it so that both micro:bits have the ability to generate random colours and send them. Combine the appropriate parts of the code and give both micro:bits the same powers.
Task 3
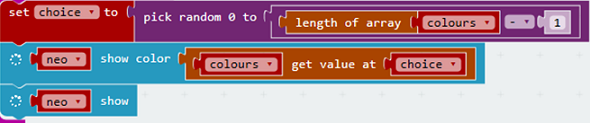
You don''t have to make completely random colours. You could use an array of preset colours. The following example code (which has none of the radio functionality), shows you how you might randomly select a colour from an array and then show that colour on a Neopixel strip when the A button is pressed.
Here's how you define an array of Neopixel colours. You can have as many colours as you like. You can pick colours by name or use your home-made colours.

Include the following in a button-press event to choose a colour randomly.
If both the sender and receiver both have the exact same array of colours defined (same colours, same order), then the sender only needs to send the number of the colour that they want to display.
Alter your code to make it so that the colours are chosen from a list instead of at random.
If you are not confident in integrating this code into your radio project, extend this example instead.
Task 4
There can be more than one micro:bit receiving the radio signal. When you send a radio signal, it is received by all of the micro:bits which have the same radio group set. Try this out with 3 or more people using micro:bits with connected Neopixels.
Task 5
Instead of choosing a colour at random from the list, write a program that cycles through the colours in the array. Make a variable called choice and set it to 0 at the start of the program. When a button is pressed, change the value of this variable by 1. If the variable is equal to the number of colours in your array, set it back to 0. After this, find the block that lets you retrieve an item from an array by its position/index. The position you want is stored in the variable you made.
Task 6
Work out a completely different way to set your colours. Ideally, you can alter the amount of red, green and blue separately. Start by just using one of the colour channels and setting the other two to 0. Make it so that the A and B buttons can be used to increase and decrease the amount of red being shown. When you are happy with this, you are ready to work on the other channels.
Here's an outline for this type of program,
On Start
- Set up the Neopixel(s).
- Create variables, r, g, b, and state.
- Set all of them to 0 at the start.
Update_Neopixel Function
- Make a function to set the colour of the Neopixel using the r, g and b variables.
- Include the block that shows the colour.
There are 2 blocks needed to choose and display a colour on the Neopixel strip. You will need this a lot in the program. Creating a function allows you to call that function instead of re-writing the code.
A+B Pressed
- Change variable state by 1.
- If the variable is now equal to 4, set it to 0.
The variable state allows us to keep track of which colour is being set. The values of the variable have the following meanings for us,
0. Waiting for the user to want to change the colour
1. Setting the amount of red
2. Setting the amount of green
3. Setting the amount of blue
4. All 3 settings done, ready to transmit the colour.
A Pressed
What you do here, depends on the value stored in the variable state.
- If state = 1, change r by -5. If r is now less than 0, set it to 0.
- If state = 2, change g by -5. If g is now less than 0, set it to 0.
- If state = 3, change b by -5. If b is now less than 0, set it to 0.
- Call the function to show the new colour.
B Pressed
What you do here, depends on the value stored in the variable state.
- If state = 1, change r by 5. If r is now greater than 255, set it to 255.
- If state = 2, change g by 5. If g is now greater than 255, set it to 255.
- If state = 3, change b by 5. If b is now greater than 255, set it to 255.
- Call the function to show the new colour.