BBC Microbit
![]()


BBC micro:bit
Neopixels
Introduction
If you have used Neopixels with an Arduino, then you know what a joy it is to find out that they can be used with the micro:bit and MicroPython.
Neopixels is the name used by the electronics company Adafruit for a type of RGB LED that they package in different ways. Their guide to Neopixels can be found here. The products they make, sell and distribute are all really good. You can power around 8 LEDs directly from the micro:bit but, for more than that, you need to power them separately. They are meant to work at 5V but they play quite nicely with a few of the 3V3 microcontrollers like the micro:bit.
The Neopixels come in lots of different flavours, strips, individually, on circuit boards, rings. They all have a few things in common. They are chained together and have constant current drivers that means you supply a power and ground connection and one digital pin to control all of the LEDs.
For the programs on this page, I used the Neopixel Jewel and powered it directly from the micro:bit. It looks like this,
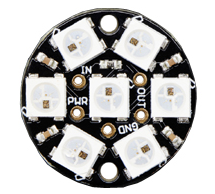
The Jewel is a nice choice because it's cheaper than the more impressive items but still pretty bright and well, pretty. Even one of these costs around £7. You need to do a good amount of programming to make sure you make the component earn its keep.
You can see 4 connections in the image. PWR should be connected to 3V on the micro:bit or to an external source 4-5V. GND should be connected to GND, naturally. The pin marked IN needs to be connected to one of the GPIO pins. Here I used pin 0.
Programming
This first program is good place to start with testing your connections and seeing some of the main features of the neopixel module.
from microbit import *
import neopixel

npix = neopixel.NeoPixel(pin0, 7)

while True:
    for pix in range(0, len(npix)):
        npix[pix] = (255, 0, 0)
        npix.show()
        sleep(500)
    npix.clear()
    sleep(500)
The variable npix is set in the third line of code. When we instantiate the object, we select a pin and state the number of Neopixels. The pixels are indexed so that we can refer to them using a number in square brackets after our object variable npix. We change the colour of a pixel by supplying a value from 0-255 for each of the colours red, green and blue. To make the whole display update, we call the show() method.
The point of this program is to test the appearance of different colours and to see how the neopixels are numbered. The order in which they light up is their index, the first pixel being at index 0. This is the order in which they are connected electrically after being connected to the IN pin on the PCB. This information will be useful for using the Neopixels in your own projects.
The next program shows that you can find easier ways to work with setting the colours if you write a function. This one lights all of the LEDs a particular colour. 4 colours are defined at the start of the program. Read a bit more about Python and you can work out some better ways to store this kind of value.
from microbit import *
import neopixel

npix = neopixel.NeoPixel(pin0, 7)

red = (255,0,0)
green = (0,255,0)
blue = (0,0,255)
purple = (255,0,255)

def LightAll(col):
    for pix in range(0, len(npix)):
        npix[pix] = col
    npix.show()
    return

while True:
    LightAll(red)
    sleep(1000)
    LightAll(green)
    sleep(1000)
    LightAll(blue)
    sleep(1000)
    LightAll(purple)
    sleep(1000)
RGB LEDs, of any variety, are among my favourite components. Once you have made the electrical connections and learned the few statements you need for basic control of the LEDs, the rest is about programming and creativity. Without connecting any more components, you have hours of experimentation ahead to make the coolest light shows. The trick is to make more functions like these that light up the LEDs for you the way that you want.
This final example uses a loop to fade a colour in and out.
from microbit import *
import neopixel

npix = neopixel.NeoPixel(pin0, 7)

def LightAll(col):
    for pix in range(0, len(npix)):
        npix[pix] = col
    npix.show()
    return

while True:
   for i in range(0,255,5):
       LightAll((i,0,0))
       sleep(20)
   for i in range(255,-1,-5):
       LightAll((i,0,0))
       sleep(20)
Challenges
- Write a new function to light up all of the LEDs in the strip, one at a time, using the colour of your choice. Have a second argument for the function and make it so that you can specify the delay between each pixel taking on its new colour.
- On the Jewel and the Rings, the lights are in a circle. You can make it look like a pixel is going around the circle if you set a background colour for all of the pixels and then use a loop to quickly turn each pixel to another colour and then back again. Do this with each one in order (except the centre one on a Jewel) and it looks like the pixel is travelling around the circle.
- The Neopixels make great mood lighting. Experiment with different ways of varying the amount of red, green and blue over time and different ways of fading in and out. Try lighting the odd and even numbered pixels with different colours.
- Dancing pixels. It sounds good, whatever it means. You could combine this with some background music played through a buzzer or some hacked headphones.
- Make a function to generate a random colour for you.
- Use a potentiometer, button or accelerometer input to allow the user some control over the colour or pattern shown with the pixels.
- A nice challenging project is to work out how to fade smoothly from one colour to another. Imagine you have the colour (0,128,255) and you want to fade this into (255,255,128). It will need to take the same amount of time for each of the different colour channels to be changed to its new value. Since the amount of change required varies from one channel to the next, you need to work out different sized steps for the changes you make.
- Connect a microphone and you can make a sound-reactive circuit.
- Make some more pretty patterns with the lights.