BBC Microbit
![]()


BBC micro:bit
4 LED Circuit
Introduction
For this project, you will build a circuit with 4 LEDs. The following picture shows what your finished circuit will look like,
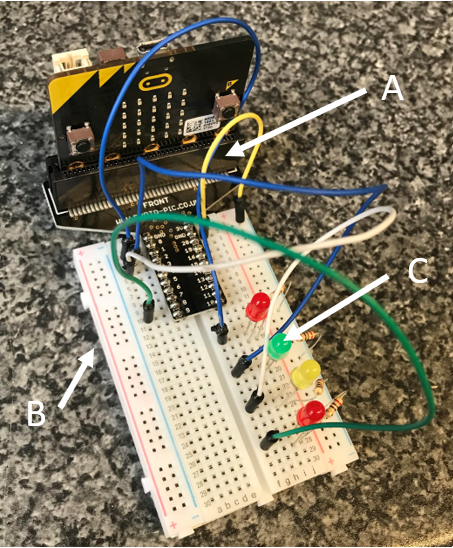
A
This is an edge connector. It makes it possible to connect components to the micro:bit.
B
This is called a breadboard. It allows us to plug in and connect components using jumper wires.
C
Each LED has two legs. The longer leg is positive. The shorter leg is negative.
The long leg is connected to a digital pin on the micro:bit. The pins used for this circuit are,
- Pin0
- Pin1
- Pin2
- Pin8
The short leg is connected to GND using a resistor, 200-330 OHMS.
The connections on a solderless breadboard work as follows,
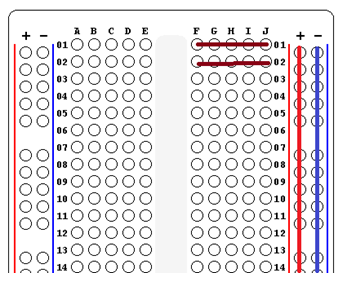
- The 5 holes that form a row on the breadboard are all connected together.
- The power rails (+/-) are connected together vertically.
- Connecting components to a breadboard is about making electrical connections.
- It is not about the exact position you choose on the breadboard.
- The colour of a jumper wire does not make any difference in an electrical circuit.
Task 1
The following program can be used to test that the LED circuit is built correctly. It should turn the LEDs all on and then off.
from microbit import *

# turn on the LEDs
pin0.write_digital(1)
pin1.write_digital(1)
pin2.write_digital(1)
pin8.write_digital(1)

sleep(1000)

# turn them off
pin0.write_digital(0)
pin1.write_digital(0)
pin2.write_digital(0)
pin8.write_digital(0)
- To turn an LED on, we write a HIGH signal (1) to the digital pin.
- To turn an LED off, we write a LOW signal (0) to the digital pin.
There is no repetition in this program. Press the reset button if you were not watching the micr:bit when it started. SPeak to your teacher if any of your LEDs is not working.
Task 2
Look back over the programs you have previously written. Using a while True: loop, you can make all of the lights blink on and off once per second.
Task 3
Write a program that turns the LEDs on when the A button is pressed and turns them off when the B button is pressed.
Your program should be something like this. The lines that begin with a # are comments. Press enter after these lines and include the code that does the job described by the comment.
from microbit import *

while True:
    if button_a.was_pressed():
        # turn on the lights
    elif button_b.was_pressed():
        # turn off the lights
    sleep(20)
Task 4
Write a program that always has 2 of the LEDs on. When you turn 2 off, you turn the other 2 on and vice versa. Make the program do this once every second.
Task 5
Copy and test the following program,
from microbit import *

ledpins = [pin0,pin1,pin2,pin8]

for led in ledpins:
    led.write_digital(1)
    sleep(500)
In this program, we define a list called ledpins. It is a list of the digital pins that we have connected the LEDs to.
The FOR loop can be used to reduce the number of lines we need to turn all of the LEDs on or off.
Copy the 3 lines of the FOR loop and paste them at the end of the program. Make the tiny change to the code needed to turn the lights off again.
Task 6
Another way to make it easier to work with the LEDs is to make a subroutine. A subroutine is a reusable block of code that has a name that you choose. Copy and test the following program,
from microbit import *

def all(x):
    ledpins = [pin0,pin1,pin2,pin8]
    for led in ledpins:
        led.write_digital(x)

all(1)
sleep(500)
all(0)
The subroutine in this program is called all. The letter x is called a parameter. When we run the subroutine, we need to supply a 1 or a 0 to let the subroutine know whether it is turning the LEDs on or off. A subroutine is only defined once in a program, usually at the start. Do not add any other statements before the subroutine.
The definition of the subroutine (the 4 lines starting from the word def) must appear before the subroutine is called.
Adapt the program to use a while True: loop to make the LEDs blink on and off. Remember to include a pause when the LEDs are off as well as when they are on.
Task 7
Rewrite your program for Task 3 so that it makes use of the efficient subroutine. You need to copy the 4 lines of code that define the subroutine and place them before the place in the program where you turn lights on or off.
Task 8
Write a program that lights up the first LED, pauses for about 100 milliseconds, before turning the LED off. Then it should do the same with the second LED, then the third, then the fourth.
Once this has happened, the same process should be carried out working backwards up the line, turning the third, second and first lights on and off in order.
The whole process should carry on repeating forever. It should look a little bit like the light is forwards and backwards along the line of LEDs.
Task 9
The following lines of code show how to generate a random number in MicroPython. The variable a, is storing a random number from 0 to 3.
from microbit import *
import random

a = random.randint(0,3)
Write a program that allows a user to turn on a randomly chosen LED when the A button on the micro:bit is pressed. Pressing the button should turn off all of the LEDs before randomly selecting one to turn on.
If you have the following list defined in your program,
ledpins = [pin0,pin1,pin2,pin8]
you could turn on the first LED with a statement like,
ledpins[0].write_digital(1)
Instead of writing a literal number in the square brackets, you need to use the variable that stores the random number that you generated.
Task 10
With the LEDs lined up in the circuit, we can use them as place value indicators for a binary pattern to represent any integer from 0 to 15 (4 bits). The following lines of code should help you,
from microbit import *

denary = 15
eights = denary // 8
remainder = denary % 8
fours = remainder // 4
remainder = remainder % 4
twos = remainder // 2
units = remainder % 2
The variables eights, fours, twos, units will each store a 1 or 0 depending on whether the place value is a 1. The code depends on the variable denary which stores the number before it has been converted to denary. Get your program to count from 0 to 15 in binary numbers.
As an extension, make a subroutine for the binary conversion.
Task 11
Make your program from Task 10 count up and down in binary using for loops.