BBC Microbit
![]()


BBC micro:bit
Wii Nunchuck
Introduction
The Wii Nunchuck was never intended to be used without a direct connection to a Wii Remote. In normal use, it draws its power from the remote and communicates with the Wii console via that device. It turns out to be a totally hackable device and can be connected up to a microcontroller that can communicate using the i2c protocol.
It works nicely with 3V3 logic and power and is relatively easy to connect to the micro:bit. It gives you a nice analog joystick and a couple of push buttons. On top of that, there is a built-in accelerometer. The device was meant to be operated comfortably in one hand.
Circuit
Apart from the micro:bit and edge connector, required equipment here is a Nunchuck (a genuine Nintendo one is more likely to work here) and a connection method. The easiest way to make the connection is with a breadboard adapter. Search for WiiChuck or NunChucky and you will find what you are looking for. These things cost only a couple of pounds at most and save you having to cut the connector off a usable Nunchuck. The one in the picture below is designed to hold the connect firmly, others are a little thinner.
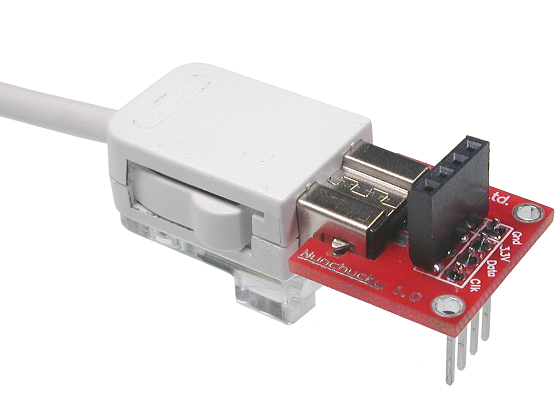
Whatever adapter you use, you still end up with 4 connections,
- VCC - connect to 3V
- GND - connect to GND
- CLK - connect to pin 19
- DAT - connect to pin 20
Programming
The first thing to do is to make sure that we can get all of the readings from the Nunchuck and that they make sense when we interact with it.
from microbit import *

class chuck:

    def __init__(self):
        self.addr = 0x52
        i2c.write(self.addr, bytes([0x40,0x00]), repeat=False)
        sleep(1)

    def read(self):
        i2c.write(self.addr, b'\x00', repeat=False)
        sleep(1)
        buf = i2c.read(self.addr, 6, repeat=False)
        data = [(0x17 + (0x17 ^ buf[i])) for i in range(6)]
        return data

    def readall(self):
        data = self.read()
        butc = (data[5] & 0x02)
        butz = (data[5] & 0x01)
        # joyX, joyY, accX, accY, accZ, c, z
        return data[0],data[1], data[2], data[3],data[4],butc==0,butz==0

    def joystick(self):
        data = self.read()
        return data[0],data[1]

    def accelerometer(self):
        data = self.read()
        return data[2],data[3],data[4]

    def buttons(self):
        data = self.read()
        butc = (data[5] & 0x02)
        butz = (data[5] & 0x01)
        return butc==0,butz==0

    def button_c(self):
        data = self.read()
        butc = (data[5] & 0x02)
        return butc == 0

    def button_z(self):
        data = self.read()
        butz = (data[5] & 0x01)
        return butz == 0

    def joystick_y(self):
        data = self.read()
        return data[1]

    def accelerometer_x(self):
        data = self.read()
        return data[2]

    def accelerometer_y(self):
        data = self.read()
        return data[3]

    def accelerometer_z(self):
        data = self.read()
        return data[4]


wii = chuck()
while True:
    print(wii.readall())
    sleep(50)
Most of this listing is a class for accessing different inputs on the Nunchuck. Replace readall with the name of one of the other methods to get specific inputs.
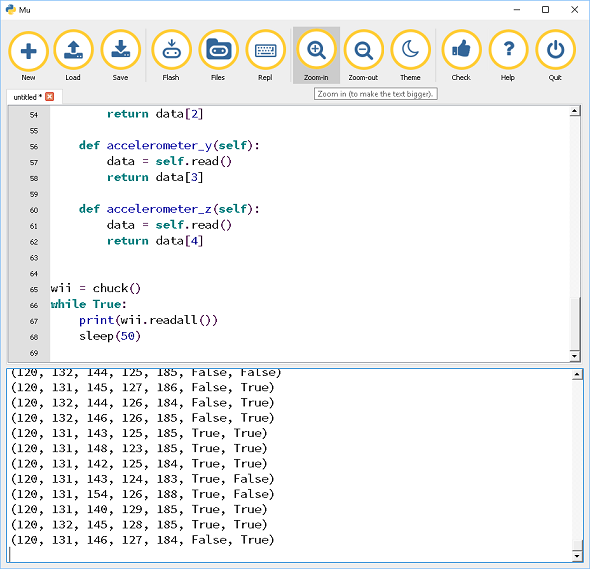
I used the REPL window in Mu to see the readings. Although it scrolls quite quickly, working with the order, joyX, joyY, accX, accY, accZ, c, z, you can see the readings you get for each of these inputs as you muck around with the buttons and joystick and wave the Nunchuck about a little.
All of those methods aren't really necessary. It's easy enough to work with just,
from microbit import *

class chuck:

    def __init__(self):
        self.addr = 0x52
        i2c.write(self.addr, bytes([0x40,0x00]), repeat=False)
        sleep(1)

    def read(self):
        i2c.write(self.addr, b'\x00', repeat=False)
        sleep(1)
        buf = i2c.read(self.addr, 6, repeat=False)
        data = [(0x17 + (0x17 ^ buf[i])) for i in range(6)]
        return data

    def readall(self):
        data = self.read()
        butc = (data[5] & 0x02)
        butz = (data[5] & 0x01)
        # joyX, joyY, accX, accY, accZ, c, z
        return data[0],data[1], data[2], data[3],data[4],butc==0,butz==0


wii = chuck()
while True:
    joyX, joyY, accX, accY, accZ, c, z = wii.readall()
    print(joyX, joyY, accX, accY, accZ, c, z,sep='\t')
    sleep(50)
Joystick - Example 1
You may have noticed that the joystick readings are not centred around any values. Using the test code from above, I found that my joystick reads 120 and 131 on the joystick axes when not being moved.
For both axes, there is a range of around 90-100 either side of the centre. With a small modification to the class, we can centre the joystick readings on 0, expecting to read 0 on both axes when the joystick is still. Negative values will be used for the left or down directions.
from microbit import *

class chuck:

    def __init__(self, offset_x,offset_y):
        self.addr = 0x52
        self.offset_x = offset_x
        self.offset_y = offset_y
        i2c.write(self.addr, bytes([0x40,0x00]), repeat=False)
        sleep(1)

    def read(self):
        i2c.write(self.addr, b'\x00', repeat=False)
        sleep(1)
        buf = i2c.read(self.addr, 6, repeat=False)
        data = [(0x17 + (0x17 ^ buf[i])) for i in range(6)]
        return data

    def readall(self):
        data = self.read()
        butc = (data[5] & 0x02)
        butz = (data[5] & 0x01)
        # joyX, joyY, accX, accY, accZ, c, z
        return data[0],data[1], data[2], data[3],data[4],butc==0,butz==0

    def centred_joystick(self):
        joyX, joyY, accX, accY, accZ, c, z = self.readall()
        return joyX-self.offset_x, joyY-self.offset_y


wii = chuck(120,131)

while True:
    print(wii.centred_joystick())
    sleep(50)
Now to get away from just looking at the REPL output and get some interaction with the micro:bit outputs. For this example, a dot is positioned on the matrix based on the value read on the centred joystick. It's not the most elegant way to code things but you can see how the x and y positions of the dot are made from the readings on the Nunchuck. The values of x and y here correspond to 9 different positions on the joystick.
from microbit import *

class chuck:

    def __init__(self, offset_x,offset_y):
        self.addr = 0x52
        self.offset_x = offset_x
        self.offset_y = offset_y
        i2c.write(self.addr, bytes([0x40,0x00]), repeat=False)
        sleep(1)

    def read(self):
        i2c.write(self.addr, b'\x00', repeat=False)
        sleep(1)
        buf = i2c.read(self.addr, 6, repeat=False)
        data = [(0x17 + (0x17 ^ buf[i])) for i in range(6)]
        return data

    def readall(self):
        data = self.read()
        butc = (data[5] & 0x02)
        butz = (data[5] & 0x01)
        # joyX, joyY, accX, accY, accZ, c, z
        return data[0],data[1], data[2], data[3],data[4],butc==0,butz==0

    def centred_joystick(self):
        joyX, joyY, accX, accY, accZ, c, z = self.readall()
        return joyX-self.offset_x, joyY-self.offset_y

    def joystick_to_grid(self):
        joyX, joyY = self.centred_joystick()
        if joyX<-50:
            x = 0
        elif joyX>=-50 and joyX<50:
            x = 2
        else:
            x = 4
        if joyY<-50:
            y = 4
        elif joyY>=-50 and joyY<50:
            y = 2
        else:
            y = 0
        return x,y

def update():
    img = Image('00000:'*5)
    img.set_pixel(x, y, 9)
    return img

# joystick
wii = chuck(120,131)

while True:
    x,y = wii.joystick_to_grid()
    i = update()
    display.show(i)
    sleep(10)
Joystick Example 2
In the last example we were converting the position of the joystick relative to the centre onto a 3x3 grid square. If we simplify that a little, we can use 0, 1 and 2 instead of matrix positions.
You can always convert 2 dimensions into a single number with a little arithmetic. In this example, the class method tells us a number from 0 to 8 based on the position of the joystick. This is used to choose an image to display to indicate the movement.
from microbit import *

class chuck:

    def __init__(self, offset_x,offset_y):
        self.addr = 0x52
        self.offset_x = offset_x
        self.offset_y = offset_y
        i2c.write(self.addr, bytes([0x40,0x00]), repeat=False)
        sleep(1)

    def read(self):
        i2c.write(self.addr, b'\x00', repeat=False)
        sleep(1)
        buf = i2c.read(self.addr, 6, repeat=False)
        data = [(0x17 + (0x17 ^ buf[i])) for i in range(6)]
        return data

    def readall(self):
        data = self.read()
        butc = (data[5] & 0x02)
        butz = (data[5] & 0x01)
        # joyX, joyY, accX, accY, accZ, c, z
        return data[0],data[1], data[2], data[3],data[4],butc==0,butz==0

    def centred_joystick(self):
        joyX, joyY, accX, accY, accZ, c, z = self.readall()
        return joyX-self.offset_x, joyY-self.offset_y

    def joystick_to_point(self):
        joyX, joyY = self.centred_joystick()
        if joyX<-50:
            x = 0
        elif joyX>=-50 and joyX<50:
            x = 1
        else:
            x = 2
        if joyY<-50:
            y = 2
        elif joyY>=-50 and joyY<50:
            y = 1
        else:
            y = 0
        return y*3 + x

# joystick
wii = chuck(120,131)
# images
pictures = [Image.ARROW_NW, Image.ARROW_N, Image.ARROW_NE, Image.ARROW_W,
            Image.HAPPY,Image.ARROW_E, Image.ARROW_SW, Image.ARROW_S, Image.ARROW_SE]
while True:
    display.show(pictures[wii.joystick_to_point()])
    sleep(10)
If you look at the list of pictures and number each item from 0 to 8, you can see how the numbers returned by the method correspond to positions of the joystick.
Button Example
Here's a simple example reading the buttons and showing a different picture on the matrix for each combination of buttons pressed/not pressed.
from microbit import *

class chuck:

    def __init__(self, offset_x,offset_y):
        self.addr = 0x52
        self.offset_x = offset_x
        self.offset_y = offset_y
        i2c.write(self.addr, bytes([0x40,0x00]), repeat=False)
        sleep(1)

    def read(self):
        i2c.write(self.addr, b'\x00', repeat=False)
        sleep(1)
        buf = i2c.read(self.addr, 6, repeat=False)
        data = [(0x17 + (0x17 ^ buf[i])) for i in range(6)]
        return data

    def readall(self):
        data = self.read()
        butc = (data[5] & 0x02)
        butz = (data[5] & 0x01)
        # joyX, joyY, accX, accY, accZ, c, z
        return data[0],data[1], data[2], data[3],data[4],butc==0,butz==0


# joystick
wii = chuck(120,131)

while True:
    joyX, joyY, accX, accY, accZ, c, z = wii.readall()
    if c and z:
        display.show(Image.HAPPY)
    elif c:
        display.show(Image.SAD)
    elif z:
        display.show(Image.MEH)
    else:
        display.clear()
    sleep(10)
Challenges
- A starting point might be to take some of the examples from other pages that rely on button or accelerometer input for control. You can easily see whether the Nunchuck adds to the experience.
- The Nunchuck would make a good controller to use for a remote control car if you were sending the instructions by radio. You could use the buttons for speed and the joystick for direction. Other combinations could let you activate sensors and outputs on the remote vehicle.
- Make a shift register circuit (parallel output). Write code to make the pins connected to the data and clock of the shift register go high and low when the buttons are pressed. Choose a movement of the joystick to make your latch pin go high and low. See if you can make manage to copy the shift register protocol in button presses.