BBC Microbit
![]()


BBC micro:bit
Cube:Bit RGB LED Cube
Introduction
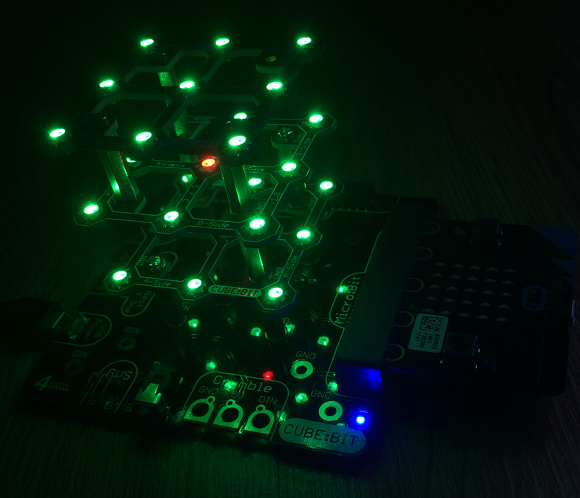
The Cube:Bit is an approach to building RGB LED cuboids produced by 4tronix. The cuboids are built of 3x3, 4x4 or 5x5 layers that can be stacked on top of one another. There is an LED on the bottom as well as the top of each layer. Each addressable pixel is really two RGB LEDs. The LEDs are compatible with Neopixel code.
When you have lots of Neopixels, you need to consider power. The photograph below shows the cube mounted on a base which has a wide variety of connectors for different microcontrollers. It also has an edge connector through which the micro:bit can draw power.
You can see the boards better in the following image, with the power off.
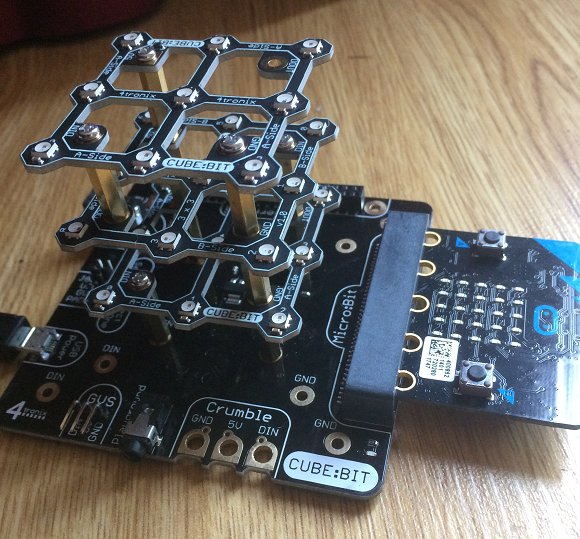
The 3x3x3 Cube:Bit is £18 at the time of writing and comes with all of the pillars and screws needed to get up and running. The base is an extra £10. In addition to that, a decent power supply is needed. There are a lot of different options on the base board but I went for feeding in 5V via USB from a Raspberry Pi power supply. This made it really easy to get going with the Cube:Bit.
The build quality and the build system are both very high in this product. You get an LED cube where the LEDs are perfectly positioned (hard to do with a DIY kit) and it takes a matter of minutes to put together. The largest available cube has faces that are the same size as the micro:bit matrix, meaning that you could display the built-in font and images on the cube quite easily.
Programming
These programs have only been tested on the 3x3x3 cube. I've accounted for different side lengths of cubes but not for different heights.
The first job was to get a MicroPython library to help work with the Neopixels. I decided to write a class to act as a wrapper for the Neopixel methods and make things a little easier to work with.
from microbit import *
import neopixel

class cbit:
    def __init__(self,csize):
        self._s = csize
        self._n = csize**3
        self._p = neopixel.NeoPixel(pin0, self._n)
        self._b = 40
        self.show()

    def _dim(self, rgb):
        d = self._b/255
        return tuple([int(i * d) for i in rgb])

    def set_brightness(self,b):
        self._b = b

    def show(self):
        self._p.show()

    def clear(self):
        self._p.clear()

    def set_all(self,rgb):
        for i in range(self._n):
            self._p[i] = self._dim(rgb)

    def set_pixel(self,n,rgb):
        self._p[n] = self._dim(rgb)

    def _map(self,x,y,z):
        s = self._s
        q = 0
        if z % 2 == 0:
            if y % 2 == 0:
                q = (y * s) + x
            else:
                q = (y * s) + s - 1 - x
        else:
            if s % 2 == 0:
                y = s - y - 1
            else:
                if x % 2 == 0:
                    q = (s * (s - x)) - 1 - y
                else:
                    q = ((s - 1 - x) * s) + y
        return (z * s * s) + q

    def setxyz(self,x,y,z,rgb):
        p = self._map(x,y,z)
        self._p[p] = self._dim(rgb)

    def set_plane(self,p,a, rgb):
        # a = 0  xy, 1 xz, 2  yz
        pln = self._get_plane(p,a)
        for n in pln:
            self._p[n] = self._dim(rgb)

    def _get_plane(self,p,a):
        pl = []
        s = self._s
        for n1 in range(s):
            for n2 in range(s):
                if a==0:
                    pl.append(self._map(n1,n2,p))
                elif a==1:
                    pl.append(self._map(n1,p,n2))
                else:
                    pl.append(self._map(p,n1,n2))
        return pl

# Create a cube instance
c = cbit(3)

# set all
c.set_all((255,0,0))
c.show()
sleep(500)

# light one at a time using 3D coords
for z in range(3):
    for y in range(3):
        for x in range(3):
            c.setxyz(x,y,z,(0,0,255))
            c.show()
            sleep(150)

c.clear()
sleep(500)

# light up some planes
for axis in range(3):
    for plane in range(3):
        c.set_plane(plane, axis, (0,255,0))
        c.show()
        sleep(250)
        c.clear()


# make a 3d pattern
c.set_all((0,255,0))
c.setxyz(1,1,1,(255,0,0))
c.setxyz(1,1,2,(255,0,0))
c.setxyz(1,1,0,(255,0,0))
c.show()
Towards the end of the listing, you can see how the class is used. You could trim this code quite a lot - there are some inefficiencies that are meant to help with ideas that are not yet implemented.
Rotating Planes
After writing the first program, the idea of rotating the planes or the whole cube itself kept nagging at me. This program draws a 2x2 cube on the bottom left of the cube. It then rotates the cube 4 times along each of the 3 axes.
from microbit import *
import neopixel

class cbit:
    def __init__(self,csize):
        self._s = csize
        self._n = csize**3
        self._p = neopixel.NeoPixel(pin0, self._n)
        self._b = 40
        self.show()

    def _dim(self, rgb):
        d = self._b/255
        return tuple([int(i * d) for i in rgb])

    def set_brightness(self,b):
        self._b = b

    def show(self):
        self._p.show()

    def clear(self):
        self._p.clear()

    def set_all(self,rgb):
        for i in range(self._n):
            self._p[i] = self._dim(rgb)

    def set_pixel(self,n,rgb):
        self._p[n] = self._dim(rgb)

    def _map(self,x,y,z):
        s = self._s
        q = 0
        if z % 2 == 0:
            if y % 2 == 0:
                q = (y * s) + x
            else:
                q = (y * s) + s - 1 - x
        else:
            if s % 2 == 0:
                y = s - y - 1
            else:
                if x % 2 == 0:
                    q = (s * (s - x)) - 1 - y
                else:
                    q = ((s - 1 - x) * s) + y
        return (z * s * s) + q

    def setxyz(self,x,y,z,rgb):
        p = self._map(x,y,z)
        self._p[p] = self._dim(rgb)

    def set_plane(self,p,a, rgb):
        # a = 0  xy, 1 xz, 2  yz
        pln = self._get_plane(p,a)
        for n in pln:
            self._p[n] = self._dim(rgb)

    def _get_plane(self,p,a):
        pl = []
        s = self._s
        for n1 in range(s):
            for n2 in range(s):
                if a==0:
                    pl.append(self._map(n1,n2,p))
                elif a==1:
                    pl.append(self._map(n1,p,n2))
                else:
                    pl.append(self._map(p,n1,n2))
        return pl

    def rotate_plane(self,p,a):
        s = self._s
        pl = self._get_plane(p,a)
        pl3 = [pl[i * s:(i + 1) * s] for i in range((len(pl) + s - 1) // s )]
        tpl3 = [[pl3[j][i] for j in range(len(pl3))] for i in range(len(pl3[0]))]
        rpl3 = [i[::-1] for i in tpl3]
        fin = [i for j in rpl3 for i in j]
        cols = [self._p[i] for i in fin]
        for i in range(len(pl)):
            self._p[pl[i]] = cols[i]

    def rotate_cube(self,a):
        for i in range(self._s):
            self.rotate_plane(i,a)

# Create a cube instance
c = cbit(3)
red = (255,0,0)
yellow = (128,128,0)
c.set_all(yellow)
for i in range(8):
    c.setxyz(i >> 2 & 1,i >> 1 & 1,i & 1,red)

c.show()
sleep(500)

while True:
    for a in range(3):
        for i in range(4):
            c.rotate_cube(a)
            c.show()
            sleep(500)
In the first program, I created lists of the pixels in each plane. To rotate the plane, I started by dividing the list into sublists as long as the side length. The 2D list is transposed and then the rows reversed to do a 90° rotation. This list is flattened and used to map the colours onto the correct LEDs. If all of the planes are rotated the same way, the whole cube is rotated.
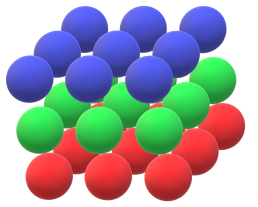
3D LED Puzzle
This idea is based on treating a 3x3x3 LED cube as a Rubik's-like puzzle, like the following image of a solved puzzle,
The program uses input at the REPL for turning the planes as you would on a Rubik's cube. The following notation is used to label each plane with a single letter,
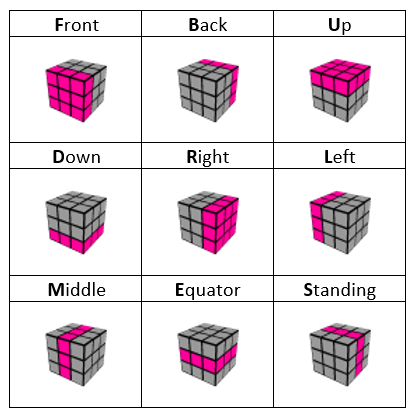
At the start of the program, a large number of randomly chosen planes are rotated one after another. The user can select to rotate any one of the planes by typing in the letter used to represent it. The aim is to restore the puzzle to the state it was at the start.
from microbit import *
import neopixel
from random import randint, choice

class cbit:
    def __init__(self,csize):
        self._s = csize
        self._n = csize**3
        self._p = neopixel.NeoPixel(pin0, self._n)
        self._b = 40
        self.r = (255,0,0)
        self.g = (0,255,0)
        self.b = (0,0,255)

        self.show()

    def _dim(self, rgb):
        d = self._b/255
        return tuple([int(i * d) for i in rgb])

    def set_brightness(self,bb):
        self._b = bb

    def show(self):
        self._p.show()

    def _map(self,x,y,z):
        s = self._s
        q = 0
        if z % 2 == 0:
            if y % 2 == 0:
                q = (y * s) + x
            else:
                q = (y * s) + s - 1 - x
        else:
            if s % 2 == 0:
                y = s - y - 1
            else:
                if x % 2 == 0:
                    q = (s * (s - x)) - 1 - y
                else:
                    q = ((s - 1 - x) * s) + y
        return (z * s * s) + q

    def set_plane(self,p,a, rgb):
        # a = 0  xy, 1 xz, 2  yz
        pln = self._get_plane(p,a)
        for n in pln:
            self._p[n] = self._dim(rgb)

    def _get_plane(self,p,a):
        pl = []
        s = self._s
        for n1 in range(s):
            for n2 in range(s):
                if a==0:
                    pl.append(self._map(n1,n2,p))
                elif a==1:
                    pl.append(self._map(n1,p,n2))
                else:
                    pl.append(self._map(p,n1,n2))
        return pl

    def rotate_plane(self,p,a):
        s = self._s
        pl = self._get_plane(p,a)
        pl3 = [pl[i * s:(i + 1) * s] for i in range((len(pl) + s - 1) // s )]
        tpl3 = [[pl3[j][i] for j in range(len(pl3))] for i in range(len(pl3[0]))]
        rpl3 = [i[::-1] for i in tpl3]
        fin = [i for j in rpl3 for i in j]
        cols = [self._p[i] for i in fin]
        for i in range(len(pl)):
            self._p[pl[i]] = cols[i]

    def make_turn(self,t):
        faces = {
            "D":(0,0),
            "E":(1,0),
            "U":(2,0),
            "F":(0,1),
            "S":(1,1),
            "B":(2,1),
            "L":(0,2),
            "M":(1,2),
            "R":(2,2),
            }
        p,a = faces.get(t, (0,0))
        self.rotate_plane(p,a)

    def mix(self):
        f = list("DEUFSBLMR")
        for i in range(50):
            self.make_turn(choice(f))
            c.show()
            sleep(100)

    def start(self):
        # starting pattern
        c.set_plane(2,0,self.r)
        c.set_plane(1,0,self.g)
        c.set_plane(0,0,self.b)

    def is_solved(self):
        for i in range(3):
            for j in self._get_plane(i,0):
                if self.get_col(j)!= i: return False
        return True

    def get_col(self,p):
        a = list(self._p[p])
        for i in range(3):
            if a[i]>0: return 2-i


# Create a cube instance
c = cbit(3)
c.start()
c.show()
while True:
    input("Press the enter key to mix up the LEDs.")
    c.mix()
    unsolved = True
    while unsolved:
        t = input("Enter a letter to turn a plane: ").upper()
        c.make_turn(t)
        c.show()
        unsolved = not(c.is_solved())
        sleep(20)
    input("You solved the puzzle. Press enter to continue.")
The input at the REPL could be replaced with some components. You could reduce the number of inputs to 6 if you don't use the M,E and S turns. Alternatively, go for a smaller number of inputs and use combinations of presses to select a face to turn.
This program is a little long for what it does. When I ran out of memory, I just removed methods from the class that I wasn't using. Once you have the idea for a program like this, you can rewrite the code more efficiently from the bottom up.
Challenges
As with the other Neopixel pages on this site, I've tried to avoid doing all of the obvious stuff that you might want to work out for yourself. Do check the other pages though for ideas.
- Start with the cube filled with a single colour. Light the middle pixel in a different colour. Make the pixel travel around the cube, moving at random every quarter of a second or so.
- If you set the brightness to 255, you can use this class and control the brightness through your colour selection. A beating heart would be nice, with the red fading as it moves outwwards from the centre.
- The 4tronix blog includes some MakeCode samples. One is for Noughts & Crosses in 3D. That would be fun to make in Python.
- LED cubes have been around for a while. Have a look at some videos online of the effects people have generated and then have a go at making some of your own.