BBC Microbit
![]()


BBC micro:bit
Just A micro:bit
Introduction
The exercises on this page are designed to be completed with just a micro:bit, no additional components. They start off pretty easy and are designed to get you into using the micro:bit.
To program the micro:bit, you will need to use an online editor. The one you need can be found at the following location,
https://makecode.microbit.org/
Keep a record of the programs that you write. You can take screenshots of the blocks of your program. This makes a useful set of resources to help you with your future programs and projects.
Task 1
For your first task, just make sure that you can successfully make and download a program. Copy the following blocks. Remove any blocks that you don't need.
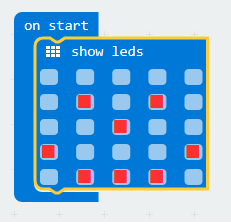
- When you have finished your program, you copy it to the micro:bit by clicking on the DOWNLOAD button and choosing to Save File As and then selecting the micro:bit drive as your saving location.
- Check that you get the pattern of dots on the matrix that is expected.
Task 2
The following code flashes an image on and off every half a second. Copy and test it.
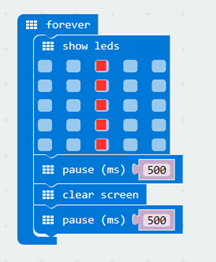
The first program you wrote ran its code On Start, making it only happen once. This program uses a Forever block to repeat the code...forever.
Task 3
Start with the exact same code as you had for Task 2. Replace the clear screen block with a show leds block and design a new image. Your program should now blink between two images.
Task 4
The following blocks are used to detect when the user has pressed one of the two buttons.
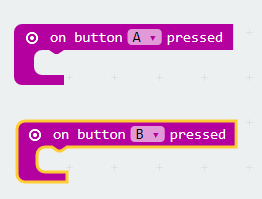
You will be adding 3 blocks to each of these two events. They are,
1. show string
Show an A or B depending on which button was pressed.
2. pause
Wait for a second (1000 milliseconds).
3. clear screen
Clear the screen.
When you are done, pressing a button should display the letter of the button, wait for a second, then clear the screen before the next button press.
Task 5
Copy and test the following program to make an electronic die,
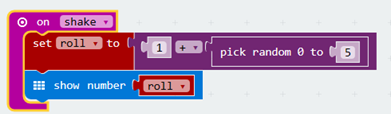
Look carefully at how the random value is generated. This approach will be needed in a later task.
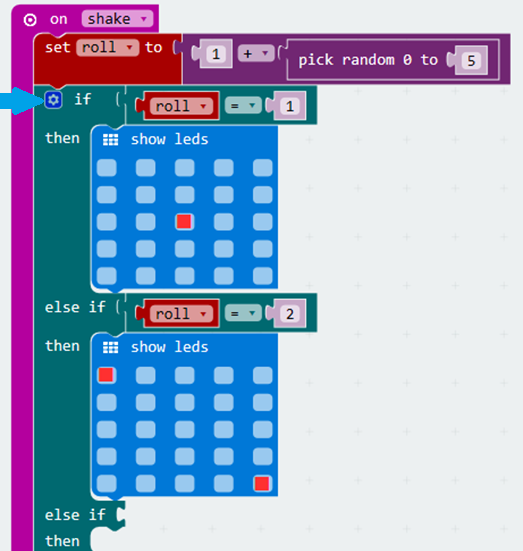
Task 6
Finish this program to make a better electronic die. The little settings cog allows you to add the ELSE Ifs to the IF block. You need to test to make sure that all values from 1 to 6 appear. You might need to do a fair bit of shaking.
Task 7
Here is some outline code for Rock, Paper, Scissors. Copy and test that it works.
The letters 'R', 'P' and 'S' represent the rock, paper and scissors shapes that you make with your hands when playing the game.
Adapt the program so that it, instead of showing these letters, it shows an image (show leds) that represents the rock, paper or scissors.

Task 8
Adapt the following program so that it counts from 0 to 9.
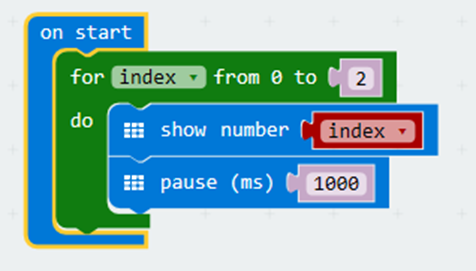
When you use a FOR loop, you have a counter variable. It keeps count of the repetitions for you.
Task 9
You should be able to adapt your code from Task 8 to give you a program that counts backwards from 9 to 0.
That will be the same number of digits to display as before so the FOR block does not need to change.
The part to change is the show number block. Make it something like,

You will need to replace the 0 with a number. If you choose the correct number, the program will count down from 9 to 0.
Task 10
The following program displays only even numbers. Copy and change it so that it only displays odd numbers.
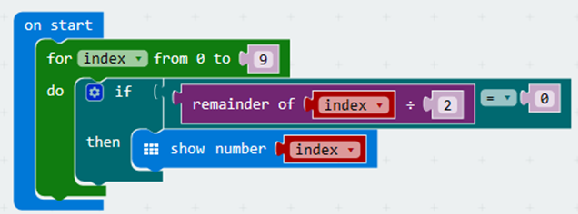
To understand this program, you need to think about what is meant by the term remainder when talking about division. If you are finding this task hard, start by dividing every number (1 to 10) by 2. Write down the remainder each time. If you have done your divisions correctly, you should see a pattern.
Task 11
In Task 7, you were using a block to capture a shake event. There are other gestures that you can capture too.
Write a single program that displays an appropriate and different image for each of the following events,
- Logo up
- Logo down
- Screen up
- Screen down
- Tilt left
- Tilt right
Display the image for a second before clearing the screen. You will need to do some experimentation to get this working.
Task 12
Copy and test the following code,
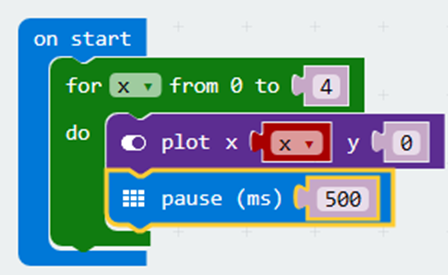
This program should light up the first row of LEDs on the matrix. The coordinates of these LEDs are,
(0,0), (1,0), (2,0), (3,0), (4,0)
In this code, the variable x is a counter for the FOR LOOP.
Adapt this code so that it lights up the first column of LEDs on the matrix, instead of the first row.
Task 13
Copy and test the following program,
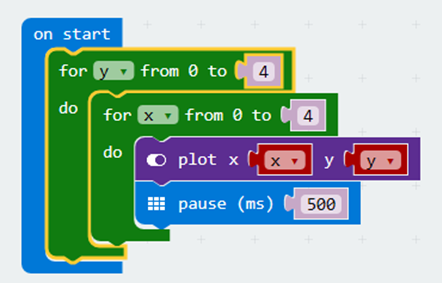
This program lights up all of the LEDs on the matrix. It does this one row at a time. Adapt the code so that it lights up all of the LEDs one column at a time.
Task 14
Start with the code you wrote for Task 13. After the two FOR LOOPS, add code to unplot each of the LEDs, one by one. The finished program should light up the LEDs first, then turn them off, one by one.
Task 15
Copy and test the following code,
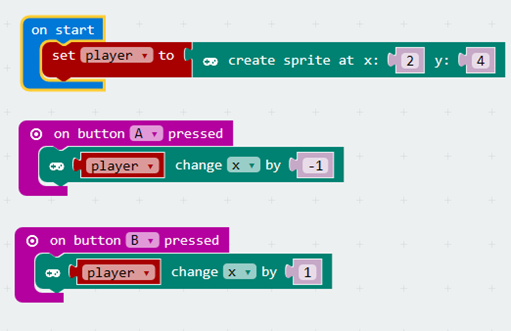
Look under Advanced, Game to find the blocks for working with sprites.
This program should allow you to steer a dot left and right on the bottom row of the matrix.
Make the following changes to the program,
- Adapt the program so that the player sprite starts at location (0,0).
- When the A button is pressed, the sprite should move one space to the right. If the sprite is already at location (4,4), it should not move right and instead move to (0,0).
- When the B button is pressed, the sprite should move one space downwards.
Task 16
Copy and test the following program,
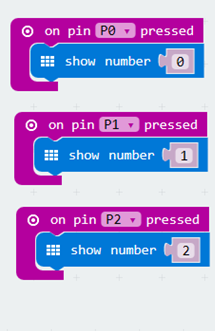
When you have downloaded the code, you will need to hold the part of the micro:bit edge that is labelled GND. Whilst you are pressing this, press the 0,1 or 2 labels on the edge. You should see the number of the pin you pressed shown on the matrix.
Adapt the program to make a micro:bit tickler. Have a sad face shown on the matrix. When Pin 0 is pressed, show a happy face for a second, before showing the sad face again. No other pins should be involved.
Task 17
The micro:bit has a built-in accelerometer. This senses the amount of acceleration applied to the board along the x, y and z axes.
The technical terms for the ways in which something can be tilted are pitch, roll and yaw. These are the terms that are used for flight. Picturing an aeroplane helps you to remember what each of the terms means.
- When a pilot causes the nose of the plane to point upwards or downwards, he/she is changing the pitch of the aircraft. On the micro:bit, you change the pitch when you tilt the board away from you or towards you.
- The pilot can lean the plane to the left or right. This is called roll. On the micro:bit, this means tilting the board to the left or right.
- Yaw is the heading of the plane. There is no statement for this in the code editors.
This program displays an arrow pointing upwards if the micro:bit is pitched forwards, a downwards arrow if pitched backwards.
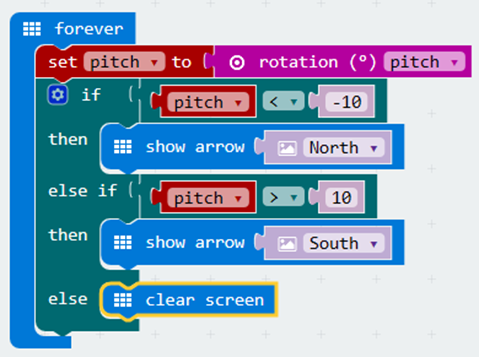
- Add another set block (directly underneath the one that is already there). Set a variable roll to the angle of roll. You get the roll value by using the same block as you do for pitch.
- Add 2 more ELSE IF sections to the IF block. Click on the settings cog to do this.
- If the roll is less than -10, show a West arrow. If the roll is greater than 10, show an East arrow.
Task 18
Adapt the code from the previous program. If the micro:bit is pitched forward and rolled to the left, you should get a diagonal arrow. See if you can adapt the program from Task 17 to make it so that 8 directions of tilt can be captured.