BBC Microbit
![]()


BBC micro:bit
Meet The Bit:Bot
Introducing...
The Bit:Bot is a two-wheel drive robot vehicle that is controlled by a micro:bit. It is made and sold by the company, 4tronix and costs just under £30. Its chassis is a nicely shaped PCB with a generous selection of components. The Bit:Bot comes pretty much assembled because most of its components are already soldered or attached to the PCB/chassis. You have to screw on a caster wheel and a battery box and then wiggle some wheels onto the spokes of the motor. Most micro-controller robot car kits would call this 'ready-assembled' and it takes longer to find your screwdrivers than it does to put it together. It takes 3xAA batteries to power the micro:bit and the motors.
Top View
Ready for action, it looks like this,
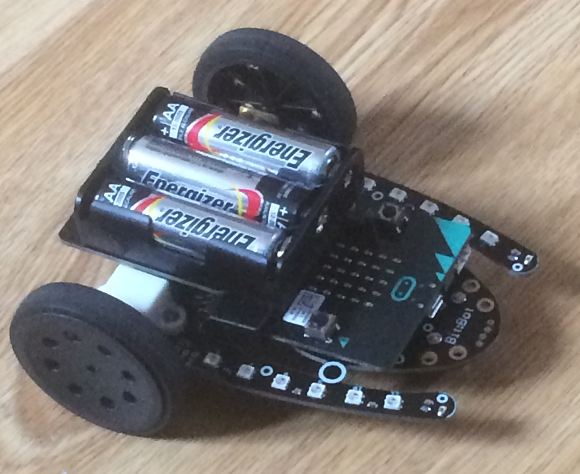
As you can see, it's quite a tidy-looking robot. It will fit neatly in one hand. The fins on the left and right of the PCB each have 6 neopixels and a light sensor. Obscured by the battery box, there is a buzzer that can output one high pitched tone when driven high.
Bottom View
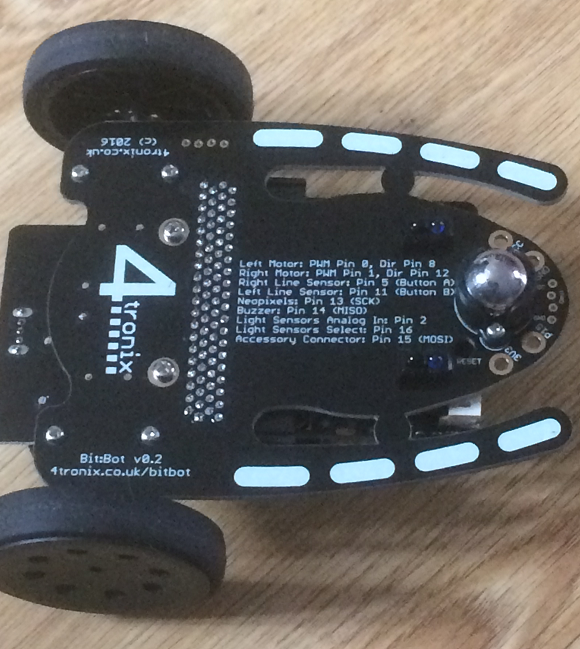
On the underside of the PCB there are two line sensors. These are far enough apart to follow the lines on the tracks I've used with other robot vehicles. There is also a helpful list of the pin connections which are,
- LFT Motor: PWM pin 0, DIR pin 8
- RGT Motor: PWM pin 1, DIR pin 12
- LFT Line: pin 11
- RGT Line: pin 5
- Neopixel: pin 13
- Buzzer: pin 14
- Light Select: pin 16
- Light Analog In: pin 2
On the bottom, you can also see some holes. The 4 small holes at the front are for connecting additional neopixels to the chain already on the board. The larger holes are connected to 3V, GND and pin 15. These are large enough for something to be attached with crocodile clips. There are also some small holes for power, GND and i2c pins.
Most of what you want to do with a robot is catered for in a ready-made package. Most robot kits leave you with very few options for connecting additional items and this one isn't an exception. The i2c connection may be the best way to get the additional functionality you might want. The built-in components cover a lot of what you might do with a robot vehicle and there's an enormous amount you can do with just those.
Programming
The PCB has an edge connector into which you slot the micro:bit. There's an on-off slide switch. This means that you don't have to disconnect the micro:bit to program it, just remember to switch off before you attach the USB connector.
Any of the code editors can be used to write the programs you need to make use of the robot's features.
Finally
The Bit:Bot is a good beginner robot platform with a lot of features at reasonable price. It deals with the limitations of the micro:bit platform well and gives something that you can learn from. It is easy to get started. The neopixels are lovely and bright. A second micro:bit gives you the power to use the radio as a remote control. This adds an extra dimension to the way you can work with the Bit:Bot. You can be as inventive with the programs you write and the circuits you build with your remote control station as you are with the robot.
You'll need to handle your Bit:Bot with reasonable care, not tread on it or do aerobatic stunts with it. It's not a fighting robot.
There's a little bit of scope for expansion, but it is a bit limited for adding some of the components I'd normally add to a micro:controller robot. That does make you focus a little more on the parts you already have in the robot. Lights. Bright lights. Different colours.