BBC Microbit
![]()


BBC micro:bit
Radio Message Sender & Scroller
Introduction
This project is an amalgamation of several things explained in greater detail in other pages on the site. The idea was to have a keyboard and LCD connected to a micro:bit. The user would be able to enter a message and then send it by radio to another micro:bit. The second micro:bit receives the message and scrolls it on a Pimoroni Scroll pHAT.
The photograph shows the kit I used, with my apologies to the manufacturers of these fine pieces of equipment for the injustice done to their products by my poor photography skills. The message on the LCD and being scrolled was 'Hello World'.
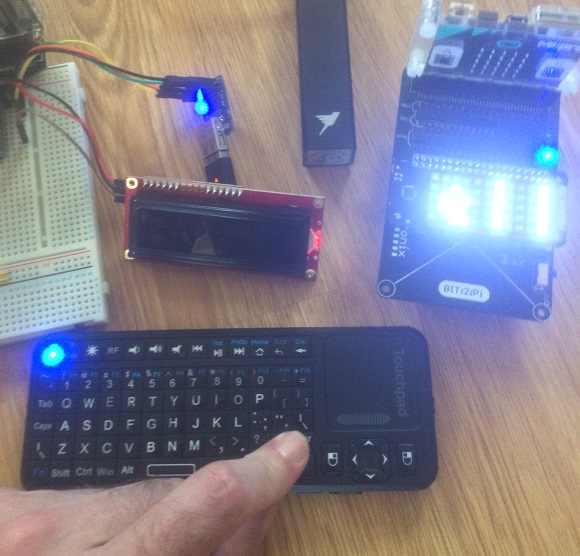
On the left of the image, the sending micro:bit is connected to a breadboard with an edge connector. It is powered by a USB charger. A Hobbytronics USB host board with a USB keyboard receiver and Sparkfun serial LCD can be seen connected to this micro:bit. Keystrokes on the remote wireless keyboard are echoed to the screen so that the user can see the message they are creating. When they press enter, the message is sent. I'm pressing enter in the photograph. On the right of the screen is a Pimoroni Scroll pHAT connected to a 4tronix Bit:2:Pi. When a radio message is received, it is scrolled across the Scroll pHAT.
Programming
All of the components are connected up as described in the other pages about them on the site. The programs here are far from perfect. They are just enough to get something that allows a message to be sent with the radio and be displayed brightly on the Scroll pHAT matrix.
Sender
The user interface here is very basic but does the job. Refinements come when the concept has been proven to work.
from microbit import *
import radio

# start radio
chnl = 10
radio.config(channel=chnl)
radio.on()

# keyboard functions
def get_num_chars():
    i2c.write(0x29,b'\x01')
    data = i2c.read(0x29,1)[0]
    return data

def read_buffer():
    n = get_num_chars()
    i2c.write(0x29,b'\x00')
    data = i2c.read(0x29,n)
    txt = [chr(i) for i in data]
    return txt

# lcd functions
clear = " "*32

def move_cursor(row,col):
    cmd = [254,128]
    if row==1:
        cmd[1]+=64
    cmd[1]+=col
    uart.write(bytes(cmd))
    sleep(10)


# Start-up sequence
sleep(500)
# initialise uart
uart.init(baudrate=9600, bits=8, parity=None, stop=1, tx=pin12)

# clear display
move_cursor(0,0)
uart.write(clear)
move_cursor(0,0)

# function to get a string
def get_string():
    move_cursor(0,0)
    uart.write(clear)
    move_cursor(0,0)
    msg = ""
    while True:
        if get_num_chars()>0:
            t = read_buffer()
            for c in t:
                if c=='\r':
                    return msg
                else:
                    if c.isalpha() or c.isdigit() or c==' ':
                        msg = msg + c
                        uart.write(c)

# test run
while True:
    m = get_string()
    radio.send(m)
    sleep(1000)
Receiving
This was the simpler program - a quick copy and paste of the driver code and a few lines to read the radio and scroll.
from microbit import *
import radio

# start radio
chnl = 10
radio.config(channel=chnl)
radio.on()


class ScrollP:

    font = [0x0,0x17,0xc03,0x2bea,0x6a76,0x2889,0x6aaa,0x3,0x45c0,0x1d1,0xc6,
            0x11c4,0x38c,0x1084,0x10,0xc98,0x7e3f,0x3e2,0x5ebd,0x7eb5,0x790f,
            0x76b7,0x76bf,0x7c21,0x7ebf,0x7eb7,0x140,0x340,0x4544,0x294a,0x1151,
            0x1ea0,0x5ebf,0x7cbf,0x6ebf,0x463f,0x3a3f,0x56bf,0x4bf,0x763f,0x7c9f,
            0x47f1,0x3e08,0x6c9f,0x421f,0x7cdf,0x709c,0x7e3f,0x1cbf,0x7b2e,0x6cbf,
            0x76b7,0x7e1,0x7e1f,0x3e0f,0x7d9f,0x6c9b,0x7e97,0x4eb9,0x47e0,0x6083,
            0x3f1,0x1826,0x4210,0x821,0x7298,0x729f,0x529c,0x7e9c,0x534c,0x17c4,
            0x7ab7,0x709f,0x3a0,0x3608,0x699f,0x3e0,0x6198,0x6098,0x7a5e,0x1cbf,
            0x7ca7,0x109e,0x26b2,0xbe2,0x721c,0x320c,0x330c,0x5114,0x1b16,0x4384]

    def __init__(self):
        self.ADDRESS = 0x60
        self.buffer = bytearray([0] * 11)
        self.offset = 0
        # set 5x11 mode
        self.write_reg(0,0x03)
        self.set_brightness(32)
        self.show()

    def write_reg(self,reg,value):
        i2c.write(self.ADDRESS, bytes([reg,value]), repeat=False)

    def set_pixel(self, x,y,value):
        if value==1:
            self.buffer[x] |= (1 << y)
        else:
            self.buffer[x] &= ~(1 << y)

    def set_brightness(self,b):
        self.write_reg(0x19,b)

    def show(self):
        data = bytearray([0x01]) + self.buffer + bytearray([0xff])
        i2c.write(self.ADDRESS,data,repeat=False)

    def set_char(self, char, col):
        char3 = self.get_char_bytes(char)
        for i in range(3):
            if i+col<=10 and i+col>=0:
                self.buffer[i+col] = char3[i]

    def get_char_bytes(self,c):
        if ord(c)<32 or ord(c)>122:
            return [0,0,0]
        else:
            return [(self.font[ord(c)-32]>>(i*5)) & 31 for i in range(3)]


    def scroll_msg(self, msg, speed):
        self.clear()
        self.show()
        col = 10
        i = 0
        msg+= "    "
        while i< len(msg)-3:
            while col > -5:
                self.set_char(msg[i],col)
                if col<8:
                    self.buffer[col+3]=0
                    self.set_char(msg[i+1],col+4)
                if col<4:
                    self.buffer[col+7]=0
                    self.set_char(msg[i+2],col+8)
                if col<0:
                    self.buffer[col+11]=0
                    self.set_char(msg[i+3],col+12)
                self.show()
                sleep(speed)
                col -= 1
            col = 0
            i += 1

    def clear(self):
        self.buffer = bytearray([0] * 11)

sp = ScrollP()
while True:
    s = radio.receive()
    if s is not None:
        sp.scroll_msg(s,50)
        sleep(250)
Reflections
Although the user interface is rough around the edges, the effect is pretty good. The characters are echoed quite nicely to the LCD display and the responsiveness is pretty good. The Scroll pHAT is bright enough to be noticed and is a little more readable than the micro:bit matrix. Doing this reminded me how effective the Scroll pHAT is. Although the 3x5 font is a little rough, being able to see the extra characters makes it much easier for the brain to catch everything in the scrolling message.
Altogether, the components used here add up to a fair cost to purchase. I had all of these things separately and put this together to see how easy it would be to use the keyboard and LCD together. That part of the project is the bit that is most interesting to develop further. The Sparkfun LCD has an interface which is pretty easy to use and reduces the code needed for displaying text in decent amounts compared to alternatives. The i2c interaction with the USB host board is also pretty easy. Being able to check if there are keypresses to read is very handy. The button pressing on the keyboard is really accurate you don't have to add code to debounce or pause unduly to have it work well. It works by press and release so you don't get loads of readings for single press. The functionality here makes it possible to have an installed projet with a micro:bit and reconfigure it without programming.
When you have collected a handful of components like this over time and worked with them separately, learning how to use them, it's nice to hack something like this together. It's always worth thinking about new ways to connect together the components you have into something new. This project was a very quick hack based on previously written code and, for the briefest of moments, drew the attention of a techno-bored muggle from their boxset.