BBC Microbit
![]()


BBC micro:bit
HT16K33 7-Segment Display
Introduction
This page uses an Adafruit 0.56inch 7-segment display with an i2c backpack. The backpack contains an HT16K33 display controller. This is the same chip that is used to control the alphanumeric displays in the Rainbow HAT and Four Letter pHAT. It is also used on a handful of other useful backpacks that Adafruit make. This display has a colon and a decimal place for each digit.
Without the backpack, there is a complex circuit required. The backpack also copes with the work of turning the correct LEDs on and off really quickly. With these displays, you can only light up the LEDs of a single digit at a time. To display more than one digit, the microcontroller has to switch between digits really quickly. This is hard to code for and you can't have your program do anything but update the display. With the backpack, you send instructions from the micro:bit using i2c and have all the work done by the display controller.
This display costs around £10 and is very easy to connect. It works at 3V and doesn't take up any of your GPIO pins, because you can always share the i2c bus. When you work with sensors, you often want to be able to see the readings change in real time. It can be annoying to try to take a lot of readings when the numbers are scrolling. 4 digits is good for a clock display, and the full range of analog readings we can get.
If you are programming the micro:bit on a computer where you cannot use REPL, it's the quickest way to get numeric output. The other time that I find the need for a display that's easy to connect is when the device I want to test uses UART.
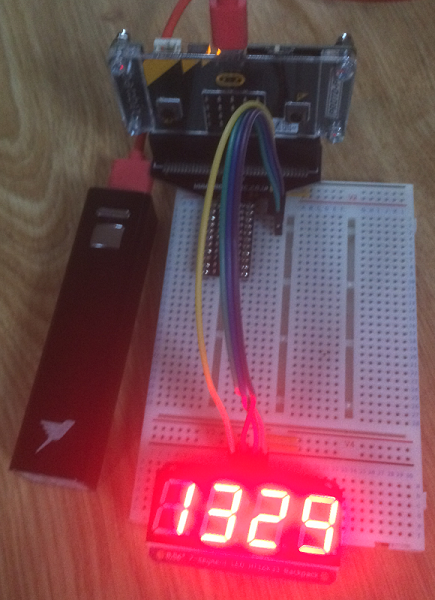
The Circuit
This is pretty easy to connect. Like all i2c devices, you are always going to need to provide a power (3V) and ground (GND) connection. You are also going to need to make a data connection (pin20) and a clock connection (pin19). Although the pins are labelled with a single character each on the board, the meaning will be obvious when these facts are considered.
Programming
Since this is the same display controller as Four Letter pHAT, I started by looking back at that code. Adafruit have libraries in Python as well as for Arduino. Scanning through those, looking at the interactions with the display buffer, it's easy enough to hack together a basic driver.
from microbit import *

class backpack:
    ADDRESS             = 0x70
    BLINK_CMD           = 0x80
    CMD_BRIGHTNESS      = 0xE0
    # Digits 0 - F
    NUMS = [0x3F, 0x06, 0x5B, 0x4F, 0x66, 0x6D, 0x7D,
        0x07, 0x7F, 0x6F, 0x77, 0x7C, 0x39, 0x5E, 0x79, 0x71]

    def __init__(self):
        self.buffer = bytearray([0]*16)
        i2c.write(self.ADDRESS,b'\x21')
        # 0 to 3
        self.blink_rate(0)
        # 0 to 15
        self.set_brightness(15)
        self.update_display()

    def set_brightness(self,b):
        i2c.write(self.ADDRESS,bytes([self.CMD_BRIGHTNESS | b]))

    def blink_rate(self, b):
        i2c.write(self.ADDRESS,bytes([self.BLINK_CMD | 1 | (b << 1)]))

    def write_digit(self, position, digit, dot=False):
        # skip the colon
        offset = 0 if position < 2 else 1
        pos = offset + position
        self.buffer[pos*2] = self.NUMS[digit] & 0xFF
        if dot:
            self.buffer[pos*2] |= 0x80

    def update_display(self):
        data = bytearray([0]) + self.buffer
        i2c.write(self.ADDRESS,data)

    def print(self,value):
        if value<0 or value>9999:
            return
        sdig =  '{:04d}'.format(value)
        dts = [int(x) for x in sdig]
        for i,d in enumerate(dts):
            self.write_digit(i,d)

    def set_decimal(self, position, dot=True):
        # skip the colon
        offset = 0 if position < 2 else 1
        pos = offset + position
        if dot:
            self.buffer[pos*2] |= 0x80
        else:
            self.buffer[pos*2] &= 0x7F

    def clear(self):
        self.buffer = bytearray([0]*16)
        self.update_display()

    def set_colon(self, colon=True):
        if colon:
            self.buffer[4] |= 0x02
        else:
            self.buffer[4] &= 0xFD

# declare an instance
f = backpack()
# decimals on
for i in range(4):
    f.set_decimal(i)
    f.update_display()
    sleep(1000)
# decimals off
for i in range(4):
    f.set_decimal(i, False)
    f.update_display()
    sleep(1000)

# print something
f.print(1234)
f.update_display()
sleep(1000)
# clear the display
f.clear()
sleep(1000)
# blink the colon
for i in range(4):
    f.set_colon()
    f.update_display()
    sleep(500)
    f.set_colon(False)
    f.update_display()
    sleep(500)
# do some counting
for i in range(10000):
    f.print(i)
    f.update_display()
    sleep(50)
Next Steps
- The code includes definitions for the letters A-F. A nice challenge would be to add a method for displaying hexadecimal values.
- Clearly, a clock, stopwatch or timer of some sort will have to be made.
- Displaying floating point numbers (numbers with decimal places), you need to work a little harder. The number you display has to be rounded to 4 significant figures. You need to work out how to get the dot in the right place too.
- There are enough segments that you can make some interesting patterns. If you turn on the horizontal segments at the top of each digit, you can make a track. Use one of the vertical segments of the first digit to represent your vehicle. You have two lanes to move between. You can make the other vertical segments into monsters and scroll them across the display towards the player. Binary is your friend.