BBC Microbit
![]()


BBC micro:bit
More Buttons
Introduction
This page describes a method for connecting multiple buttons to a single analogue pin using a resistor ladder.
Making The Circuit
The circuit consists of 5 pushbuttons and 6 resistors. The schematic will give you a clearer idea of what is happening.
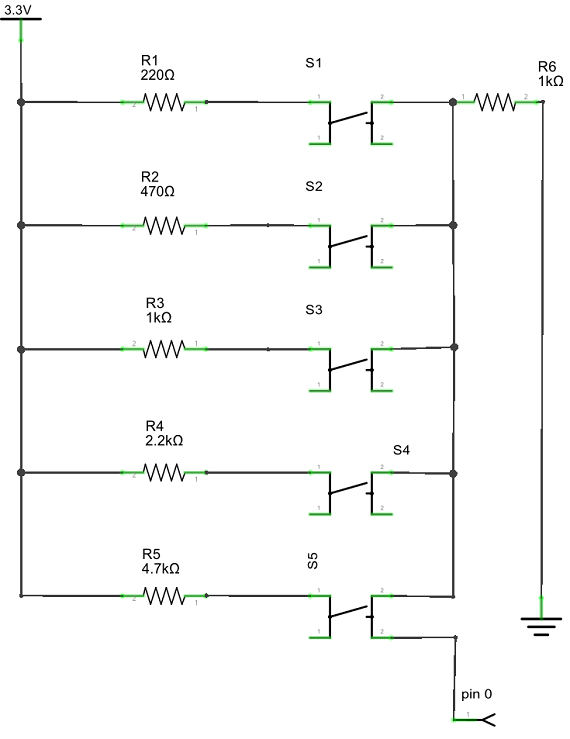
There is a different value resistor connected from the 3V supply to each switch. The other ends of the switches are connected together through a resistor to the GND pin on the micro:bit. The 1K resistor that connects the buttons to GND will drag our reading close to 0V when no buttons are pressed. When a button is pressed, it brings one of the other resistors into the circuit. These are connected to the power supply and are pulling the reading high, towards 1023 when a button is pressed. The different values of resistor ensure a different reading for each button.
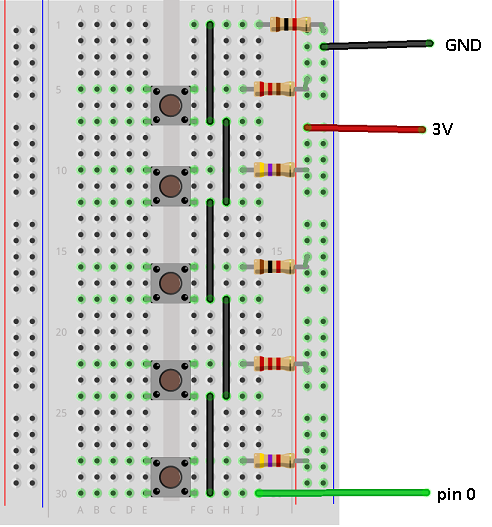
Here is the circuit on a breadboard.
In order to work out how to use the buttons, we need to find the analogue reading that we get for each button. We can do that with a simple program and by printing the readings. Open the REPL window before you flash the program. There will be numbers scrolling down the screen.
from microbit import *

while True:
    reading = pin0.read_analog()
    print(reading)
    sleep(20)
Press each button in turn and write down the readings that you get. The readings I got were as follows,
| 0 buttons | 1 |
| Button 1 | 842 |
| Button 2 | 705 |
| Button 3 | 517 |
| Button 4 | 328 |
| Button 5 | 185 |
This is pretty good news. There's a lot of room between the readings for each button press. Now to make use of them in a program. The following program uses the LED matrix to display the number of the button being pressed. A little bit of slack is allowed for small variations in the readings we get from things like temperature changes.
from microbit import *

while True:
    reading = pin0.read_analog()
    if reading>838:
        display.show("1")
    elif reading>700:
        display.show("2")
    elif reading>513:
        display.show("3")
    elif reading>325:
        display.show("4")
    elif reading>180:
        display.show("5")
    else:
        display.clear()
    sleep(10)
Challenges
- Once you have this working, you need to experiment a little. The way that the last program was written changes the behaviour of the buttons when more than one of them is pressed. If you go back to the test program and write down the reading you get for every different combination of buttons, you can see if any of them come out the same. You can then adapt the program to allow at least some combinations of button press.
- 4 buttons on one pin means you could get a Simon Says game going with some lovely buzzing. Shift the input pin along to pin 1 and use pin 0 for a buzzer or some headphones you've hacked. Use the matrix to give instructions and feedback for the game.
- Rearrange the buttons to make a D pad configuration. Write a matrix based program and move a sprite around in 4 directions.
- If you have a wide variety of resistors, you can add some more buttons. You can either experiment with them or look up the reasoning behind the staggered values.