BBC Microbit
![]()


BBC micro:bit
McRoboFace
Introduction
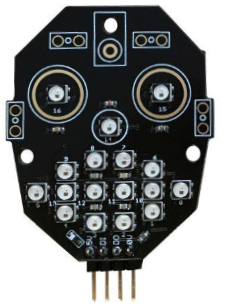
The McRoboFace is a robot-shaped face consisting of 17 Neopixel LEDs. It is made by 4tronix and costs £7.20. It was originally a successful Kickstarter project and now comes in a new version labelled 1.0. The newer version of the board comes with headers pre-soldered, the pixels labelled and the finish on the board is a little sharper. Since both versions of the board consist only of Neopixels, they are really easy to use with a micro:bit or any microcontroller that can do Neopixels.
Obviously, the McRoboFace works well mounted on a robot vehicle or acting as the 'face' and 'personality' of an electronics project. The whole face is a little bit smaller than a micro:bit - to give a sense of scale. With Neopixels being so bright and colourful, the features of the face come out really well when you light different parts. When you do simple animations with facial expressions, you will find yourself smiling. It is really bright and looks good through the diffuser that you can also pick up from 4tronix.
I've already made a handful of pages about Neopixels, trying a different approach depending on the context or accessory being used. The McRoboFace is different to the other boards in that it is undeniably in the shape of a face and this affects the way you think about programming and using it. The other part of this project that interested me was building a test rig for Neopixels (shown below).

The Circuit
The basic principle for connecting any more than about 8 Neopixels to a microcontroller is shown in the diagram below,
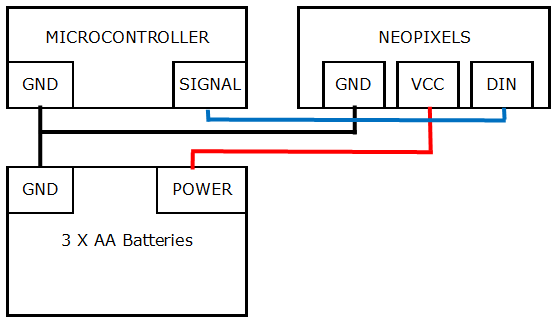
Neopixels look better when you use a voltage closer to 5V. With 3 X 1.5V batteries (AA, AAA), you stay within the 5V limit and get more juice to make your Neopixels bright. In the image, the power for the Neopixels comes from the batteries. When you use more than one power supply, connect the GND of the power supply to the GND of your microcontroller to make a common ground for the circuit.
A single Neopixel can draw up to 60ma when red, green and blue channels are all at maximum. You don't often do that in practice but, with the micro:bit, you do need to stay within a current limit of around 90-100ma. The general advice for micro:bit is not to go with more than 8 Neopixels connected directly. Any more than that and a separate power supply is the best way to go. Sticking with pretty low brightness, a direct connection to the micro:bit is probably going to be fine.
I built my test rig because I have amassed a reasonably large collection of Neopixel boards and thought it might be time to make something that I could use quickly and with LIPO power for the Neopixels.
Here is the project again, with some labels.
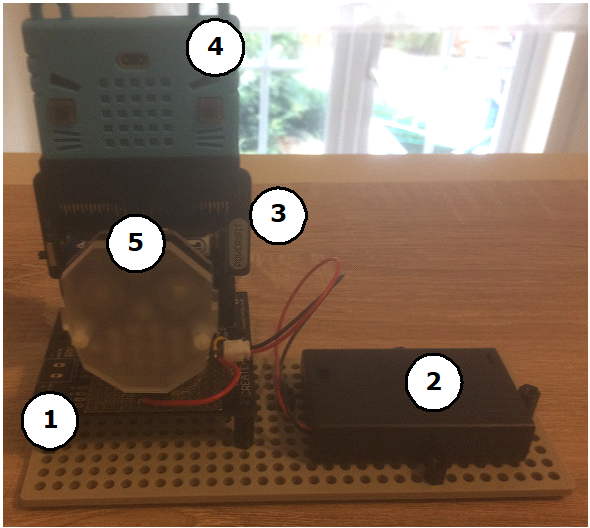
Item 1: This is a Kitronik protoboard for the micro:bit. It has a pre-soldered edge connector and loads of connection points. There are 2 sets of breakouts for the pins and the micro:bit can be inserted either way around. There's a set of tiny solder points that you can use to make connections. I soldered 4 female headers to the protoboard. Although there is a terminal block, I chose to solder a JST header for battery connections. I couldn't quite manage to use the little solder lines so went with some jumpers and made solder bridges to link everything together. The DIN pin of the McRoboFace is connected to pin12.
Item 2: This is a 3xAAA battery box with a JST-PH connector. A LIPO battery would have also been suitable.
Item 3: This is a 4tronix Power:bit. Since the rig is for testing, most of the time the micro:bit will be powered by USB whilst programming so this was only needed to move the project to a place I could photograph it. This little board has space for 2xAA batteries and has an extra edge to allow it to go straight into another edge connector. It often comes in useful when experimenting to quickly take the project on-the-go.
Item 4: The micro:bit in a blue Kitty Case.
Item 5: McRoboFace. With all the other things setup, it is ready to fire at full brightness.
Programming
The pixels on the board are numbered for you from 0 to 16. Basic Neopixel code can be used to get the effects you want on a line by line basis. You can do this by flashing a program consisting of the first two lines and the line that assigns the variable n and then writing things straight into the REPL.
This is the first chunk of code I wrote for the McRoboFace, explanation follows.
from microbit import *
import neopixel
import random

n = neopixel.NeoPixel(pin12, 17)

colours = {
    "off":(0,0,0),
    "red":(255,0,0),
    "orange":(255,165,0),
    "yellow":(255,255,0),
    "green":(0,255,0),
    "blue":(0,0,255),
    "indigo":(75,0,130),
    "violet":(138,43,226),
    "purple":(255,0,255),
    "white":(255,255,255),
}
parts = {
    "nose":[14],
    "eyes":[15,16],
    "mouth":list(range(14)),
    "all":list(range(17)),
    "smile":list(range(6)),
    "frown":[0] + list(range(5,10)),
    "oh":list(range(10)),
    "straight":list(range(10,14)) + [0,5]
}


def all_off():
    for i in range(17):
        n[i] = (0,0,0)

def get_colour(colour):
    return colours.get(colour, (0,0,0))

def get_part(part):
    return parts.get(part,[])

def light(part,colour):
    c = get_colour(colour)
    p = get_part(part)
    for i in p:
        n[i] = c

def pick_colour():
    a = random.choice(list(colours.keys()))
    return a

def pick_part():
    a = random.choice(list(parts.keys()))
    return a

def animate(times=100):
    light("all",pick_colour())
    n.show()
    sleep(500)
    for i in range(times):
        light(pick_part(), pick_colour())
        n.show()
        sleep(500)


# light parts separately
light("all","red")
n.show()
sleep(1000)
light("eyes","blue")
light("nose","violet")
n.show()
sleep(1000)
light("mouth","red")
light("smile","blue")
n.show()
sleep(1000)
# light random parts with random colours
animate()
colours/get_colour()
The colours variable stores a dictionary of colours with their names as keys. This allows us to use the words for whichever colours we define in the dictionary. More colours could be added.
The get_colour() subroutine isn't strictly needed. It ensures one default value when retrieving values and was easier to type when I used it later.
parts/get_part()
The parts variable is another dictionary. This one stores lists of the numbers of pixels making up the different parts of the McRoboFace as well as some of LEDs involved in a few expressions. The numbers could have been typed out but this shows some other ways to generate lists of numbers. More could be added.
light()
This is the subroutine used to light up a part of the face with a specific colour. Both part and colour must be in the dictionaries, bit it is as easy as writing,
light("eyes","blue")
pick_colour()/pick_part()
These two subroutines each choose a random key from the relevant dictionary. This can then be used to create effects.
animate()
This was a quick way to see some blinky action.
Challenges
Using the subroutines from the example code can get you started on most of these. Add or remove from the dictionaries to make things work for you.
- Redefine some of the colours to lower the brightness to comfortable levels and then work out a colour pattern you like on the face.
- Using your preferred pattern of colours on the McRoboFace, make the eyes blink from one colour to another.
- Work out a reasonably low brightness setting for the face. Make the eyes twinkle by varying the brightness of their colour up and down repeatedly.
- Make a program that responds to a button press on the micro:bit. Display the open mouth face and then either smile or frown at random.
- Make a program that uses the McRoboFace as a success/failure indicator for a secret combination of A and B button presses.
- Work out a sequence of expressions that approximate talking. Start by alternating between the open mouth and closed mouth (oh and straight in the example code) using a while loop. Then work out a way to make vary the length of time between the changes of expression so that the animation of the mouth has some rhythm. If you have worked out a way to make the robot face look like it is talking, make it so that this happens only when one of the buttons is being held down and carries on until the button is released. When the button is released, a smile, frown or look of surprise should be shown on the McRoboFace.
- Work out a program that makes a lit pixel run around the outside of the mouth area of the McRoboFace.
- Have a pixel run around the display whichever route takes your fancy. Adapt the code for the concentration game from this site to work on the McRoboFace.
- Use McRoboFace as a compass point indicator. Pixels 1-10 and 12 should be used. Indicate North (7,8) and South with two pixels and one for each of the other 6 compass points.
- Add a buzzer to your circuit and work out some sound effects to go with the expressions and animations that you worked out earlier.
- With a buzzer, play a tune in the background whilst the McRoboFace is animated in some interesting fashion. Either animate a talking effect or just do some random stuff.
- If you use the music.pitch() method to play your notes, starting and stopping them 'manually', you can time changes on the McRoboFace with each note. At the bottom of the page is a table of note frequencies. Make a list of the frequencies of each note (in order) of the tune. Use the value of 0 for a rest (eg. notes = [440,494,523]). Make another list of the numbers of beats for which you want to play each of these notes (eg. beats = [1,1,2]). Define a variable to store your tempo. (eg tempo = 150). This is the length of a single 'beat' in this encoding, the unit being milliseconds. It is the length of time that the shortest note in the tune plays for. Use a loop to process the lists. In the loop, start the current note. Do the changes on the McRoboFace. Then sleep for tempo multiplied by the current number of beats. Stop the note from playing. Then pause for a very small amount of time (eg tempo divided by ten).
- Speech library, face. Putting the two things together with some decent animation means two micro:bits, one with the speaker, one with the McRoboFace. Radio between the two to synchronise things for talking. The micro:bit with the speaker needs to be programmed to say whatever it receives by radio and then send a 'finished' message to the micro:bit with the McRoboFace.
- If you have the animations and the timing cracked for speech, take things a little further. Vary the pitch of the voice alongside the colours used with McRoboFace. Play around with it a little so that you have some distinct 'characters' emerging where your colours match the tone of voice for you. The examples in the MicroPython documentation are good place to start.
- The McRoboFace has a connection labelled DOUT. A second McRoboFace could be connected in a chain. Its pixels would be numbered from 17 onwards. Connect the VCC and GND of the second McRoboFace to the battery supply. Connect the DIN pin of the second McRoboFace to the DOUT pin of the first.
- Use a multiple McRoboFace setup and multiple micro:bits to stage a McRoboFace dramatic scene of some sort. Speech and sound effects would be great, movement even more so.
- Two micro:bits, two McRoboFaces and you have the setup for a game of some sort. Rock, Paper, Scissors can be refashioned around the facial expressions. The smile beats frown, frown beats straight, straight beats smile. Work out a routine for timing the game to make it fair (don't show the expressions until both players have chosen).
Notes Frequencies
| Note | Hertz | Note | Hertz | Note | Hertz |
|---|---|---|---|---|---|
| C0 | 16 | C3 | 131 | C6 | 1047 |
| CS0 | 17 | CS3 | 139 | CS6 | 1109 |
| D0 | 18 | D3 | 147 | D6 | 1175 |
| DS0 | 19 | DS3 | 156 | DS6 | 1245 |
| E0 | 21 | E3 | 165 | E6 | 1319 |
| F0 | 22 | F3 | 175 | F6 | 1397 |
| FS0 | 23 | FS3 | 185 | FS6 | 1480 |
| G0 | 24 | G3 | 196 | G6 | 1568 |
| GS0 | 26 | GS3 | 208 | GS6 | 1661 |
| A0 | 27 | A3 | 220 | A6 | 1760 |
| AS0 | 29 | AS3 | 233 | AS6 | 1865 |
| B0 | 31 | B3 | 247 | B6 | 1976 |
| C1 | 33 | C4 | 262 | C7 | 2093 |
| CS1 | 35 | CS4 | 277 | CS7 | 2217 |
| D1 | 37 | D4 | 294 | D7 | 2349 |
| DS1 | 39 | DS4 | 311 | DS7 | 2489 |
| E1 | 41 | E4 | 330 | E7 | 2637 |
| F1 | 44 | F4 | 349 | F7 | 2794 |
| FS1 | 46 | FS4 | 370 | FS7 | 2960 |
| G1 | 49 | G4 | 392 | G7 | 3136 |
| GS1 | 52 | GS4 | 415 | GS7 | 3322 |
| A1 | 55 | A4 | 440 | A7 | 3520 |
| AS1 | 58 | AS4 | 466 | AS7 | 3729 |
| B1 | 62 | B4 | 494 | B7 | 3951 |
| C2 | 65 | C5 | 523 | C8 | 4186 |
| CS2 | 69 | CS5 | 554 | CS8 | 4435 |
| D2 | 73 | D5 | 587 | D8 | 4699 |
| DS2 | 78 | DS5 | 622 | DS8 | 4978 |
| E2 | 82 | E5 | 659 | E8 | 5274 |
| F2 | 87 | F5 | 698 | F8 | 5588 |
| FS2 | 92 | FS5 | 740 | FS8 | 5920 |
| G2 | 98 | G5 | 784 | G8 | 6272 |
| GS2 | 104 | GS5 | 831 | GS8 | 6645 |
| A2 | 110 | A5 | 880 | A8 | 7040 |
| AS2 | 117 | AS5 | 932 | AS8 | 7459 |
| B2 | 123 | B5 | 988 | B8 | 7902 |