BBC Microbit
![]()


BBC micro:bit
Blinkt APA 102 Pixels
Introduction
Blinkt is the name of a Raspberry Pi accessory made by the company Pimoroni. It consists of 8 APA 102 pixels attached to a Raspberry Pi GPIO female header block. It costs £5, which compares well with the cost of an equivalent item with Neopixels. It looks like this,
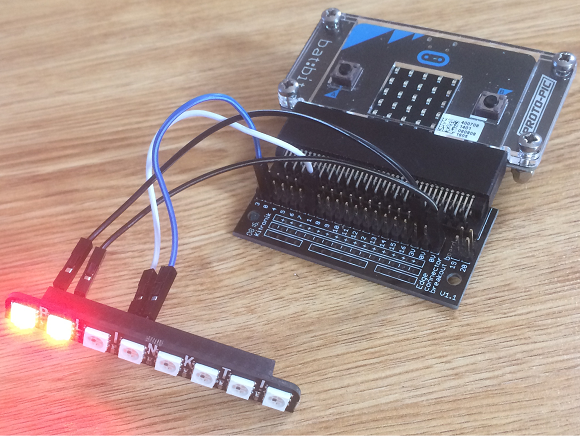
You can use an edge connector to make direct wire connections from your micro:bit to the Blinkt or use a Bit:2:Pi connector from 4tronix. These LEDs are capable of kicking out some serious light. I've used low brightness settings here. With a separate power supply, you could run these at higher brightness.
These LEDs use a 2 wire protocol that is similar to a shift register with signals sent along the whole chain. One pin acts as a data pin, set high or low to represent each bit value, another pin acts as a clock to get the LEDs to read the bit. Latching is taken care of with clock pulses.
Although it takes one more pin to control these than it does Neopixels, the protocol is a lot simpler to implement without having to use a third party library.
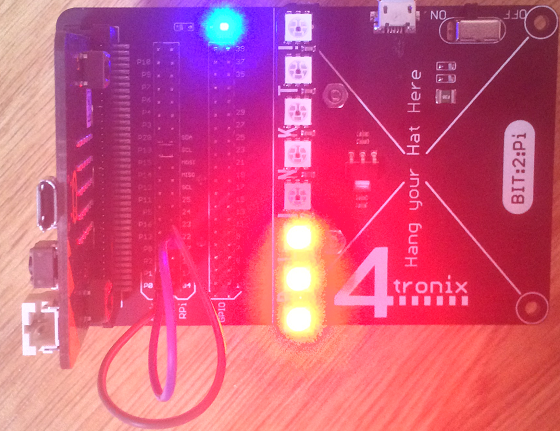
On the Bit:2:Pi board, you just neeed to make connections to the clock and data pins, the power and ground connections are done for you.
Connecting
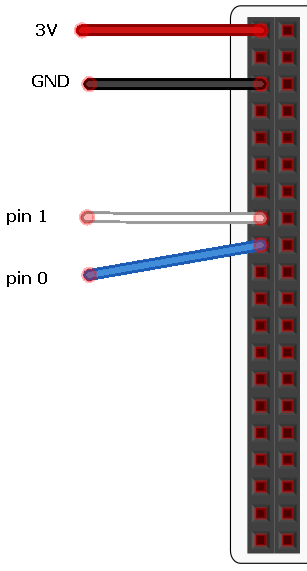
This is easy to get wrong. We are connecting to the headers meant for the Raspberry Pi's 5V and GND as well as for pins 23 and 24. The following diagram shows the connections I made.
Here's another version using a Raspberry Pi GPIO connector and a separate battery power supply for the Blinkt.
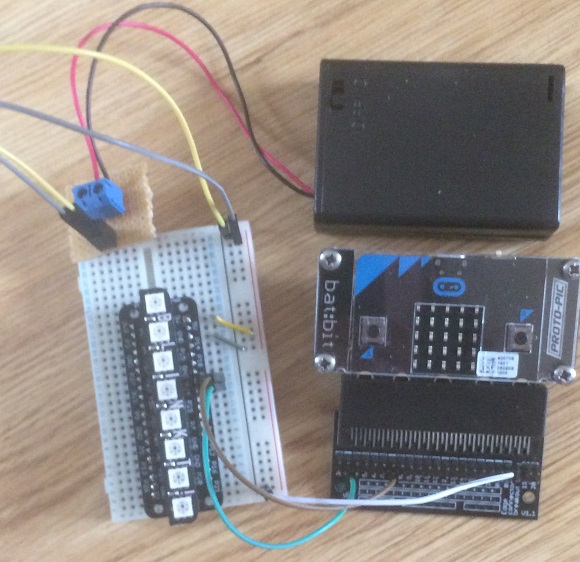
The little light brown board is a tiny piece of stripboard with a 2 pin terminal block and some female headers soldered on. This makes it easier to get a stable connection from the batteries to the breadboard. When you use a separate battery supply, you have to make sure that the batteries and the micro:bit have a common connection to GND. In this photograph the micro:bit is powered separately from the Blinkt. Now there are no concerns about power usage at full mega-brightness,
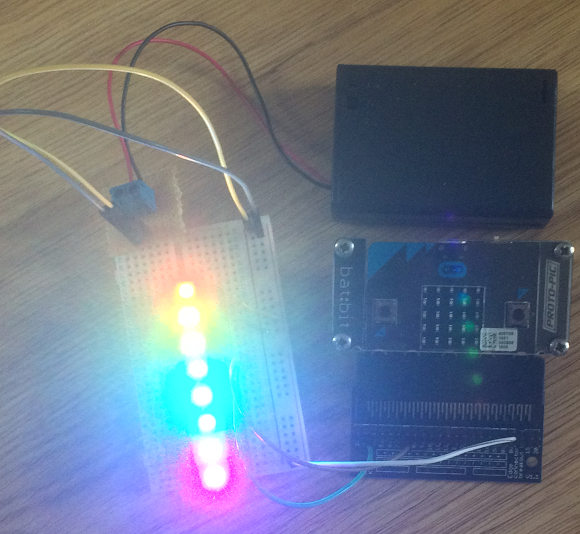
(This wasn't full brightness, just the best photograph I took with the lights on)
You can use any digital GPIO for the connections to the micro:bit.
Programming
This code is loosely adapted from the Pimoroni library (see product page for link).
from microbit import *

# to remind us which pin serves which function
DAT = pin1
CLK = pin0
# number of pixels in the chain
NUM_PIXELS = 8
# default brightness setting
BRIGHTNESS = 7
# list of pixels
pixels = [[0,0,0,BRIGHTNESS]] * NUM_PIXELS

# Set the brightness of all pixels - 0 - 1.
def set_brightness(brightness):
    if brightness < 0 or brightness > 1:
        return
    for x in range(NUM_PIXELS):
        pixels[x][3] = int(31.0 * brightness) & 0b11111

# Clear all of the pixels
def clear():
    for x in range(NUM_PIXELS):
        pixels[x][0:3] = [0,0,0]

# Pulse a byte of data a bit at a time
def write_byte(byte):
    bits = [byte >> i & 1 for i in range(7,-1,-1)]
    for x in range(8):
        DAT.write_digital(bits[x])
        CLK.write_digital(1)
        CLK.write_digital(0)

# Latch procedure - 36 clock pulses
def eof():
    DAT.write_digital(0)
    for x in range(36):
        CLK.write_digital(1)
        CLK.write_digital(0)

# Latch at start - 32 clock pulses
def sof():
    DAT.write_digital(0)
    for x in range(32):
        CLK.write_digital(1)
        CLK.write_digital(0)

# Update colour and brightness values from pixels list
# Call this procedure to update the display
def show():
    sof()
    for pixel in pixels:
        r, g, b, brightness = pixel
        write_byte(0b11100000 | brightness)
        write_byte(b)
        write_byte(g)
        write_byte(r)
    eof()

# Set all of the pixels in the chain to the colour and brightness (optional)
def set_all(r, g, b, brightness=None):
    for x in range(NUM_PIXELS):
        set_pix(x, r, g, b, brightness)

# Set the colour and brightness of an individual pixel
def set_pix(x, r, g, b, brightness=None):
    if brightness is None:
        brightness = BRIGHTNESS
    else:
        brightness = int(31.0 * brightness) & 0b11111
    pixels[x] = [int(r) & 0xff,int(g) & 0xff,int(b) & 0xff,brightness]


# Test code and example use
while True:
    # all off
    clear()
    show()
    sleep(1000)
    # on red individually
    for i in range(NUM_PIXELS):
        set_pix(i,255,0,0)
        show()
        sleep(100)
    sleep(1000)
    # all green
    set_all(0,255,0)
    show()
    sleep(1000)
    # all blue
    set_all(0,0,255)
    show()
    sleep(1000)
You can use the above code to test that you are properly connected up to the lights.
The key procedures for you to use to control the lights are,
set_brightness(brightness)
Sets the brightness of all pixels based on a value from 0 - 1.
clear()
Sets all of the pixels to off.
show()
Updates the display from the list pixels. Any changes you make are displayed when this is called.
set_all(r,g,b,brightness=None)
Sets the colour of all of the pixels. The brightness argument is optional.
set_pix(r,g,b,brightness=None)
Sets the colour of an individual pixel. The brightness argument is optional.
Rainbows
You can adapt pretty much any code you had for Neopixels and make it work on the Blinkt too. Here's some code that makes a rainbow pattern,
def hsv_to_rgb(h, s, v):
    if s == 0.0:
        return (v, v, v)
    i = int(h*6.0) # XXX assume int() truncates!
    f = (h*6.0) - i
    p = v*(1.0 - s)
    q = v*(1.0 - s*f)
    t = v*(1.0 - s*(1.0-f))
    i = i%6
    if i == 0:
        return (v, t, p)
    if i == 1:
        return (q, v, p)
    if i == 2:
        return (p, v, t)
    if i == 3:
        return (p, q, v)
    if i == 4:
        return (t, p, v)
    if i == 5:
        return (v, p, q)

def MakeColour(h):
    hsv = hsv_to_rgb(h,1,0.5)
    r,g,b = hsv
    return (math.floor(r*255),math.floor(g*255),math.floor(b*255))


def Rainbow(delay):
    for pix in range(NUM_PIXELS):
        r,g,b = MakeColour(pix/(NUM_PIXELS))
        set_pix(pix, r,g,b)
        show()
        sleep(delay)
This allows you to make a rainbow pattern across the 8 pixels by writing Rainbow(delay) replacing the word delay with a number of milliseconds to wait between lighting each LED.
Challenges
Effects
Check through the challenges on the Neopixel pages and generally play around with what you can do with the pixels. It's a good idea to generalise your specific effects and experiments into functions, where you can chose the colours, timings or other variables for the effect.
A starting point for this might be to have one light on at a time, so it looks like the pixel is moving. Then try to make 2 or 3 LEDS move up and down the strip. Then, vary the brightness of the pixels before and after a main pixel. Try this against a background of different colours and brightnesses. These are chase effects.
Wipe effects are about lighting pixels up one at a time, building a strip or pattern of colour with a delay between each step of the process. The Rainbow() function above does that. You should be able to make a simpler version that works with a single colour or with progressively varying amounts of a single colour.
Fade effects are achieved by varying the brightness and amounts of each colour in the pixels. Combined with some of the other effects, you can make some cool animations this way.
Bytes
Having 8 pixels in a line has its uses. You can represent a byte of data nicely. The line,
bits = [byte >> i & 1 for i in range(7,-1,-1)]
creates a list of the bits in an 8 bit integer with the largest place value first. This could be used in a function that lights up LEDs according to the 8 bit of its binary representation. Using the two buttons, you can make a binary up/down counter from 0 to 255. Given that you are only using 2 pins to control the lights, it makes a good indicator when experimenting with a sensor or when you want to take readings on the move.
You could combine the Blinkt with an RTC (see other pages) and make a binary clock. You can use different colours for the binary patterns for hours and minutes, alternately blinking them. An less blinky way to do it is to use 4 colours,
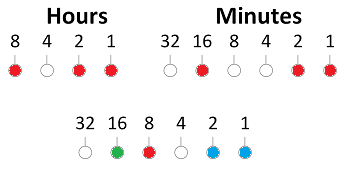
The clock shows 11:19. Lights that are red are place values for the hours, those that are green are place values for the minutes. The blue lights are place values for both hours and minutes. This is much easier to decode than if you blink the hours and minutes on and off. You get a whole minute to decode and not much changes in the pattern for each tick. The ambient effect is nicer too.
With Other Components
You can use the Blinkt as a nice spirit level if you take readings from the accelerometer and use the amount of roll to determine which LEDS to light up. You could make the LEDs change colour when the amount of tilt is in a 'dead zone' that you think is flat enough.
You can program changes in colour from any analog or digital input, user activated or otherwise. All you need is the idea. Potentiometer, rotary encoder, flex sensor, potentiometer, temperature sensor, sound sensor, light sensor, ...
The Blinkt lights up any project and would sit well on your DIY robot vehicle - perhaps performing a particular chase effect. If you are looking to get the vehicle to behave in a certain way based on sensor readings, the lights are a good way to test when/that you are getting the readings you use to trigger movements.
Combine the Blinkt with some noise from a buzzer or DIY MIDI and you can have a noisy blinky light show. Or you can make something nice.
The Simon game can be remade with 8 buttons if you use an input shift register. Add a buzzer and adapt the code for the greatest test of memory ever. Keep the brightness low if you need to keep staring at the lights to play the game.