BBC Microbit
![]()


BBC micro:bit
Button SHIM
Introduction
The button SHIM is another Raspberry Pi accessory from the UK electronics company Pimoroni. Like the other accessories, it is meant to fit on the 40-pin GPIO header strip of the Raspberry Pi. SHIMs are designed to be smaller and thinner than other accessories so that they can be combined with HATs and pHATs. With this SHIM, you get 5 miniature push buttons and a single APA102 pixel. Whilst this not sound like a lot of kit, the bonus is that these components are connected up to a TCA9554A port expander that can be controlled via i2c. It is reasonably priced at £6 and is a neat board to use when you need some inputs and an indicator LED but don't have the GPIO to spare in your project.
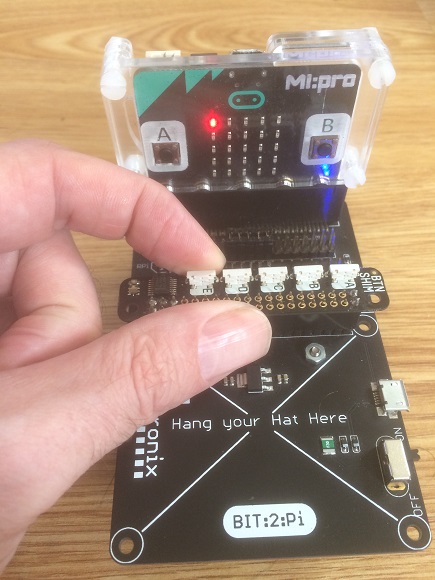
The photograph shows the button SHIM connected to the micro:bit on a 4tronix Bit:2:Pi. This is by far the easiest way to connect and power Raspberry Pi accessories on the micro:bit. You can also access the unused micro:bit pins and tap into the battery or USB power. The button SHIM used here is from Will's extensive collection.
Like all Pimoroni products, it is a designed extremely well. Having been designed for the Raspberry Pi, you get best value when you use it in that context with the nicely written library. 5 buttons is a nice round number to have for some of the ways you might interact with the 5x5 LED matrix. I've done quite a few projects where having one button per column would make the user interaction a little more direct.
Circuit
You are connecting via i2c. On the Bit:2:pi, you just have to make sure that you have the jumpers on the i2c pins and are providing battery/USB power. Otherwise, you want the following,
| Connection | Raspberry Pi | micro:bit |
|---|---|---|
| Power | 5V | 5V |
| Power | 3V3 | 3V |
| Ground | GND | GND |
| Data | Pin 2 | Pin 20 |
| Clock | Pin 3 | Pin 19 |
Programming
A lot of work has gone into the Pimoroni library for this, much of it oriented towards the capabilities of the Pi. It was a bit easier to build this up from the basics and learn about the port expander.
To work with the TCA9554A, we need to use 3 main registers. We'll deal with these in reverse.
0x03
This is the configuration register. The byte that you write to this register determines the direction, input or output, for the pins. We write the byte 0x1F, which is 00011111 in binary. This configures the first 5 pins on the port expander (P0-P4) as inputs. P5 to P7 are left as outputs. P6 is the clock pin for the APA102 pixel and P7 is the data pin.
0x02
This is the polarity register. The bits of the byte that you write determine whether or not the outputs signals are inverted. We write a 0 to this to leave our pins as normal.
0x01
This is the output register. The byte that we write to this register sets the output pins high or low according to the bit pattern. When we first connect to the IC, we write a 0 to this register to ensure that all outputs are low.
Reading
To read from the inputs, we write a 0 to the IC and read the byte that is returned. The bits of this byte tell us the state of the buttons.
The Pixel
In order to control the APA102 LED, we need to toggle the clock pin a great many times, each time with the correct signal being sent on the data pin. If we had the pins on separately controllable GPIO, we would set the correct value on the data pin, then write a HIGH and then a LOW to the clock pin. Using the port expander, we write 2 bytes. In the first byte, we have the correct value for the data bit and make sure that the clock bit is set HIGH. We then send the same byte with the clock pin set to LOW. There is a preamble and postamble of bits that acts as a 'latch' for the data transmission.
When doing something like this with a port expander, you have to think about the states of all of the pins involved in the protocol each time you want change one of the outputs.
The following gives a basic class to use with the SHIM. There is a quick test of the LED and then an infinite loop to test the buttons. Pressing a button lights up the top row matrix LED that is opposite.
from microbit import *

class btnshim:

    def __init__(self):
        self.ADDR = 0x3F
        self.write_reg(0x03,0x1F)
        self.write_reg(0x02,0)
        self.write_reg(0x01,0)

    def write_reg(self,reg,value):
        i2c.write(0x3F, bytes([reg,value]))

    def read_btns(self):
        i2c.write(0x3F, b'\x00')
        data = i2c.read(0x3F,1)[0]
        bits = [data >> i & 1 for i in range(5)]
        return bits

    def write_byte(self,byte):
        bits = [byte >> i & 1 for i in range(7,-1,-1)]
        for i in range(8):
            self.write_reg(0x01, (bits[i]<<7) + 0x40)
            self.write_reg(0x01, (bits[i]<<7))

    def set_pixel(self,r,g,b):
        # sof
        for i in range(32):
            self.write_reg(0x01,0x40)
            self.write_reg(0x01,0)
        # brightness
        self.write_byte(0xEF)
        # colours
        self.write_byte(b)
        self.write_byte(g)
        self.write_byte(r)
        # eof
        for i in range(36):
            self.write_reg(0x01,0x40)
            self.write_reg(0x01,0)


shim = btnshim()

# pixel test
shim.set_pixel(255,0,0) #red
sleep(1000)
shim.set_pixel(0,255,0) #green
sleep(1000)
shim.set_pixel(0,0,255) #blue
sleep(1000)
shim.set_pixel(255,255,255) #white
sleep(1000)
shim.set_pixel(0,0,0) #off


# button test
while True:
    btns =shim.read_btns()
    for x in range(5):
        if btns[x]==0:
            display.set_pixel(4-x,0,9)
        else:
            display.set_pixel(4-x,0,0)
    sleep(50)
Summary
The code here can be simplified a little to make it more compact. That makes it relatively easy to insert the board into any project that would benefit from a little extra input. Connect 4 would have much easier user interactions if you could select the column you want with a single press. If you add 1 extra input, you can use the state of that one to make it so that the 5 buttons on the SHIM relate to either columns or rows on the LED matrix. That gives a neater way of allowing a user to select individual pixels on the matrix, making some of your project ideas a little more usable.