BBC Microbit
![]()


BBC micro:bit
MAX7219 LED Matrix
Introduction
The MAX7219 integrated circuit is an LED driver that can be used with LED matrices to drive the LEDs at constant current. There are i2c and SPI versions of the chip. This page uses the SPI version.
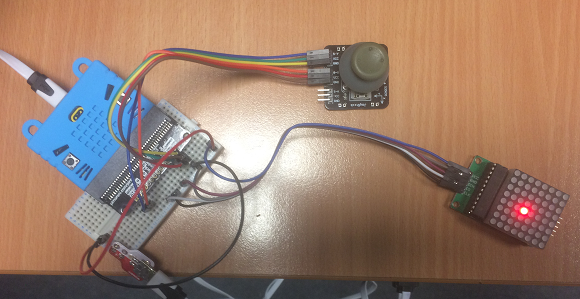
In the image, the LED matrix is powered separately from the micro:bit, via USB, using a Proto-Pic adapter board. I was using a thumbstick to control the position of a dot on the display.
Connecting
You cannot power this Matrix from the micro:bit if you want to run at reasonable brightness and with more than a few LEDs being used. On the cheaper boards, power usage from this setup is pretty high, the ones made by well-known companies are a little better thought out but, whichever setup you use, this chip is going to draw way more current than a micro:bit can handle.
The first step is to ensure that the VCC going to the MAX7219 is coming from a separate supply. I'm using a USB connection in the image. The GND connection from that supply is connected to the MAX7219 and also to the micro:bit. You need to ensure a common ground connection.
The SCLK pin will go to pin13, the SPI clock pin. The DIN pin needs to be connected to pin14. You can choose which pin to use for CS. I used pin8.
Programming
I adapted this library for this test program. I replaced the variables with literal values. This makes the code a little harder to follow but saves a little bit of memory for the program.
from microbit import *

class Matrix:
    def __init__(self, cs):
        self.cs = cs
        self.buffer = bytearray(8)
        spi.init()
        self.init()

    def _register(self, command, data):
        self.cs.write_digital(0)
        spi.write(bytearray([command, data]))
        self.cs.write_digital(1)

    def init(self):
        for command, data in (
            (12, 0),
            (15, 0),
            (11, 7),
            (9, 0),
            (12, 1),
        ):
            self._register(command, data)

    def brightness(self, value):
        self._register(10, value)

    def fill(self, color):
        for y in range(8):
            self.buffer[y] = data

    def pixel(self, x, y, color=None):
        if color is None:
            return bool(self.buffer[y] & 1 << x)
        elif color:
            self.buffer[y] |= 1 << x
        else:
            self.buffer[y] &= ~(1 << x)

    def show(self):
        for y in range(8):
            self._register(1 + y, self.buffer[y])

d = Matrix(pin8)
d.brightness(15)
d.show()
for x in range(8):
    for y in range(8):
        d.pixel(x,y,True)
        d.show()
        sleep(100)
With the matrix lighting up nicely, I thought I'd attach a thumb joystick to control the position of an LED - a basic starting point for a user interface. The two axes for the joystick have been connected to pin0 and pin1.
from microbit import *

class Matrix:
    def __init__(self, cs):
        self.cs = cs
        self.buffer = bytearray(8)
        spi.init()
        self.init()

    def _register(self, command, data):
        self.cs.write_digital(0)
        spi.write(bytearray([command, data]))
        self.cs.write_digital(1)

    def init(self):
        for command, data in (
            (12, 0),
            (15, 0),
            (11, 7),
            (9, 0),
            (12, 1),
        ):
            self._register(command, data)

    def brightness(self, value):
        self._register(10, value)

    def fill(self, color):
        for y in range(8):
            self.buffer[y] = data

    def pixel(self, x, y, color=None):
        if color is None:
            return bool(self.buffer[y] & 1 << x)
        elif color:
            self.buffer[y] |= 1 << x
        else:
            self.buffer[y] &= ~(1 << x)

    def show(self):
        for y in range(8):
            self._register(1 + y, self.buffer[y])

d = Matrix(pin8)
d.brightness(15)
d.show()
x = 0
y = 0
d.pixel(x,y,True)
d.show()
while True:
    dx = pin0.read_analog()
    dy = pin1.read_analog()
    d.pixel(x,y,False)
    if dx<20:
        x = x + 1
        sleep(50)
    elif dx>1000:
        x = x - 1
        sleep(50)
    elif dy<20:
        y = y + 1
        sleep(50)
    elif dy>1000:
        y = y - 1
        sleep(50)
    x = max(0,min(x,7))
    y = max(0,min(y,7))
    d.pixel(x,y,True)
    d.show()
    sleep(20)
This program gave a reasonable level of control over the position of the pixel. Some further adjustments can be made to suit the context of the project in which this approach is being used.
Review
When suitably powered, the LEDs on the matrix are pretty bright. The driver chip updates the LEDs quicker than we could with the micro:bit and SPI is a fast way to communicate with a chip.
The extra LEDs are a boost when it comes to dot-based games. Some of the things that are hard to make sense of on a 5x5 display start to work a little better with extra pixels.
A future project might define a font to use for scrolling messages across the larger matrix.