BBC Microbit
![]()


BBC micro:bit
Ultrasonic Distance HC-SR04
Introduction
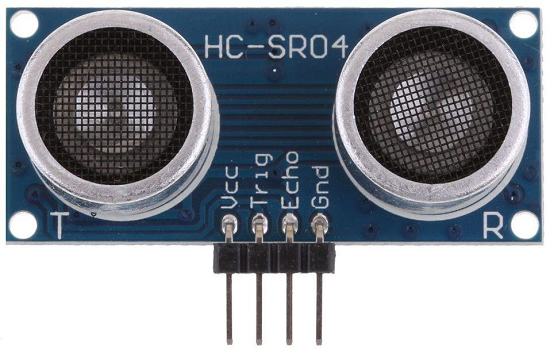
The HC-SR04 is an ultrasonic distance sensor that is widely used with microcontroller projects. You often see them connected to robot vehicles to detect obstacles in the vehicle's path. It has a range from 2cm up to 4.5m although, more often than not, it is used for distances nearer than a couple of metres.
To use the sensor with the micro:bit, you need to look for one that is specifically labelled as working with 3V logic. The one I used came from 4tronix and is very good value for money at just over £2.
The Circuit
Ultrasonic distance sensors work by sending out a high frequency sound on a trigger (transmitter) pin. The sound reflects off any objects in the sensor's path and this reflected sound can be detected by the echo (receiver) pin on the sensor. The time taken for this signal to be received depends on the distance of the object.
You can see 4 pins in the image at the top of the page. For my test program, I connected the pins as follows,
- VCC - 3V
- GND - GND
- ECHO - pin16
- TRIG - pin12
Programming - Test
The test program was used connected to a laptop with the REPL window open to check the values.
The process starts with setting the trigger pin to LOW for a few microseconds, then a 10 second HIGH signal is set. The time_pulse_us method is used to time how long it takes for a HIGH signal to be detected on the echo pin. This value is used to determine if any signal was received and, if so, how far away the object was.
from microbit import *
import machine
import utime

def get_dist():
    pin12.write_digital(0)
    utime.sleep_us(2)
    pin12.write_digital(1)
    utime.sleep_us(10)
    pin12.write_digital(0)
    d = machine.time_pulse_us(pin16,1,11600)
    if d>0:
        return d/58
    else:
        return d

pin16.set_pull(pin16.NO_PULL)

while True:
    if button_a.was_pressed():
        d = get_dist()
        print(d)
        sleep(150)
    sleep(20)
Programming - With 7-Segment Display
For my next project, I connected an Adafruit HT16K33 7-Segment Display. This is my favourite component for portable sensor projects. I trimmed my code library a little and made some adjustments for my readings. My code meant that my sensor readings were going to be from 0 to 200, with decimal places. I multiplied the reading by 10 and set the last but one decimal point. This truncates the reading after the first decimal place and plays nicely with the code I had previous written for the display.
from microbit import *
import machine
import utime


class backpack:
    NUMS = [0x3F, 0x06, 0x5B, 0x4F, 0x66, 0x6D, 0x7D,
        0x07, 0x7F, 0x6F, 0x77, 0x7C, 0x39, 0x5E, 0x79, 0x71]

    def __init__(self):
        self.buffer = bytearray([0]*16)
        i2c.write(0x70,b'\x21')
        self.blink_rate(0)
        self.set_brightness(15)
        self.update_display()

    def set_brightness(self,b):
        i2c.write(0x70,bytes([0xE0 | b]))

    def blink_rate(self, b):
        i2c.write(0x70,bytes([0x80 | 1 | (b << 1)]))

    def write_digit(self, position, digit, dot=False):
        offset = 0 if position < 2 else 1
        pos = offset + position
        self.buffer[pos*2] = self.NUMS[digit] & 0xFF
        if dot:
            self.buffer[pos*2] |= 0x80

    def update_display(self):
        data = bytearray([0]) + self.buffer
        i2c.write(0x70,data)

    def print(self,value):
        if value<0 or value>9999:
            return
        sdig =  '{:04d}'.format(value)
        dts = [int(x) for x in sdig]
        for i,d in enumerate(dts):
            self.write_digit(i,d)

    def set_decimal(self, position, dot=True):
        # skip the colon
        offset = 0 if position < 2 else 1
        pos = offset + position
        if dot:
            self.buffer[pos*2] |= 0x80
        else:
            self.buffer[pos*2] &= 0x7F

    def clear(self):
        self.buffer = bytearray([0]*16)
        self.update_display()

# ultrasound
def get_dist():
    pin12.write_digital(0)
    utime.sleep_us(2)
    pin12.write_digital(1)
    utime.sleep_us(10)
    pin12.write_digital(0)
    d = machine.time_pulse_us(pin16,1,11600)
    if d>0:
        return d/58
    else:
        return d

pin16.set_pull(pin16.NO_PULL)
f = backpack()
while True:
    if button_a.was_pressed():
        d = get_dist()
        d = max(0,d)
        d *= 10
        d = int(d)
        f.print(d)
        f.set_decimal(2,True)
        f.update_display()
        sleep(150)
    sleep(20)
With this program flashed, I set off to do some field tests. In this first one, the fake cat is approximately one metre from the sensor.
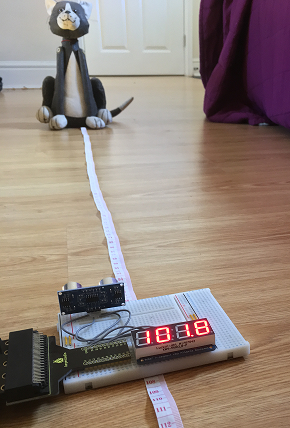
The real cat showed up at this point. He appears not to be a particularly good reflector of sound, despite being an accomplished emitter of noise.
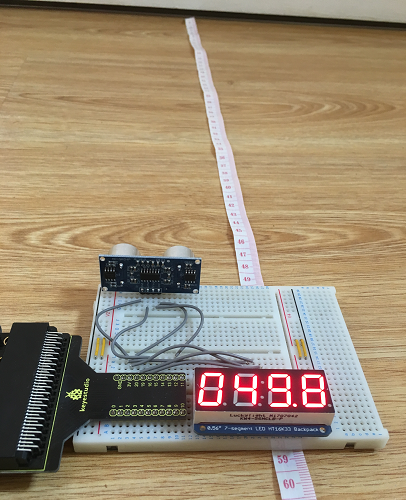
The next few photographs are at approximately 50cm from a door,
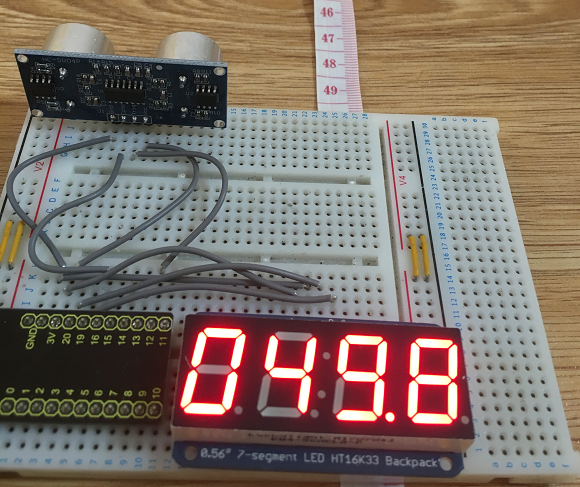
A close-up on the circuit,
Review
This is a really good version of the sensor. Readings were particularly reliable under a metre with some missed readings at longer distances. On a robot car it would be worth taking several readings at once, maybe using an average of several readings or discarding outliers. The sensor would be quite usable for collision avoidance and, with some clever code, maze solving.