BBC Microbit
![]()


BBC micro:bit
Radio Control (PXT)
Introduction
Let's be honest. When you think about a robot car, you are wanting to be able to control it remotely. Fun as it is laboriously working out code to direct a robot around a complex route, it does seem easier to be able to respond in real time when things aren't quite what you expect.
With only one GPIO spare on the Bit:Bot and no more analog pins, you'd think that it might be difficult. Fortunately, the radio library for MicroPython is pretty well designed. A second micro:bit can be used as a remote control for the robot car.
Programming - Sending
Start by programming the remote control. This is just the starter code - you will have to work out the rest. You will need to use some and blocks to check the button states to see if a left or right turn is needed too.
Here are the blocks,
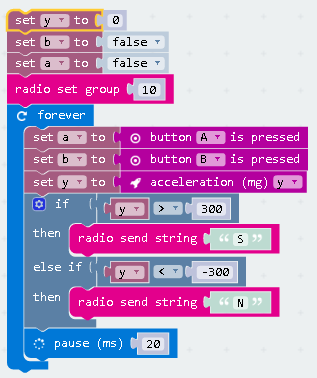
The JavaScript for this is,
let y = 0
let b = false
let a = false
radio.setGroup(10)
basic.forever(() => {
    a = input.buttonIsPressed(Button.A)
    b = input.buttonIsPressed(Button.B)
    y = input.acceleration(Dimension.Y)
    if (y > 300) {
        radio.sendString("S")
    } else if (y < -300) {
        radio.sendString("N")
    }
    basic.pause(20)
})
Programming - Receiving
This is the script that receives the radio signal and drives the motors accordingly.
Here are the blocks,
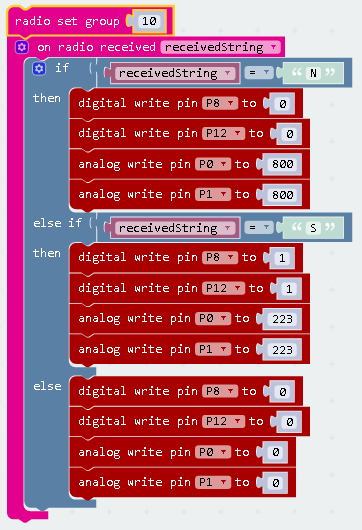
The JavaScript for this is,
radio.setGroup(10)
radio.onDataPacketReceived(({receivedString}) => {
    if (receivedString == "N") {
        pins.digitalWritePin(DigitalPin.P8, 0)
        pins.digitalWritePin(DigitalPin.P12, 0)
        pins.analogWritePin(AnalogPin.P0, 800)
        pins.analogWritePin(AnalogPin.P1, 800)
    } else if (receivedString == "S") {
        pins.digitalWritePin(DigitalPin.P8, 1)
        pins.digitalWritePin(DigitalPin.P12, 1)
        pins.analogWritePin(AnalogPin.P0, 223)
        pins.analogWritePin(AnalogPin.P1, 223)
    } else {
        pins.digitalWritePin(DigitalPin.P8, 0)
        pins.digitalWritePin(DigitalPin.P12, 0)
        pins.analogWritePin(AnalogPin.P0, 0)
        pins.analogWritePin(AnalogPin.P1, 0)
    }
})
This approach depends on the command sent being only a single character.
Challenges
- Once you have tested the example, you will want to add the logic to turn left and right in either direction. Add some ELSE IFs to the IF block in your sending program. If a is equal to true and y is greater than 300, you want to make the car go forward and to the left. You will need an AND block to do this.
- The example on this page doesn't make full use of the GPIO on the micro:bit that does the sending. You could go for a load of buttons in a much more fancy controller. Use a keypad or an input shift register and you can have full mission control. That would give you the scope to remotely trigger the robot to perform sequences of pre-designed actions.
- The radio is a two way thing. The robot can send feedback. The robot could send messages to the controller to confirm the movements that it is doing and they could be displayed on the controller matrix.
- The Neopixels on the robot are pretty cool in themselves. The car makes a nice mood lamp. With a second micro:bit controlling the colour and or the effects on the lights, you can make something interesting withouth even bothering the motors. You could set up a simple line for the robot to follow slowly - something it could follow without having to make too many course corrections. Make it make back and forward using the line to ensure you get to the correct spot. Either that or place find a transparent or translucent container and stick the robot in that with no moving aboout involved. You could use the buttons to trigger different colours and animations of the neopixels. Light show.