BBC Microbit
![]()


BBC micro:bit
PXT Neopixels
Introduction
If you have used Neopixels with an Arduino, then you know what a joy it is to find out that they can be used with the micro:bit and Microsoft PXT.
Neopixels is the name used by the electronics company Adafruit for a type of RGB LED that they package in different ways. Their guide to Neopixels can be found here. The products they make a pretty good. You can power around 8 LEDs directly from the micro:bit but, for more than that, you need to power them separately. They are meant to work at 5V but they play quite nicely with a few of the 3V3 microcontrollers like the micro:bit.
The Neopixels come in lots of different flavours, strips, individually, on circuit boards, rings. They all have a few things in common. They are chained together and have constant current drivers that means you supply a power and ground connection and one digital pin to control all of the LEDs.
For the programs on this page, I used the Neopixel Jewel and powered it directly from the micro:bit. It looks like this,
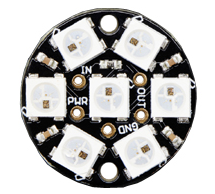
The Jewel is a nice choice because it's cheaper than the more impressive items but still pretty bright and well, pretty. Even one of these costs around £7. You need to do a good amount of programming to make sure you make the component earn its keep.
You can see 4 connections in the image. PWR should be connected to 3V on the micro:bit or to an external source 4-5V. GND should be connected to GND, naturally. The pin marked IN needs to be connected to one of the GPIO pins. Here I used pin 0.
Programming
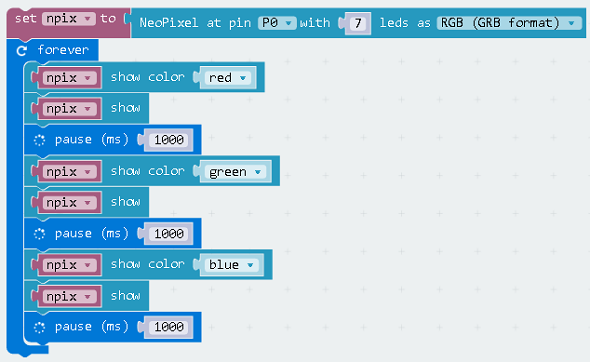
As with most Neopixel libraries, you need to begin by defining the number and type of neopixels that you have. Mine worked with the values you see in the first block.
This program sets all of the pixels in the strip to a colour, pauses, changes colour and so on. This is a nice first test to make sure that you have the right settings for the pixels.
In JavaScript,
let npix = neopixel.create(DigitalPin.P0, 7, NeoPixelMode.RGB)
basic.forever(() => {
    npix.showColor(neopixel.colors(NeoPixelColors.Red))
    npix.show()
    basic.pause(1000)
    npix.showColor(neopixel.colors(NeoPixelColors.Green))
    npix.show()
    basic.pause(1000)
    npix.showColor(neopixel.colors(NeoPixelColors.Blue))
    npix.show()
    basic.pause(1000)
})
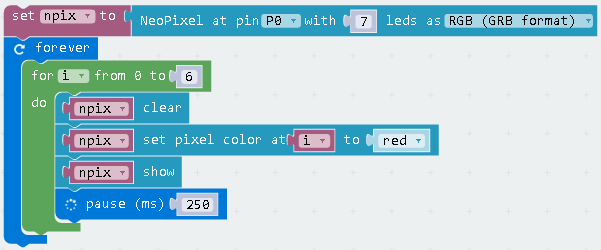
You can light up the neopixels individually too. This is a useful way to make sure you know which pixels have which number. With the Jewel, the pixels are numbered from 0 to 6. A loop is used here to light them one at a time.
In JavaScript,
let npix = neopixel.create(DigitalPin.P0, 7, NeoPixelMode.RGB)
basic.forever(() => {
    for (let i = 0; i <= 6; i++) {
        npix.clear()
        npix.setPixelColor(i, neopixel.colors(NeoPixelColors.Red))
        npix.show()
        basic.pause(250)
    }
})
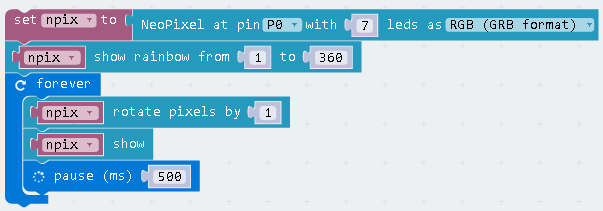
There are some built-in functions that are quite nice to use. This one makes a rainbow effect spread across the whole range of pixels.

In JavaScript,
let npix = neopixel.create(DigitalPin.P0, 7, NeoPixelMode.RGB)
npix.showRainbow(1, 360)
Combine this with the rotate block and you can get the beginnings of an animation,
let npix = neopixel.create(DigitalPin.P0, 7, NeoPixelMode.RGB)
npix.showRainbow(1, 360)
basic.forever(() => {
    npix.rotate(1)
    npix.show()
    basic.pause(500)
})
Challenges
Neopixels are generally a luxury component. There's an enormous amount that you can do with this range of colours and the amount of control you get through the code. Store the JavaScript for your programs and experiments as text files. Keep them in a neat folder structure and use names. Since you are only using one digital pin to control the strip, you can squeeze a little brightness into lots of projects. Although it takes a little longer to keep the records, it speeds you up when you want to add your lighting effects to another project and encourages you to do more.
- An easy starting point for you should be to turn the neopixels on when one button is pressed and off when the other is pressed.
- Experiment with some of the examples. The last one with the rainbow can be improved massively if you change the timing.
- You can use numbers to define the colours. A number from 0 to 255 for each of the red, green and blue channels can be used to make a colour. You can use the counter variable from a loop to make lots of changes in the amount of a colour channel. Try going from (0,0,0) to (255,0,0). An interesting variation is to calculate your pause based on the amount of red. Less red, shorter pause, more red, longer pause.
- Lights and music would be great. It's quite laborious to write out a tune in blocks. You might want to switch to JavaScript when you've put a few blocks in. Copying and pasting, with some adjustments is going to be a lot quicker. The same goes for your light changes.
- Using different shades of red, you can make a heartbest effect. This looks just as good if you use a different colour. What you are looking for is a range of shades of the same colour with the edges of the strip being dimmer than the centre. Make the pixels glow brighter by differing amounts depending on their location in the strip.
- Mood lamp.
- Using input gestures and input devices, you can combine some of your effects into a single program for demonstration and testing purposes. When you have more effects than you have inputs, work out an input method for a menu to select your effects/animations.
- You can find examples of quite fancy effects and animations with Neopixels that people have done with microcontrollers and coding environments that have been around a lot longer than PXT. Even having a go at some of the effects is going to produce something interesting for you.