BBC Microbit
![]()


BBC micro:bit
Analogue Joystick
Introduction
You find analogue joysticks on game controllers. Sometimes referred to as 'thumb' joysticks, they are a made up of a pair of potentiometers and a switch. Moving the joystick on the horizontal and vertical axes leads to a different voltage that tells you the position of the stick in relation to its centre. The switch part of the package is activated by pressing the top of the joystick.
Although you can buy them separately, a hobby electronics site will let you buy one that is mounted on a printed circuit board with the pins labelled for you. These cost no more than a few pounds.
Making The Circuit
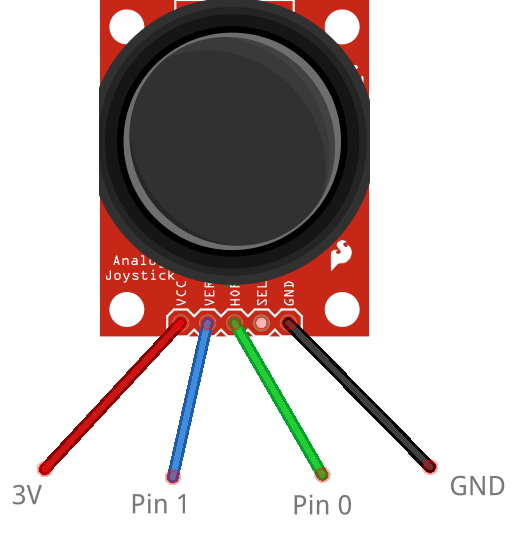
The exact nature of the circuit will depend on the package you had for the joystick. On the one shown here, there is one connection for VCC (3V) and GND. There will be one for each of the two potentiometers. Sometimes these are connected for you on the circuit board, sometimes you have to make a connection to 3V and GND for each axis. On the one shown below, the horizontal and vertical pins are labelled that way, sometimes you will see x and y used to indicate the same thing. On this board, the switch pin is labelled SEL, sometimes you will see something like SW1.
Programming
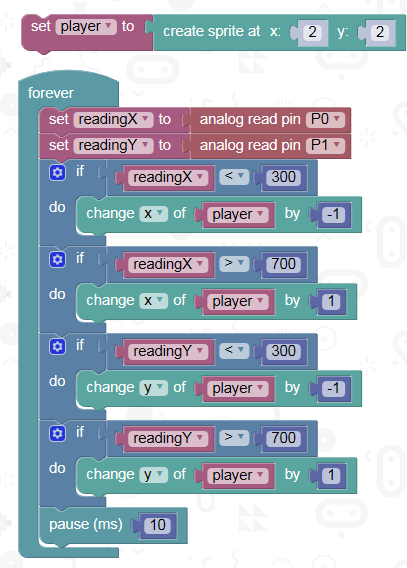
In this example, a sprite is created in the centre of the matrix. The joystick gives us a number from 0-1023 for each axis. You will need to play around with numbers and the length of the pause to get smooth control of the movement. This is just a starting point.
Challenges
- The example script creates what gamers refer to as a 'dead zone' around the centre. This is because the joystick readings will change a little as you hold a controller in the air. If you change the length of the pause in the script, you can prevent the double movements, but get other effects you might not want. You may well have used a game controller and either liked or disliked the sensitivity settings on the thumbsticks. Most gamers prefer the joystick to rest level when not pushed but want some sensitivity to a slight push that differs from a full push. This script is using the joystick more like a switch. A little more work and it would not be that different from a game player's perspective. You could make a series of images and allow the user to scroll through them. Instead of one at a time, they could scroll quicker or slower depending on the joystick. Map your images out on a large 2x2 grid and you are getting close to making a multi-screen map for a game. This could be the core of a miniature RPG.
- You can use the joystick readings for making some noise with a buzzer. If you connect the buzzer to pin 0 and use only one axis of the joystick, you can make the buzzer play the joystick reading as a frequency but that will not be particularly musical. Mapping the joystick readings to a simple scale will improve things. You could make it so that pressing a button changed the octave or the key of the scale or make it so that you could only hear a tone when a button is being pressed. The trick is to try out as many different ways of giving the user some level of control over the pitch of the notes.