BBC Microbit
![]()


BBC micro:bit
Using A Buzzer
Introduction
These exercises all involve using the micro:bit with some sort of buzzer/speaker connected. There are various options for the circuit that will all work with these exercises.
- Alligator clip headphone socket accessory and a pair of headphones.
- Headphone hack - alligator clips directly to the jack on your headphones.
- Buzzer connected via a breadboard and jumper cables.
- Accessory which has a buzzer (eg Piano for micro:bit)
- Accessory which has a speaker (eg Noise:bit)
The buzzer or speaker needs to be connected to pin0 on the micro:bit. If you are using one of the accessories with an edge connector, you will not need to worry about this.
Task 1
Make the connections that you need according to whichever of the above methods you are using. The following is a simple program to test that sound can be made and heard.

Copy and check that you hear a tone when the micro:bit starts up. Press the reset button on the micro:bit if you need to play the tone again. If you don't hear any sound, you will need to check your circuit and connections, then speak to your teacher if you still can't see what the problem is.
Task 2
The following blocks are used to say what happens when the micro:bit buttons are pressed.
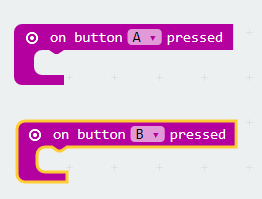
Write a program that plays a note when the A button is pressed and a different note when the B button is pressed.
Task 3
Use your code from Task 2 to get started. Adapt the code so that, when you press the A button, a MIDDLE C is played for 1 beat. When the B button is pressed, the same note should be played for 4 beats. This allows for a long and short tone - enough to be able to generate Morse Code messages.
Task 4
Here is the start of a program that is going to play a tune. The play tone block is being used to play the first note of the tune for 1 beat.
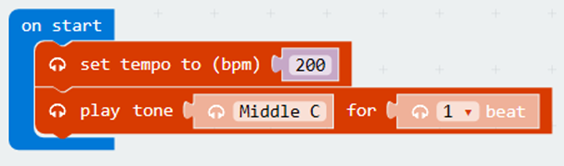
The table below has all of the notes for the tune. Add the rest of the notes and test that the tune plays correctly.
You have to take care when entering these blocks or the tune will not play correctly. Use the table as a checklist and tick off/shade/embolden each of the notes as you add it to your tune.
You will end up with a lot of blocks. You will need to use the scrollbars to keep the code you want to work on visible to you.
When you have finished this program, you might want to work out the notes for a different tune. Speak to your teacher about this if you do.
| Note | Beats |
|---|---|
| Middle C | 1 |
| Middle C | 1 |
| Middle G | 1 |
| Middle G | 1 |
| Middle A | 1 |
| Middle A | 1 |
| Middle G | 2 |
| Middle F | 1 |
| Middle F | 1 |
| Middle E | 1 |
| Middle E | 1 |
| Middle D | 1 |
| Middle D | 1 |
| Middle C | 2 |
| Middle G | 1 |
| Middle G | 1 |
| Middle F | 1 |
| Middle F | 1 |
| Middle E | 1 |
| Middle E | 1 |
| Middle D | 2 |
| Middle G | 1 |
| Middle G | 1 |
| Middle F | 1 |
| Middle F | 1 |
| Middle E | 1 |
| Middle E | 1 |
| Middle D | 2 |
| Middle C | 1 |
| Middle C | 1 |
| Middle G | 1 |
| Middle G | 1 |
| Middle A | 1 |
| Middle A | 1 |
| Middle G | 2 |
| Middle F | 1 |
| Middle F | 1 |
| Middle E | 1 |
| Middle E | 1 |
| Middle D | 1 |
| Middle D | 1 |
| Middle C | 2 |
Task 5
Copy and test the following program,

In the On Start block, we have a block that sets pin0 to be the output for tones.
In the Forever block, we have blocks to reads the x axis on the accelerometer and stores the value using a variable called tone. The absolute value of a number is the number without its sign (positive/negative).
If the A button is held down, the tone is played, otherwise it stops the noise by setting the pitch to 0.
When you hold down button A on the micro:bit and tilt the micro:bit left or right, you can control the pitch of the tone being played.
Adapt this program to show an image on the display when a note is being played. The image should be cleared when the note is not being played. You need to add 2 blocks to the program to do this.
Task 6
Copy and test the following program. Then read the explanations of the code.
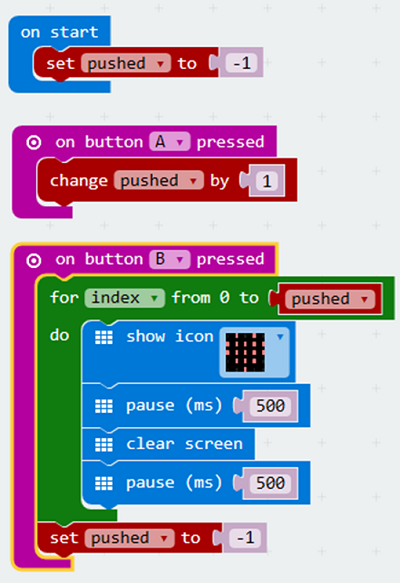
The program uses a variable called pushed to keep track of how many times the A button was pressed. It is set to -1 at the start of the program.
When the A button is pressed, the value of the variable called pushed is changed by 1.
In the event block for when the B button is pressed, we have a FOR LOOP. This is a repetition structure. We use it to repeat commands a set number of times. In this case, it counts from 0 to the value stored in the variable pushed.
Each time the loop repeats, the heart icon is shown for half a second (500 milliseconds) and then a blank screen is shown for half a second.
The heart flashes as many times as the A button was pressed before pressing B.
Our pushed variable gets set back to -1, once we have flashed the image the correct number of times.
Adapt the program so that, when the heart image is displayed, a tone is also played. That way you will be able to control the number of times that the micro:bit beeps.
Task 7
The following program does a 10 second countdown, before it displays a cross pattern on the LED matrix.
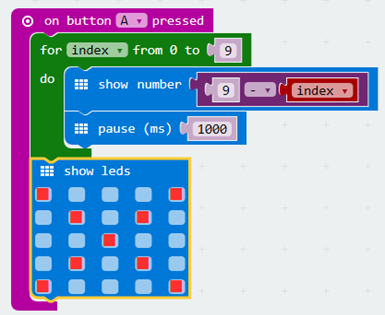
Add some code to play an alarm after 10 seconds. Do this after the show leds block. Think about what your alarm sound should be.
Task 8
Remake the Rock, Paper, Scissors game including some sound effects with the buzzer/speaker. The following is the example code for the game.

Each time you play a round of the game, you get a count of 3 shown on the display. Add a beep after each number is displayed.
These are the different outcomes in the game. Replace the letters with suitable images. Add a different noise for each shape.
Test the game that you make by playing against yourself or with another member of the class who has completed the same task.
Task 9
The following program shows a dot on the LED matrix and then makes it move every half a second in a random direction.
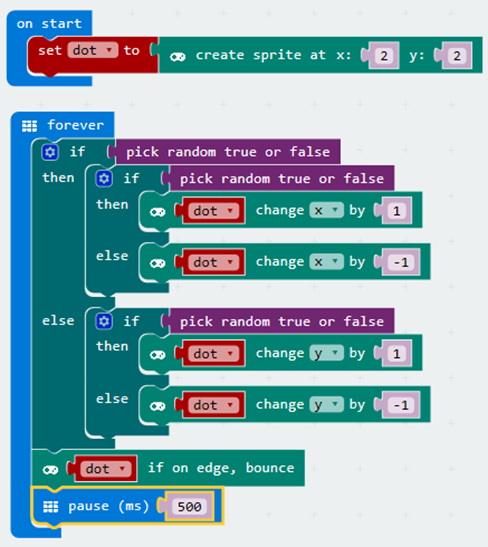
Adapt the program so that a different note is played, depending on which direction the dot moves.
Task 10
Make a micro:bit program according to the following brief.
- When you press the A button, a North, East, South or West pointing arrow should be displayed.
- The arrow that is displayed should be chosen at random.
- When the arrow is shown, a note or tune should be played.
- A different note/tune should be used for each direction.