BBC Microbit
![]()


BBC micro:bit
PiGlow SN3218
Introduction
The PiGlow is a Raspberry Pi accessory made by Pimoroni. There are 18 LEDs on the PCB, arranged in a 3 arm spiral. The LEDs are driven by an SN3218 integrated circuit which works with the i2c protocol. The LEDs are single colour but arranged in a rainbow order that allows for some lovely effects.
Here is the PiGlow mounted on a 4Tronix Bit:2:Pi. This is at pretty low brightness to give you a chance of making out the pattern of the LEDs. This board glows very brightly.
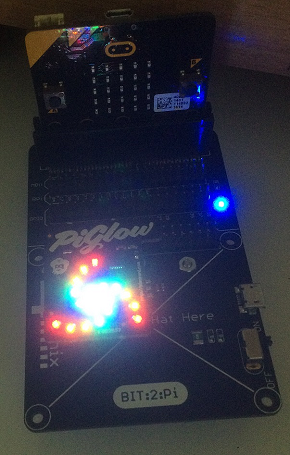
The PiGlow is pretty small but packs quite a punch. When you are writing programs for this, set the brightness low or you'll be seeing spots for a while. It costs £9. It's a board that has been around for a few years so there are a lot of people who have posted code and projects using it with the Raspberry Pi. It's a nice board for making lighting effects with and can be used as an indicator in other projects.
Circuit
The easiest way to connect this board to the micro:bit is with the Bit:2:Pi. You just place it in at the leftmost end of the GPIO as you face the micro:bit. You could happily connect this directly but you should use a separate power supply for the LEDs.
Since we are using i2c, we need the following connections,
| Connection | Raspberry Pi | micro:bit |
|---|---|---|
| Power 5V | 5V | 5V |
| Power 3V3 | 3V3 | 3V |
| Ground | GND | GND |
| Data | Pin 2 | Pin 20 |
| Clock | Pin 3 | Pin 19 |
Programming
There are a lot of links from the product page to Python and other code for controlling and using the PiGlow. If you follow the link to the Pimoroni library and look at the source, you will find that the PiGlow library depends on an SN3218 library. The base library deals with the i2c communication, the PiGlow library provides mapping and utility functions that make sense for the particular pattern of LEDs on the board.
In order to save memory, I had to ditch the precalculated gamma correction table. I replaced it with a method in the class that does the calculation on demand. This is slower but does work. If you take the gamma correction away, you will notice a difference in the way that the lights behave when you fade in and out.
from microbit import *

class piglow:
    def __init__(self):
        self.ADDRESS = 0x54
        self.reset()
        self.enable()
        self.enable_leds(0x3FFFF)
        self.buffer = [0]*18
        self.output()
        self.ledmap = [6, 7, 8, 5, 4, 9,
                      17, 16, 15, 13, 11, 10,
                      0, 1, 2, 3, 14, 12]

    def enable(self):
        i2c.write(self.ADDRESS,bytes([0x00,0x01]),repeat=False)

    def disable(self):
        i2c.write(self.ADDRESS,bytes([0x00,0x00]),repeat=False)

    def reset(self):
        i2c.write(self.ADDRESS,bytes([0x17,0xFF]),repeat=False)

    def update(self):
        i2c.write(self.ADDRESS,bytes([0x16,0xFF]),repeat=False)

    def enable_leds(self, mask):
        data = bytes([0x13,mask&0x3F,(mask >> 6) & 0x3F, (mask >> 12) & 0X3F])
        i2c.write(self.ADDRESS,data,repeat=False)
        self.update()

    def output(self):
        data = bytes([0x01] + self.buffer)
        i2c.write(self.ADDRESS,data,repeat=False)
        self.update()

    def fill(self, value):
        self.buffer = [self.gamma(value)]*18
        self.output()

    def gamma(self, value):
        return int(pow(255, float(value - 1) / 255))

    def set_led(self,led,value):
        self.buffer[self.ledmap[led]] = value

     #   0 - 5: roygbw
    def set_colour(self,colour, value):
        self.fill(0)
        for i in range(3):
            self.set_led(colour + i*6,value)
        self.output()

p = piglow()
for i in range(6):
    p.set_colour(i,255)
    sleep(500)
p.fill(0)
sleep(500)
for i in range(18):
    p.set_led(i,128)
    p.output()
    sleep(500)
sleep(500)
# mask to enable first led only
m = 1
for i in range(18):
    p.enable_leds(m)
    sleep(50)
    # enable the next led
    m = (m<<1) + 1
while True:
    for i in range(255):
        p.fill(i)
        sleep(5)
    for i in range(255,-1,-1):
        p.fill(i)
        sleep(5)
The part you want to explore in the code is everything that follows the class. Here, I have turned each colour on and off individually, turned the lights on in order of the mapping, enabled them one by one according to their connection, and faded them all in and out.
Challenges
It's either all about the lighting and animation effects or it's an indicator to tell you that something has happened or to show you the state of a component. Whether it's a fancy mood lamp you are making or some sort of notification, this is a board that needs you to sit and play for a while with the patterns and the numbers. There are lots of different boards that have arrangements of LEDs. Each time you have a go on one of them, try to come up with a new lighting effect.