BBC Microbit
![]()


BBC micro:bit
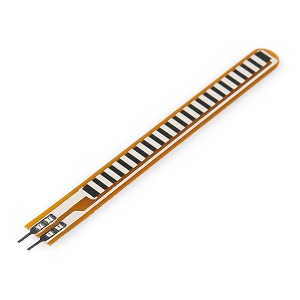
Flex Sensor
Introduction
A flex sensor is a variable resistor, like a potentiometer. Instead of rotating a dial or knob, you bend the sensor to vary the resistance. These aren't cheap and they are not the most sturdy of components. They are included in some beginner kits for Arduino and quite cool to have a play with every now and then.
This is the sensor used for this project. It is a 2.2 inch flex sensor. You bend it (and not too rough, please) so that the face you see in the image is on the outside of the bend.
Circuit
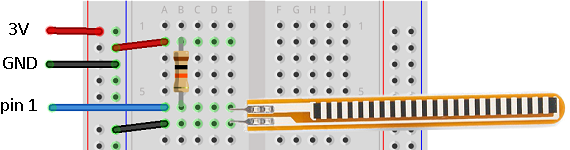
The resistor in the diagram is a 10K Ohm resistor.
Programming
You only need a very simple program to see if the sensor is properly connected and you can read values from it. This program prints the reading every 20 milliseconds. Open the REPL window or a terminal emulator and look at the readings. Bend the sensor and see if they are changing. With this setup, you should be getting around 680 when the sensor is still, a little less if you straighten it up to around 800 when the sensor is fully flexed.
from microbit import *

while True:
    a = pin1.read_analog()
    print(a)
    sleep(20)
Although the readings are not in a massive range, there is enough reaonably controllable difference between the positions that makes this interesting enough to do more with.
Add a buzzer to the circuit, connecting its positive pin to pin 0 and the negative one to GND. Try this to here some irritating tones that change when you bend the sensor.
from microbit import *
import music

while True:
    a = pin1.read_analog()
    music.pitch(a,-1)
    sleep(20)
Good for you if you can bear this for a minute without pulling out the USB cable.
Challenges
- The buzzer can be made to sound a lot better than this. When you read the sensor, subtract the 'resting value' (the reading you get when you don't bend it) from the reading you get. Print this and see what kind of range you are getting now. It should be a hundred and something. Whatever it is, use that number to work out which notes to play from a smaller set of notes, maybe two octaves.
- You can use the sensor as an input any time you want somebody to apply gradual pressure, like you would on an analogue joystick. That might be something that triggers images on the LED matrix or some other event in your project. Start by making something on the display controllable via the sensor.