Other
Arduino - LED Projects
Arduino - Buzzer Projects
Arduino - Midi Projects
Arduino - Microview
Arduino - Other Projects
Arduino - Visual Basic.NET
Arduino - Tim's Projects
Arduino - Links
![]()


Visual Basic Thermometer
Introduction
This page is concerned with reading the value of a sensor connected to the Arduino and displaying that output interestingly in Visual Basic.
You Will Need
- 1 x TMP36 Temperature Sensor
- Jumper Wires
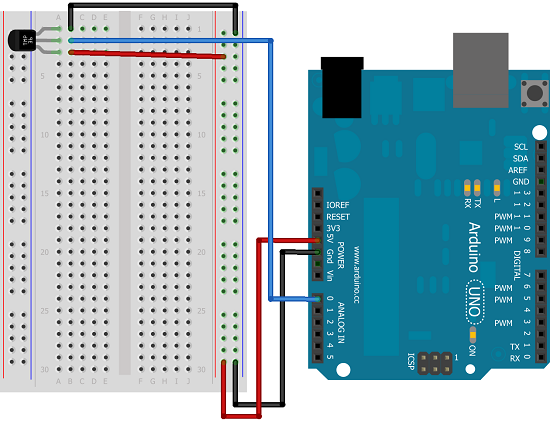
The TMP36 is helpfully almost exactly like a transistor, a part you absolutely don't want to use in this circuit. If you look very carefully at the part, you should see the letters TMP on the front side. If you do accidentally plug in the transistor in its place, it will get hot. Common sense tells you to remove the USB cable, wait for it to cool and then try harder to put the correct part in.
Making The Circuit
Programming The Arduino
All we need the Arduino to do is to read the temperature and send it to the serial port at regular intervals. The following basic code is sufficient for that purpose,
int tempPin = 0;


void setup()

{

  Serial.begin(9600);

}


void loop()

{

  float voltage;

  float degreesC;

  voltage = analogRead(tempPin) * (5.0/1024.0);

  degreesC = (voltage - 0.5) * 100.0;

  Serial.println(degreesC);

  delay(500);

}
You can test that the circuit is supplying plausible values by using the Serial monitor.
Making The Visual Basic Program
Create a Visual Basic Windows Forms project and add a PictureBox and 2 buttons to the form.
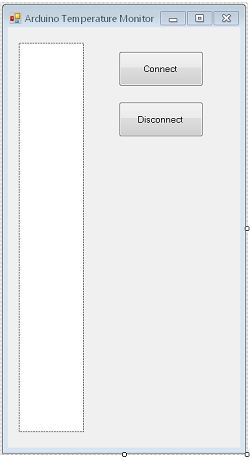
- The PictureBox should be named picTherm and be 100 by 600 pixels in size.
- The buttons are called btnConnect and btnDisconnect.
You need the following Imports at the top of the code window,
Imports System.Drawing.Drawing2D

Imports System.IO.Ports
You will need the following global variables,
Dim bmp As Bitmap = New Bitmap(100, 600)

Dim temperature As Double = 10
Now you need to click on the PictureBox, look for the events list in the Properties window and find the Paint event. Double click the space next to it. This should bring up some headers for our event handler which will be used to draw our thermometer.
Private Sub picTherm_Paint(sender As System.Object, e As System.Windows.Forms.PaintEventArgs) Handles picTherm.Paint

   Dim g As Graphics = Graphics.FromImage(bmp)

   g.Clear(Color.White)

   ' fill temperature

   If temperature > 100 Then temperature = 100

   If temperature < 0 Then temperature = 0

   g.FillRectangle(Brushes.Red, 48, 550 - CInt(temperature * 5), 4, CInt(temperature * 5))

   'draw scale

   g.DrawLine(Pens.Black, 45, 550, 45, 50)

   ' minor ticks

   For i As Integer = 50 To 550 Step 5

      g.DrawLine(Pens.Black, 45, i, 48, i)

   Next

   'major ticks

   Dim f As Font = New Font("Verdana", 8, FontStyle.Regular)

   Dim scale As Integer

   For i As Integer = 550 To 50 Step -25

      g.DrawLine(Pens.Black, 45, i, 55, i)

      scale = (550 - i) / 5

      g.DrawString(Str(scale), f, Brushes.Black, 10, i - 8)

   Next

   picTherm.Image = bmp

End Sub
You can test the program at this stage. It should display the value of the temperature that was hard-coded in the global variable declaration. If you change this value and run the program again, the reading on the scale should change.
Arduino Connection Code
Add the following to the list of global variables,
Dim WithEvents sp As New SerialPort
Now go to the properties for the Disconnect button and set the visible property to false.
Double click on the Connect button and write the event handler for it. You will need to change the COM port so that it matches the one your Arduino connects on.
Private Sub btnConnect_Click(sender As System.Object, e As System.EventArgs) Handles btnConnect.Click

   Try

      sp.BaudRate = "9600"

      sp.PortName = "COM3"

      sp.Open()

      If sp.IsOpen Then

         btnConnect.Visible = False

         btnDisconnect.Visible = True

      End If

   Catch

      sp.Close()

   End Try

End Sub
Double click on the disconnect button and write the event handler for it,
Private Sub btnDisconnect_Click(sender As System.Object, e As System.EventArgs) Handles btnDisconnect.Click

   Try

      sp.Close()

      btnConnect.Visible = True

      btnDisconnect.Visible = False

      Exit Sub

   Catch

      MessageBox.Show("Some kind of problem.")

   End Try

End Sub
We also need to make sure that a disconnection is made before the program is closed. Go to the properties window for the form. Click on the lightning symbol to find the list of events. Double click in the box next to Form_Closing and add the following code,
Private Sub Form1_FormClosing(sender As System.Object, e As System.Windows.Forms.FormClosingEventArgs) Handles MyBase.FormClosing

   If sp.IsOpen() Then

      MessageBox.Show("Disconnect before closing")

      e.Cancel = True

   End If

End Sub
Finally, we can add the code we need to read the value from the serial port and display it in our PictureBox,
Delegate Sub myMethodDelegate(ByVal [text] As String)

Dim myDelegate As New myMethodDelegate(AddressOf ProcessReading)


Private Sub SerialPort_DataReceived(ByVal sender As Object, ByVal e As System.IO.Ports.SerialDataReceivedEventArgs) Handles sp.DataReceived

   Dim str As String = sp.ReadLine()

   Invoke(myDelegate, str)

End Sub


Sub ProcessReading(input As String)

   If IsNumeric(input) Then

      temperature = CDbl(input)

      picTherm.Refresh()

   End If

End Sub
Assuming that the Arduino is running and connected to the PC, the program should now display the temperature reading on the scale. It updates once every 500 milliseconds and you should see a little bit of movement. If you hold the temperature sensor or bring something warm near to it, you will see the reading climb.
Challenge
Adapt the program so that readings of the temperature are taken at regular intervals. The reading and the time index should be stored. You can output these values into a CSV file and then use the data in Excel to produce a graph of the temperature variations over a period of time.