Other
Arduino - LED Projects
Arduino - Buzzer Projects
Arduino - Midi Projects
Arduino - Microview
Arduino - Other Projects
Arduino - Visual Basic.NET
Arduino - Tim's Projects
Arduino - Links
![]()


Morse Code - Sounder
Introduction
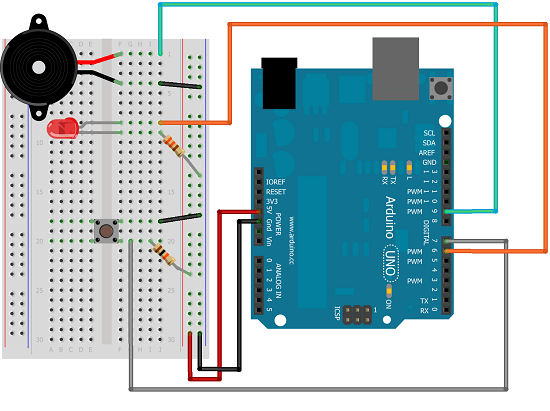
In this project, you make a circuit that you can use to play around with Morse Code. It uses a buzzer and an LED which sound and light when a button is pressed.
You Will Need
- 1 x Piezo Buzzer
- 1 x LED
- 1 x 330 Ohm Resistor
- 1 x 10 KOhm Resistor
- 1 x Pushbutton
- Jumper Wires
Making The Circuit
This is a pretty simple circuit to set up. The piezo buzzer has a marking on the underside showing which of the pins is positive.
Programming The Arduino
int buzzerPin = 9;

int buttonPin = 7;

int ledPin = 6;

const int toneFreq = 523;


void setup()

{

  pinMode(buzzerPin, OUTPUT);

  pinMode(ledPin, OUTPUT);

  pinMode(buttonPin, INPUT);

}


void loop()

{

  int buttonState = digitalRead(buttonPin);

  if (buttonState==LOW)

  {

    digitalWrite(ledPin, HIGH);

    tone(buzzerPin, toneFreq);

  }

  else

  {

    digitalWrite(ledPin, LOW);

    noTone(buzzerPin);

  }

}
The tone() statement is used to generate the required tone in the piezo buzzer. The frequency used here is a C. When the noise needs to stop, the noTone() statement is used.
Challenge
The basic concept of this circuit could be used to create the buzzers for a quiz. Add another pushbutton and LED (perhaps a different colour). Adapt the program so that the circuit registers which button is pressed first. Light the correct LED and play a different tone. The program will have to determine the length of the buzz. It makes sense to leave the light on after the buzz for a while before turning off and setting the system up for the next press.