Other
Arduino - LED Projects
Arduino - Buzzer Projects
Arduino - Midi Projects
Arduino - Microview
Arduino - Other Projects
Arduino - Visual Basic.NET
Arduino - Tim's Projects
Arduino - Links
![]()


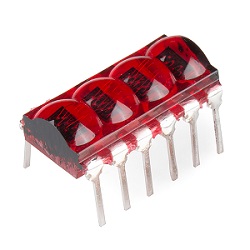
Bubble Display
Introduction
In this project you will be able to use a 4 digit, 7 segment bubble display to count numbers.
You Will Need
- 8x 1K Ohm Resistors
- Lots of jumper wires
- The Library for the sketch, here
- A sparkfun Bubble display. You can get one here
The bubble display looks like this
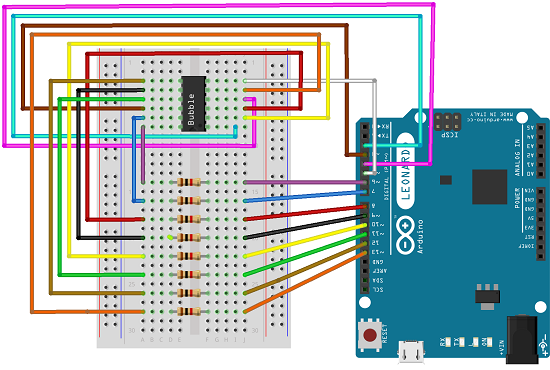
Making the circuit
Here is a sketch that shows you how to make the circuit
Coding
This sketch will count from 1 to 9999
/*

 March 6, 2014

 Spark Fun Electronics

 Nathan Seidle

 Updates by Joel Bartlett


 This code is originally based Dean Reading's Library deanreading@hotmail.com

 http://arduino.cc/playground/Main/SevenSegmentLibrary

 He didn't have a license on it so I hope he doesn't mind me

 making it public domain:

 This code is public domain but you buy me a beer if you use this

 and we meet someday (Beerware license).


 This sketch provides a simple counter example for the

 HP Bubble display from SparkFun.

 https://www.sparkfun.com/products/12710


 Pinout for HP Bubble Display:

 1:  Cathode 1

 2:  Anode E

 3:  Anode C

 4:  Cathode 3

 5:  Anode dp

 6:  Cathode 4

 7:  Anode G

 8:  Anode D

 9:  Anode F

 10: Cathode 2

 11: Anode B

 12: Anode A

 */


#include "SevSeg.h"


//Create an instance of the object.

SevSeg myDisplay;


//Create global variables

unsigned long timer;

int deciSecond = 0;


void setup()

{


  int displayType = COMMON_CATHODE;

  //Your display is either common cathode or common anode


    //This pinout is for a bubble dispaly

       //Declare what pins are connected to the GND pins (cathodes)

       int digit1 = 2; //Pin 1

       int digit2 = 3; //Pin 10

       int digit3 = 4; //Pin 4

       int digit4 = 5; //Pin 6


       //Declare what pins are connected to the segments (anodes)

       int segA = 6; //Pin 12

       int segB = 7; //Pin 11

       int segC = 8; //Pin 3

       int segD = 9; //Pin 8

       int segE = 10; //Pin 2

       int segF = 11; //Pin 9

       int segG = 12; //Pin 7

       int segDP= 13; //Pin 5


  int numberOfDigits = 4; //Do you have a 1, 2 or 4 digit display?


  myDisplay.Begin(displayType, numberOfDigits, digit1, digit2, digit3,

  digit4, segA, segB, segC, segD, segE, segF, segG, segDP);


  myDisplay.SetBrightness(100); //Set the display to 100% brightness level


  timer = millis();

}


void loop()

{

  //Example ways of displaying a decimal number

  char tempString[10]; //Used for sprintf

  sprintf(tempString, "%4d", deciSecond); //Convert deciSecond into a string that is right adjusted

  //sprintf(tempString, "%d", deciSecond); //Convert deciSecond into a string that is left adjusted

  //sprintf(tempString, "%04d", deciSecond); //Convert deciSecond into a string with leading zeros

  //sprintf(tempString, "%4d", deciSecond * -1); //Shows a negative sign infront of right adjusted number

  //sprintf(tempString, "%4X", deciSecond); //Count in HEX, right adjusted


  //Produce an output on the display

  myDisplay.DisplayString(tempString, 0); //(numberToDisplay, decimal point location)


  //Other examples

  //myDisplay.DisplayString(tempString, 0); //Display string, no decimal point

  //myDisplay.DisplayString("-23b", 3); //Display string, decimal point in third position


  //Check if 10ms has elapsed

  if (millis() - timer >= 100)

  {

    timer = millis();

    deciSecond++;

  }


  delay(5);

}
This code is from the library, if you want to use the stock code make sure you change the pins to what I have here
Bubble Display with rotary encoder
Introduction
You can add a rotary encoder to the circuit so that it counts up and down as you turn the rotary encoder.
You Will Need
- 8x 1K Ohm Resistors
- Lots of jumper wires
- The Library for the sketch, here
- A sparkfun Bubble display. You can get one here
- A rotary enoder
Making the circuit
Below is a sketch which shows you how to make the circuit.

Coding
Here is the sketch,
/*

 Pinout for HP Bubble Display:

 1:  Cathode 1

 2:  Anode E

 3:  Anode C

 4:  Cathode 3

 5:  Anode dp

 6:  Cathode 4

 7:  Anode G

 8:  Anode D

 9:  Anode F

 10: Cathode 2

 11: Anode B

 12: Anode A

 */


#include "SevSeg.h"

int changeamnt = 1;

//Create an instance of the object.

unsigned long currentTime;

unsigned long lastTime;

const int pinA = A0;

const int pinB = A1;

boolean encA;

boolean encB;

boolean lastA =false;

SevSeg myDisplay;

unsigned long timer;

int reading = 0;

int lowest = 0;

int highest = 9999;

int deciSecond = 0;


//Create global variables


void setup()

{

  pinMode(pinA, INPUT_PULLUP);

  pinMode(pinB, INPUT_PULLUP);

  currentTime = millis();

  lastTime = currentTime;


  int displayType = COMMON_CATHODE; //Your display is either common cathode or common anode


    //This pinout is for a bubble dispaly

       //Declare what pins are connected to the GND pins (cathodes)

       int digit1 = 2; //Pin 1

       int digit2 = 3; //Pin 10

       int digit3 = 4; //Pin 4

       int digit4 = 5; //Pin 6


       //Declare what pins are connected to the segments (anodes)

       int segA = 6; //Pin 12

       int segB = 7; //Pin 11

       int segC = 8; //Pin 3

       int segD = 9; //Pin 8

       int segE = 10; //Pin 2

       int segF = 11; //Pin 9

       int segG = 12; //Pin 7

       int segDP= 13; //Pin 5


  int numberOfDigits = 4; //Do you have a 1, 2 or 4 digit display?


  myDisplay.Begin(displayType, numberOfDigits, digit1, digit2, digit3,

 digit4, segA, segB, segC, segD, segE, segF, segG, segDP);


  myDisplay.SetBrightness(100); //Set the display to 100% brightness level


  timer = millis();

  Serial.begin(9600);

}


void loop()

{

  currentTime = millis();


  if(currentTime >= (lastTime + 5))

  {

    Serial.println(reading);

    char tempString[10];

    sprintf(tempString, "%4d", reading);

    myDisplay.DisplayString(tempString, 0);

    encA = digitalRead(pinA);

    encB = digitalRead(pinB);


    if ((!encA) && (lastA))

     {

       // check if B is high

      if (encB)

       {

         // clockwise

         if (reading + changeamnt <= highest)

         {

           reading = reading + changeamnt;

         }

       }

       else

       {

         // anti-clockwise

         if (reading - changeamnt >= lowest)

         {

           reading = reading - changeamnt;

         }

       }


  //Produce an output on the display

  myDisplay.DisplayString(tempString, 0);

//(numberToDisplay, decimal point location)

  //Other examples

  //myDisplay.DisplayString(tempString, 0); //Display string, no decimal point

  //myDisplay.DisplayString("-23b", 3); //Display string, decimal point in third position


  //Check if 10ms has elapsed

  if (millis() - timer >= 100)

  {

    timer = millis();

    deciSecond++;

  }


  delay(5);


     }

  }

}
This sketch will do what I described above.