Other
Arduino - LED Projects
Arduino - Buzzer Projects
Arduino - Midi Projects
Arduino - Microview
Arduino - Other Projects
Arduino - Visual Basic.NET
Arduino - Tim's Projects
Arduino - Links
![]()


Thermometer
Introduction
This page has instructions for the most basic of thermometers. It's just a temperature sensor here. Bear in mind though, that unlocks the potential for some more interesting.
You Will Need
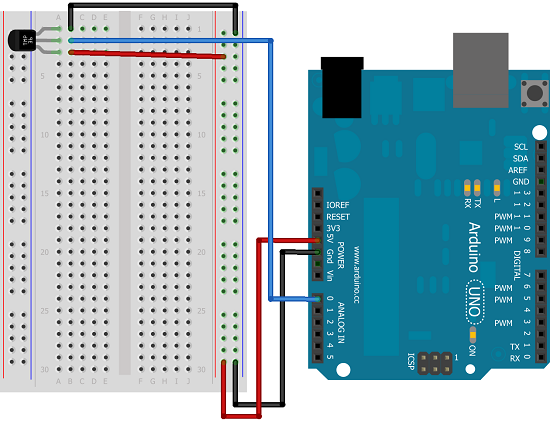
- 1 x TMP36 Temperature Sensor
- Jumper Wires
The TMP36 is helpfully almost exactly like a transistor, a part you absolutely don't want to use in this circuit. If you look very carefully at the part, you should see the letters TMP on the front side. If you do accidentally plug in the transistor in its place, it will get hot. Common sense tells you to remove the USB cable, wait for it to cool and then try harder to put the correct part in.
Making The Circuit
Programming The Arduino
int tempPin = 0;


void setup()

{

  Serial.begin(9600);

}


void loop()

{

  float voltage;

  float degreesC;

  voltage = analogRead(tempPin) * (5.0/1024.0);

  degreesC = (voltage - 0.5) * 100.0;

  Serial.print("Voltage: ");

  Serial.print(voltage);

  Serial.print("  Deg C: ");

  Serial.println(degreesC);

  delay(1000);

}
The temperature sensor gives a voltage reading according to its temperature. The values for temperature and degress are stored as float. That is the data type for decimal (floating point) numbers. The formulas for conversion come from the datasheet for the component. In particular, this graph.
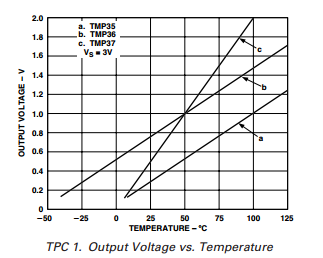
First, the analogRead() function gives us a value from 0 - 1023. Based on 5V input, we need to multiply our reading by 5/1024 to get the actual reading. Next, look carefully at the graph (line b). When the temperature is at 0°C, the voltage is at 0.5V. We subtract this offset first. The graph shows the temperature to be 50°C at 1V and 100°C at 1.5V. It's a straight line going up 100°C for every volt - so we multiply by 100.
The rest of the code is simply output of the information to the serial monitor, which you can open up through the Arduino IDE.
Challenge
Some output is needed for this to be a useful thermometer. An LCD display or 4 digit 7 segment LED would be nice. An alternative would be some LEDs. If you look at the page with the shift register and LEDs, you can just about fit 8 LEDs, a shift register and the temperature sensor on a breadboard. Print yourself out a scale to lay down next to the LEDs (breadboard pins are 2.54mm apart). If you work on 2° per LED, you can fit in a 16° range of temperatures. Light the LEDs up the scale to indicate the temperature.