Other
Arduino - LED Projects
Arduino - Buzzer Projects
Arduino - Midi Projects
Arduino - Microview
Arduino - Other Projects
Arduino - Visual Basic.NET
Arduino - Tim's Projects
Arduino - Links
![]()


Game Controller
Introduction
This project is specific to the Leonardo, Esplora and other Arduino boards that can emulate the mouse and keyboard. The purpose is to emulate key presses on the computer in response to input on the Arduino.
You Will Need
- 3 x Pushbutton
- 3 x 10K Ohm Resistors
- Jumper Wires
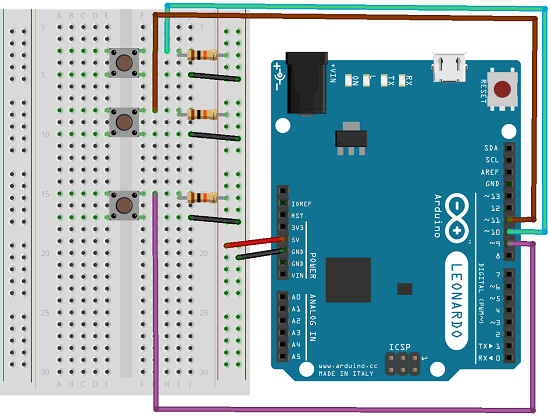
Making The Circuit
Just 3 pushbuttons with pull-up resistors.
Programming The Arduino
The sketch emulates the pressing of 3 different keys, each one associated with a button in the circuit. The left and right buttons stay pressed until released. The fire button is emulated using a different statement, equivalent to a press and release of the keyboard key.
int lbutton = 10;

int rbutton =11;

int fire = 9;


void setup()

{

pinMode(lbutton, INPUT);

pinMode(rbutton, INPUT);

pinMode(fire, INPUT);

Keyboard.begin();

}


void loop()

{

if (digitalRead(lbutton)==LOW)

{

  Keyboard.press('a');

}

else

{

   Keyboard.release('a');

}

if (digitalRead(rbutton)==LOW)

{

  Keyboard.press('d');

}

else

{

   Keyboard.release('d');

}

if (digitalRead(fire)==LOW)

{

  Keyboard.print('s');

}

delay(10);

}
To test this, you can make a quick Scratch game. Using example 2 on this page, you will need to amend the scripts so that the 'a' and 'd' keys are used for left and right.
Challenges
There are so many things you could do with the keyboard and mouse libraries. The Keyboard.print statement allows you to send a string of characters. You could easily make buttons that write out your full name, email address, launch software, type URLs. Use your imagination and come up with something interesting.
You could also try some different components for your inputs. Potentiometers, joysticks, photoresistors, ultrasound, infrared are all possible ways of triggering a mouse or keyboard event from your circuit.