Other
Arduino - LED Projects
Arduino - Buzzer Projects
Arduino - Midi Projects
Arduino - Microview
Arduino - Other Projects
Arduino - Visual Basic.NET
Arduino - Tim's Projects
Arduino - Links
![]()


Playing A Tune Via MIDI
Introduction
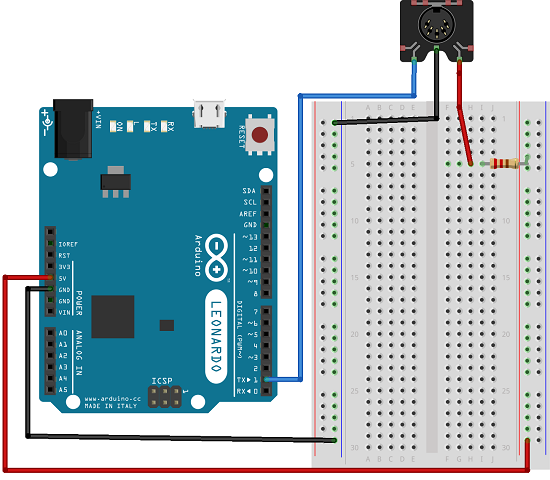
This project demonstrates the basic principle behind playing a tune over MIDI. It uses exactly the same setup as the previous MIDI project.
You Will Need
- 1 x 220 Ohm Resistor
- 1 x MIDI Jack
- Jumper Wires
- USB MIDI Adapter
Making The Circuit
Programming The Arduino
int beats[] = {1, 1, 1, 1, 1, 1, 2, 1, 1, 1, 1, 1, 1, 2 };

int tunelength = 14;

int tune[] = {0x3C, 0x3C, 0x43, 0x43, 0x45, 0x45, 0x43, 0x41, 0x41, 0x40, 0x40, 0x3E, 0x3E, 0x3C};

int tempo = 300;


void setup() {

  delay(2000);

  Serial.begin(31250);

}


void loop() {

  for (int i =0;i<tunelength;i++)

  {

    noteOn(0x90, tune[i], 0x45);

    delay(beats[i]*tempo);

    noteOn(0x90, tune[i], 0x00);

    delay(tempo/10);

  }

  while(true){

  }

}


void noteOn(int cmd, int pitch, int velocity) {

  Serial.write(cmd);

  Serial.write(pitch);

  Serial.write(velocity);

}
If you compare this to the code used for playing a tune on a buzzer, you can see that this is very similar. The only thing not catered for is a rest. Look at the buzzer version and you should be able to work out how to do that.
MIDI Note Table
| Musical Note | Hex Value |
|---|---|
| C(-1) | 00 |
| C#(-1) | 01 |
| D(-1) | 02 |
| D#(-1) | 03 |
| E(-1) | 04 |
| F(-1) | 05 |
| F#(-1) | 06 |
| G(-1) | 07 |
| G#(-1) | 08 |
| A(-1) | 09 |
| A#(-1) | 0A |
| B(-1) | 0B |
| C0 | 0C |
| C#0 | 0D |
| D0 | 0E |
| D#0 | 0F |
| E0 | 10 |
| F0 | 11 |
| F#0 | 12 |
| G0 | 13 |
| G#0 | 14 |
| A0 | 15 |
| A#0 | 16 |
| B0 | 17 |
| C1 | 18 |
| C#1 | 19 |
| D1 | 1A |
| D#1 | 1B |
| E1 | 1C |
| F1 | 1D |
| F#1 | 1E |
| G1 | 1F |
| G#1 | 20 |
| A1 | 21 |
| A#1 | 22 |
| B1 | 23 |
| C2 | 24 |
| C#2 | 25 |
| D2 | 26 |
| D#2 | 27 |
| E2 | 28 |
| F2 | 29 |
| F#2 | 2A |
| G2 | 2B |
| G#2 | 2C |
| A2 | 2D |
| A#2 | 2E |
| B2 | 2F |
| C3 | 30 |
| C#3 | 31 |
| D3 | 32 |
| D#3 | 33 |
| E3 | 34 |
| F3 | 35 |
| F#3 | 36 |
| G3 | 37 |
| G#3 | 38 |
| A3 | 39 |
| A#3 | 3A |
| B3 | 3B |
| C4 | 3C |
| C#4 | 3D |
| D4 | 3E |
| D#4 | 3F |
| E4 | 40 |
| F4 | 41 |
| F#4 | 42 |
| G4 | 43 |
| G#4 | 44 |
| A4 | 45 |
| A#4 | 46 |
| B4 | 47 |
| C5 | 48 |
| C#5 | 49 |
| D5 | 4A |
| D#5 | 4B |
| E5 | 4C |
| F5 | 4D |
| F#5 | 4E |
| G5 | 4F |
| G#5 | 50 |
| A5 | 51 |
| A#5 | 52 |
| B5 | 53 |
| C6 | 54 |
| C#6 | 55 |
| D6 | 56 |
| D#6 | 57 |
| E6 | 58 |
| F6 | 59 |
| F#6 | 5A |
| G6 | 5B |
| G#6 | 5C |
| A6 | 5D |
| A#6 | 5E |
| B6 | 5F |
| C6 | 60 |
| C#7 | 61 |
| D7 | 62 |
| D#7 | 63 |
| E7 | 64 |
| F7 | 65 |
| F#7 | 66 |
| G7 | 67 |
| G#7 | 68 |
| A7 | 69 |
| A#7 | 6A |
| B7 | 6B |
| C8 | 6C |
| C#8 | 6D |
| D8 | 6E |
| D#8 | 6F |
| E8 | 70 |
| F8 | 71 |
| F#8 | 72 |
| G8 | 73 |
| G#8 | 74 |
| A8 | 75 |
| A#8 | 76 |
| B8 | 77 |
| C9 | 78 |
| C#9 | 79 |
| D9 | 7A |
| D#9 | 7B |
| E9 | 7C |
| F9 | 7D |
| F#9 | 7E |
| G9 | 7F |