Other
Arduino - LED Projects
Arduino - Buzzer Projects
Arduino - Midi Projects
Arduino - Microview
Arduino - Other Projects
Arduino - Visual Basic.NET
Arduino - Tim's Projects
Arduino - Links
![]()


Making Music With MIDI
Introduction
The term music is being used in its loosest sense for this project. An ultrasonic range finder is used to select notes to play through a MIDI cable.
You Will Need
- 1 x 220 Ohm Resistor
- 1 x MIDI Jack
- 1x SRF05 Ultrasound Sensor
- Jumper Wires
- USB MIDI Adapter
Making The Circuit
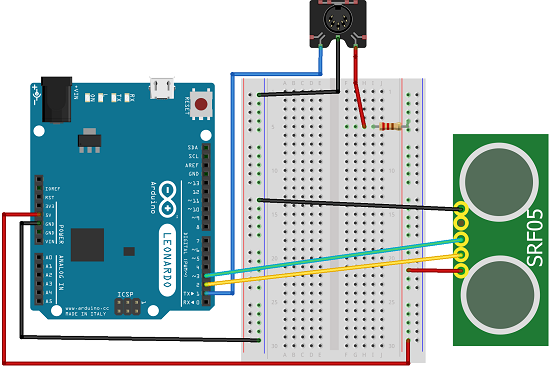
Programming The Arduino
Buried in among this code are the details for using the ultrasound sensor. The value obtained from this is converted into a value for a MIDI note.
You will also see how you can go about changing the instrument being used.
#define ECHOPIN 2

#define TRIGPIN 3


int lastnote=0;


void setup() {

  pinMode(ECHOPIN, INPUT);

  pinMode(TRIGPIN, OUTPUT);

  Serial.begin(31250);

  // chooses the synth voice

  programChange(0xc0, 0x36);

  delay(1000);

}


void loop() {

  digitalWrite(TRIGPIN, LOW);

  delayMicroseconds(2);

  digitalWrite(TRIGPIN, HIGH);

  delayMicroseconds(10);

  digitalWrite(TRIGPIN, LOW);

  int distance = pulseIn(ECHOPIN, HIGH);

  distance= distance/58;

  distance = constrain(distance,10,100);

  distance = map(distance,10,100,90,60);

  if (distance!=lastnote)

  {

    noteOn(0x90, lastnote, 0x00);

    noteOn(0x90, distance, 0x45);

    lastnote = distance;

  }

  delay(10);


}


void noteOn(int cmd, int pitch, int velocity) {

  Serial.write(cmd);

  Serial.write(pitch);

  Serial.write(velocity);

}


void programChange(int cmd, int data1) {

  Serial.write(cmd);

  Serial.write(data1);

}
Challenges
Clearly, this sounds pretty dreadful. The trick to making this kind of thing work is to consider how the values obtained from the sensor (or any input you choose to replace it with) are converted into notes. Get this right and you have something a little more interesting.