Other
Arduino - LED Projects
Arduino - Buzzer Projects
Arduino - Midi Projects
Arduino - Microview
Arduino - Other Projects
Arduino - Visual Basic.NET
Arduino - Tim's Projects
Arduino - Links
![]()


Morse Code - Encoder
Introduction
If you made the first circuit, you may have quickly come up against the major flaw - you have to know Morse Code to use it. This project uses a simpler version of the same circuit and allows you to enter text to be encoded into Morse Code.
You Will Need
- 1 x Piezo Buzzer
- 1 x LED
- 1 x 330 Ohm Resistor
- Jumper Wires
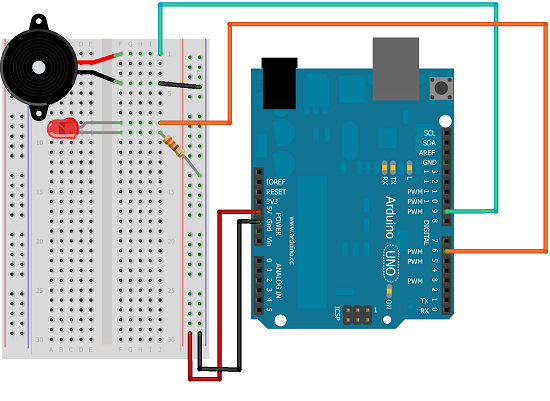
Making The Circuit
This is a pretty simple circuit to set up. The piezo buzzer has a marking on the underside showing which of the pins is positive.
Programming The Arduino
/*

 Piezo Element Morse Code Sketch


 */


const int buzzerPin = 9;

const int ledPin = 7;

// tone frequency C

const int tonefreq = 523;


// constants for tone and rest durations

const int dotlength = 100;

const int dashlength = dotlength * 3;

// inter-element gap - between each dot or dash of a letter

const int inter = dotlength;

// letter gap is 3 dots - the inter gap is always added - so this is one fewer

const int lgap = dotlength * 2; // inter-letter gap

// word gap is 7 dots - with letter and inter gap already counted, this is -1

const int wgap = dotlength * 4; //inter-word gap


void setup()

{

  pinMode(buzzerPin, OUTPUT);

  pinMode(ledPin, OUTPUT);

  Serial.begin(9600);

}


void loop()

{

  char thischar;

  if (Serial.available())

  {

    // read a single character

    thischar = Serial.read();

    if (thischar>='a' && thischar<='z')

    {

      // convert to upper case

      thischar = thischar -32;

    }

    // swap for a space if not in A-Z

    if(thischar<65 || thischar>90)

    {

      thischar=' ';

    }

    soundLetter(thischar);

    delay(lgap);

  }

}


void dot()

{

  // play a dot

  tone(buzzerPin, tonefreq);

  // LED

  digitalWrite(ledPin, HIGH);

  delay(dotlength);

  noTone(buzzerPin);

  // LED

  digitalWrite(ledPin, LOW);

  delay(inter);

}


void dash()

{

  // play a dash

  tone(buzzerPin, tonefreq);

  // LED

  digitalWrite(ledPin, HIGH);

  delay(dashlength);

  noTone(buzzerPin);

  // LED

  digitalWrite(ledPin, LOW);

  delay(inter);

}


void soundLetter(char letter)

{

  // letters are in order of frequency

  switch(letter)

  {

  case 'E':

    dot();

    return;

  case 'T':

    dash();

    return;

  case 'A':

    dot();

    dash();

    return;

  case 'O':

    dash();

    dash();

    dash();

    return;

  case 'I':

    dot();

    dot();

    return;

  case 'N':

    dash();

    dot();

    return;

  case 'S':

    dot();

    dot();

    dot();

    return;

  case 'H':

    dot();

    dot();

    dot();

    dot();

    return;

  case 'R':

    dot();

    dash();

    dot();

    return;

  case 'D':

    dash();

    dot();

    dot();

    return;

  case 'L':

    dot();

    dash();

    dot();

    dot();

    return;

  case 'C':

    dash();

    dot();

    dash();

    dot();

    return;

  case 'U':

    dot();

    dot();

    dash();

    return;

  case 'M':

    dash();

    dash();

    return;

  case 'W':

    dot();

    dash();

    dash();

    return;

  case 'F':

    dot();

    dot();

    dash();

    dot();

    return;

  case 'G':

    dash();

    dash();

    dot();

    return;

  case 'Y':

    dash();

    dot();

    dash();

    dash();

    return;

  case 'P':

    dot();

    dash();

    dash();

    dot();

    return;

  case 'B':

    dash();

    dot();

    dot();

    dot();

    return;

  case 'V':

    dot();

    dot();

    dot();

    dash();

    return;

  case 'K':

    dash();

    dot();

    dash();

    return;

  case 'J':

    dot();

    dash();

    dash();

    dash();

    return;

  case 'X':

    dash();

    dot();

    dot();

    dash();

    return;

  case 'Q':

    dash();

    dash();

    dot();

    dash();

    return;

  case 'Z':

    dash();

    dash();

    dot();

    dot();

    return;

  case ' ':

    delay(wgap);

    return;

  }

}
There is quite a lot of code here. The constants at the start define the pins, the tone we are using and the gaps between elements of the code. In the setup procedure, the pinmodes are defined and Serial communication is started.
The dot() and dash() procedures are used to make it clearer when writing out the code.
The soundLetter() procedure converts a given character to its Morse code equivalent. The order of the cases is chosen to match the frequency of letters in written English.
In the main loop, any lower case characters are converted to upper case. Anything else is treated as a space.
To use this properly, open up the Serial Monitor (CTRL + SHIFT + M). Set the Baud Rate to 9600, type in your message and press SEND.
Challenge
This program is incomplete. There are codes for digits and for punctuation. You could add those. You may also want to check the performance of the circuit against an online converter or mobile application.