Other
Arduino - LED Projects
Arduino - Buzzer Projects
Arduino - Midi Projects
Arduino - Microview
Arduino - Other Projects
Arduino - Visual Basic.NET
Arduino - Tim's Projects
Arduino - Links
![]()


Fading An LED
Introduction
This page shows an adaptation of the code for the single LED and deals with how to display the LED with differing levels of brightness.
You Will Need
- 1 x LED
- 1 x 330 Ohm Resistor
- Jumper Wires
NB Different LEDs require different resistors. The ones that come in the Sparkfun Inventor's Kit are 5mm LEDs which will need a 330ohm resistor to ensure the right kind of brightness and to look after the LED. Different LEDs may work better with a different resistor. The datasheet or specification for the particular LED you are using will normally state the minimum and maximum currents and voltages needed to power the LED without burning it out. When you buy packs of LEDs, they often come with the resistors that are most suitable for them.
Making The Circuit
The diagram shows how the circuit should look.
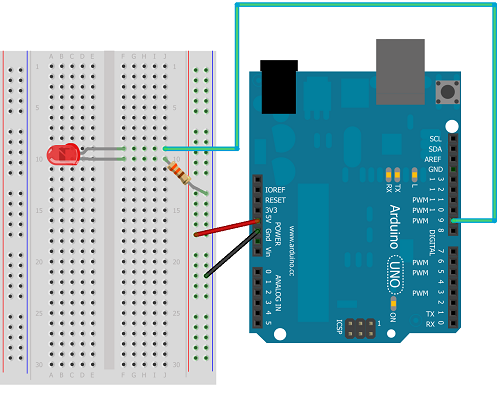
The only difference between this and the first circuit is that we connect the anode of the LED to pin 9.
To achieve the effect of fading, we need to be able to send different voltages to the LED. We can do this with the PWM pins, marked with a - on the LED board. These pins are 3, 5, 6, 9, 10, 11.
Programming The Arduino
Here is the code required to make the LED fade in and out with a 1 second delay when it has faded out.
int ledPin = 9;


void setup()

{


}


void loop()

{

  //fade on

  for (int brightness=0; brightness<=255; brightness +=5)

  {

    analogWrite(ledPin, brightness);

    delay(25);

  }

  //fade out

  for (int brightness=255; brightness>=0; brightness -=5)

  {

    analogWrite(ledPin, brightness);

    delay(25);

  }

  // stay off for a second

  delay(1000);

}
There are a few things to notice about this sketch. Firstly, there is nothing in the setup procedure. This is because we are using the analogWrite statement to create analogue-like output from the digital pin. The value we write has to be between 0 and 255 for it to be effective.
The Arduino does not actually use analogue to achieve this effect. The effect is created by pulse-width modulation. In principle this means varying the amount of time the high and low voltages are sent through the pin. You can use your favourite web search engine to find out more about the technique.
This sketch illustrates how to use a for loop in the Arduino language (based primarily on the C programming language).
You can also see examples of comments in this sketch. We use comments to help make our code easier to understand. They are ignored by the compiler so do not affect the overall size of the program.