Raspberry Pi Pico
MicroPython - Basics
MicroPython - More Involved
MicroPython - Pico W
MicroPython - micro:bit
MicroPython - Projects
CircuitPython - Some Basics
CircuitPython - HID Adventures
CircuitPython - Experiments
Other Pages
![]()


Raspberry Pi Pico
Sierpiński Triangle
This project began when I was experimenting with the Pimoroni breakout garden accessory and the 1.3" SPI Colour Square LCD (240x240) Breakout that you can use with it. For this one, I finally gave in and downloaded the Pimoroni MicroPython. I was too keen to do some drawing on the screen to get locked into writing my own version. One day, perhaps.
I decided to have a go at drawing a Sierpiński Triangle on the display using the 'Chaos Game' method. The triangle is a well known pattern that you can read about on http://en.wikipedia.org/wiki/Sierpinski_triangle.
One way to construct the image is to start with an equilateral triangle. Divide that triangle into 4 smaller equilateral triangles and remove one of them like so,

This process is continued with the 3 remaining smaller triangles and then with the triangles that remain after that and so on until you get something like,

The Chaos Game construction method means that we start from a randomly chosen spot. We then choose one of the triangle's vertices at random and draw a dot halfway between that vertex and our current spot. We then plot another point halfway between that dot and a randomly chosen vertex. We repeat this process many times. Despite the randomness, this process always recreates the pattern you can get by removing triangles.
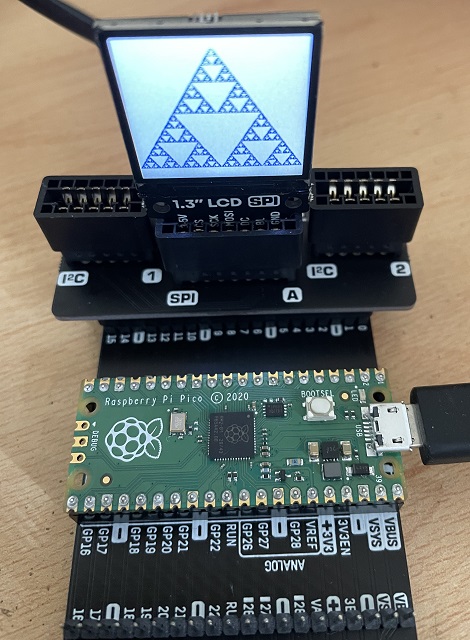
This first photograph shows the program I wrote running on the breakout garden version of the display. I am also using Pimoroni's Omnibus Dual Expander and the Pico Breakout Garden Pack.
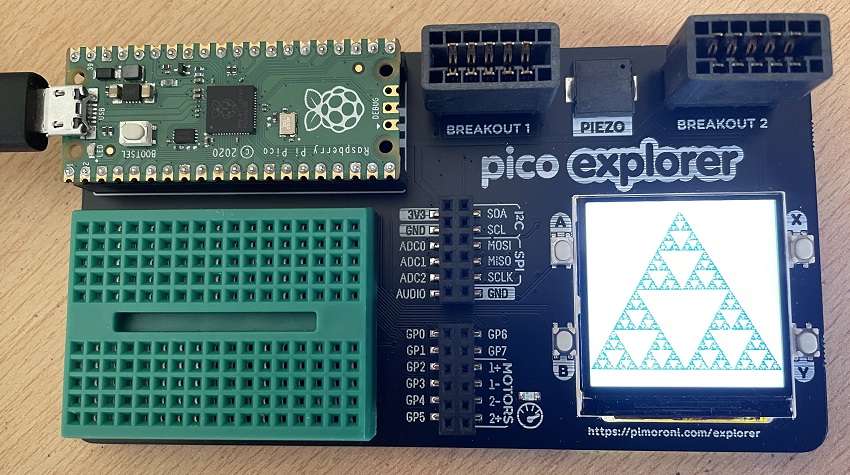
The second photograph shows the same program running on the Pico Explorer Base. This is another fantastic Pimoroni product with loads of features. One of those is having the exact same display connected up exactly as it is on the breakout garden base. As you can see, you also get some pushbuttons, a buzzer, a motor driver, 2 i2c breakout adapters and some pins broken out to female headers for use with the mini breadboard.
Here is the program code I used. You can comment out the line that draws the white rectangle if you want this to be drawn on a dark background. I worked out the coordinates for the vertices of my triangle. Calculating the area of the triangle suggested that 20000 iterations was about as many as was worth doing. One thing to note here is that the sides of the triangle are not actually being drawn. Apart from the background rectangle, this is all a series of individual pixels being set. The display is updated every 50 iterations and a small delay is used to have the pattern 'appear'.
from time import sleep
from random import randint
from breakout_colourlcd240x240 import BreakoutColourLCD240x240

width = BreakoutColourLCD240x240.WIDTH
height = BreakoutColourLCD240x240.HEIGHT

display_buffer = bytearray(width * height * 2)
display = BreakoutColourLCD240x240(display_buffer)

display.set_backlight(1.0)

# fill white
display.set_pen(255, 255, 255)
display.rectangle(0, 0, 240, 240)

display.set_pen(0, 0, 255)

def get_point(x, y):
    p = randint(0, 2)
    newx = 0
    newy = 0
    if p == 0:
        if x < 119:
            newx = x + ((119 - x) // 2)
        else:
            newx = x - ((x - 119) // 2)
        newy = y - ((y - 12) // 2)
    elif p == 1:
        newx = x - (x // 2)
        newy = y + ((219 - y) // 2)
    else:
        newx = x + ((239 - x) // 2)
        newy = y + ((219 - y) // 2)
    return newx, newy

x, y = randint(0, 219), randint(12, 219)

for i in range(20000):
    x, y = get_point(x, y)
    display.pixel(x, y)
    if i % 50 == 0:
        display.update()
        sleep(0.005)
display.update()