Raspberry Pi Pico
MicroPython - Basics
MicroPython - More Involved
MicroPython - Pico W
MicroPython - micro:bit
MicroPython - Projects
CircuitPython - Some Basics
CircuitPython - HID Adventures
CircuitPython - Experiments
Other Pages
![]()


Raspberry Pi Pico
APA102 (Dotstar) RGB LEDs
APA102 LEDs are a little like Neopixels in that they are chainable RGB LEDs and that they are really bright. You control them over SPI, which gives you plenty of choice of pins on the Pico and a quick way to update the colours of the LEDs in the chain, either indiviudally or all at once.
The photograph shows a Sparkfun Lumenati 3x3 board. Lumenati is the name of a series of different boards that Sparkfun make with APA102C LEDs. This one is (almost) convenient for breadboard use. I use the word 'almost' because the size of this board precludes simple mounting on a breadboard as it would cover the space for jumper wires. That said, I like the little matrix you get.
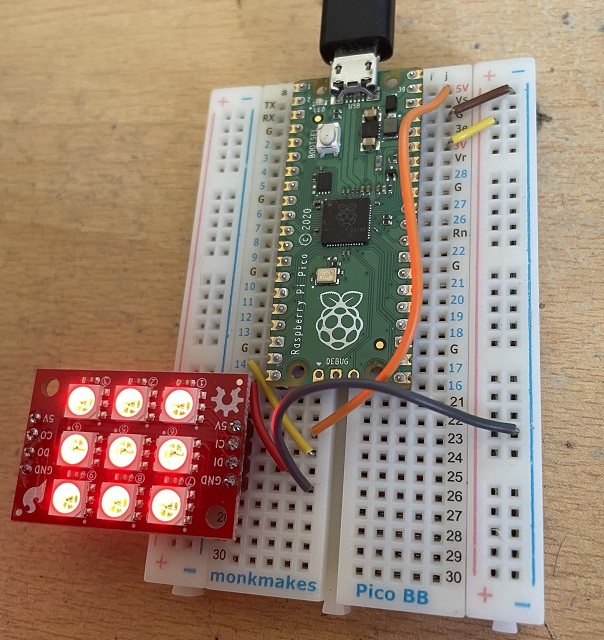
I only have 9 LEDs here and I have connected the 5V line to VBUS. That is going to draw power from the 5V USB connection rather than the regulated 3V3 Pico supply. If you increase the number of LEDs because you are using a strip or matrix board with more LEDs, you will need a separate power supply or a board like Pimoroni's Plasma 2040. When you connect a separate power supply, make sure to not go over 5V (3xAA batteries is cool) and remember to connect the GND of the battery supply to the GND on the Pico to make a common ground in the circuit.
In my photograph, you can make out the markings on connections for the board. 5V goes to VBUS. GND goes to GND. The other two pins are SPI pins. You need to connect to SCK and TX pins for one of the two SPI peripherals. CI means 'Clock In' and goes to GP14 in my circuit. DI means 'Data In' and goes to GP15 in my circuit. The pins on the opposite side of the board are 'out' connections that I could feed into the 'in' connections for another board or strip of LEDs.
I wrote a simple library for controlling the APA102 strips.
class DotStar:
    def __init__(self, spi, n):
        self.spi = spi
        self.n = n
        self.buffer = [(255,0,0,0)] * self.n
        x = (self.n // 2) + self.n % 2
        self.footer = bytes([255] * x)

    def clear(self):
        for i in range(self.n):
            self.buffer[i] = (255,0,0,0)
        self.show()

    def set_pixel(self, p, r, g, b):
        self.buffer[p] = (255, b, g, r)

    def set_all(self, r, g, b):
        for i in range(self.n):
            self.buffer[i] = (255, b, g, r)

    def show(self):
        self.spi.write(b'\x00\x00\x00\x00')
        for i in range(self.n):
            self.spi.write(bytes(self.buffer[i]))
        self.spi.write(self.footer)
You might change or add to the library depending on the kind of APA102 LEDs you have and how they are presented. For example, the ones I had here have the colours in BGR order. Well, all 6 possible permutations of the order seem to exist in APA102 packages. If yours are in a different order, make a quick change to the library. Although I have removed it here, I added an extra method for setting pixels by their xy coordinates in the matrix. That might prove useful if they are set up that way for you.
Here is some test code that I used.
from machine import SPI,Pin
from time import sleep
from dotstar import DotStar

spi = SPI(1, sck=Pin(14), mosi=Pin(15))

d = DotStar(spi, 9)

for i in range(9):
    d.set_pixel(i, 128, 0, 0)
    d.show()
    sleep(0.2)

sleep(1)
d.clear()
sleep(1)

d.set_all(255, 0, 0)
d.show()
sleep(1)

d.set_all(0, 255, 0)
d.show()
sleep(1)

d.set_all(0, 0, 255)
d.show()
sleep(1)

d.clear()
for i in range(256):
    d.set_all(i,0,0)
    d.show()
    sleep(0.05)

sleep(1)
d.clear()