Raspberry Pi Pico
MicroPython - Basics
MicroPython - More Involved
MicroPython - Pico W
MicroPython - micro:bit
MicroPython - Projects
CircuitPython - Some Basics
CircuitPython - HID Adventures
CircuitPython - Experiments
Other Pages
![]()


Raspberry Pi Pico
Cube:Bit RGB Cube
The Cube:Bit is an approach to building RGB LED cuboids produced by 4tronix. The cuboids are built of 3x3, 4x4 or 5x5 layers that can be stacked on top of one another. There is an LED on the bottom as well as the top of each layer. Each addressable pixel is really two RGB LEDs. The LEDs are compatible with Neopixel code.
I orginally got this to use with the micro:bit and hadn't taken it out for a while. I thought I'd give it a quick run with some CircuitPython and I am glad I did. It's a high quality product.
When you have lots of Neopixels, you need to consider power. The photograph below shows the cube mounted on a base that 4tronix which has a wide variety of connectors for different microcontrollers. I have one 'plane' lit up here and at quite low brightness. When I am working with Neopixels, I turn the brightness right down until I have finished to avoid getting dazzled all of the time.
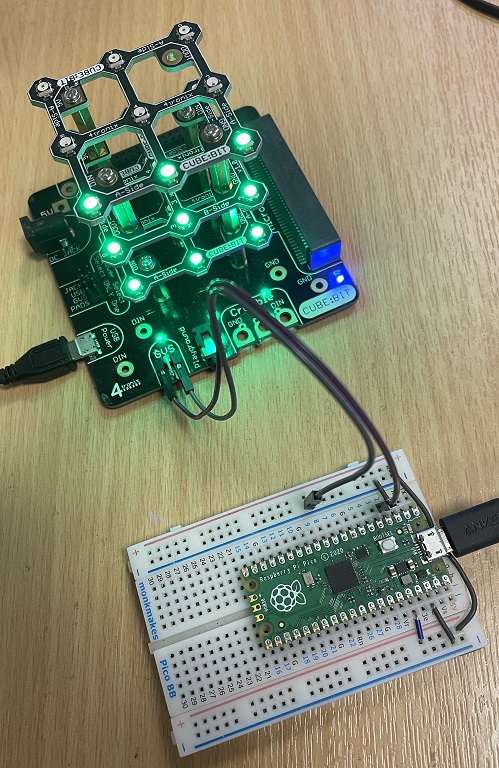
You can still pick these up from 4tronix though it looks like you have to preorder. The 3x3 slices are £6 each, the base is £10. I use a Raspberry Pi power supply on the USB connector. The jumpers you can see in the picture are going from GP2 on the Pico to the DIN pin on the GVS (grounds, volts, signal) header. I have also connected GND on the Pico to the GND on the GVS connector to make a common ground connection for the circuit. The DIN and GND pins on the GVS header still work when you set the jumper on the base to use USB for the power.
I started off by converting my micro:bit library to CircuitPython. I've tried to make this for all sizes of cube (3, 4 and 5 are available). I only have the 3x3x3 cube so I haven't been able to test for anything I missed. It does work for 3x3x3 though. I saved this as cube.py in my lib folder.
import neopixel
import board

class Cbit:
    def __init__(self, csize, pixel_pin):
        self._s = csize
        self._n = csize**3
        self._b = 40
        self._p = neopixel.NeoPixel(pixel_pin, self._n, brightness = 1.0, auto_write=False, pixel_order=neopixel.GRB)
        self.set_all((0, 0, 0))
        self.show()

    def _dim(self, rgb):
        d = self._b/255
        return tuple([int(i * d) for i in rgb])

    def set_brightness(self,b):
        self._b = b

    def show(self):
        self._p.show()

    def clear(self):
        self.set_all((0,0,0))
        self.show()

    def set_all(self,rgb):
        for i in range(self._n):
            self._p[i] = self._dim(rgb)

    def set_pixel(self,n,rgb):
        self._p[n] = self._dim(rgb)

    def _map(self,x,y,z):
        s = self._s
        q = 0
        if z % 2 == 0:
            if y % 2 == 0:
                q = (y * s) + x
            else:
                q = (y * s) + s - 1 - x
        else:
            if s % 2 == 0:
                y = s - y - 1
            else:
                if x % 2 == 0:
                    q = (s * (s - x)) - 1 - y
                else:
                    q = ((s - 1 - x) * s) + y
        return (z * s * s) + q

    def setxyz(self,x,y,z,rgb):
        p = self._map(x,y,z)
        self._p[p] = self._dim(rgb)

    def set_plane(self,p,a, rgb):
        # a = 0  xy, 1 xz, 2  yz
        pln = self._get_plane(p,a)
        for n in pln:
            self._p[n] = self._dim(rgb)

    def _get_plane(self,p,a):
        pl = []
        s = self._s
        for n1 in range(s):
            for n2 in range(s):
                if a==0:
                    pl.append(self._map(n1,n2,p))
                elif a==1:
                    pl.append(self._map(n1,p,n2))
                else:
                    pl.append(self._map(p,n1,n2))
        return pl

    def rotate_plane(self,p,a):
        s = self._s
        pl = self._get_plane(p,a)
        pl3 = [pl[i * s:(i + 1) * s] for i in range((len(pl) + s - 1) // s )]
        tpl3 = [[pl3[j][i] for j in range(len(pl3))] for i in range(len(pl3[0]))]
        rpl3 = [i[::-1] for i in tpl3]
        fin = [i for j in rpl3 for i in j]
        cols = [self._p[i] for i in fin]
        for i in range(len(pl)):
            self._p[pl[i]] = cols[i]

    def rotate_cube(self,a):
        for i in range(self._s):
            self.rotate_plane(i,a)
Here is some test code to save as your code.py file. I have tried to test out all of the main methods of the library class.
from time import sleep
from cube import Cbit
import board

c = Cbit(3, board.GP2)

# set all
c.set_all((255,0,0))
c.show()
sleep(1)
c.set_all((0,255,0))
c.show()
sleep(1)
c.set_all((0,0,255))
c.show()
sleep(1)
c.clear()
sleep(1)

# light one at a time using 3D coords
for z in range(3):
    for y in range(3):
        for x in range(3):
            c.setxyz(x,y,z,(0,0,255))
            c.show()
            sleep(0.5)

c.clear()
sleep(0.5)

# light up some planes
for axis in range(3):
    for plane in range(3):
        c.set_plane(plane, axis, (0,255,0))
        c.show()
        sleep(1)
        c.clear()


# make a 3d pattern
c.set_all((0,255,0))
c.setxyz(1,1,1,(255,0,0))
c.setxyz(1,1,2,(255,0,0))
c.setxyz(1,1,0,(255,0,0))
c.show()

# the rotating cube
red = (255,0,0)
yellow = (128,128,0)
c.set_all(yellow)
for i in range(8):
    c.setxyz(i >> 2 & 1,i >> 1 & 1,i & 1,red)

c.show()
sleep(0.5)

while True:
    for a in range(3):
        for i in range(4):
            c.rotate_cube(a)
            c.show()
            sleep(0.5)
There is a lot you can do with the cube. With some time and some creativity, you can make all sorts of patterns. You can even turn it into a 3D puzzle of sorts (find the micro:bit page I did on this component and you can see what I mean).