Visual Basic 2005 Guide
Making Dialog Boxes
Introduction
So far, all of the focus in our application is on the parent and child forms. Some useful features cannot be implemented without the user supplying some key information at runtime. The best way to do this is probably through the use of a series of dialog boxes.
We are going to make a dialog box to help us to insert hyperlinks into our web documents.
Step 1- Create The Dialog Box
Go to the project menu and choose to add a new form. Select to add a dialog box and name it frmLink. Check out the code that has been generated by the IDE for the OK and Cancel buttons.
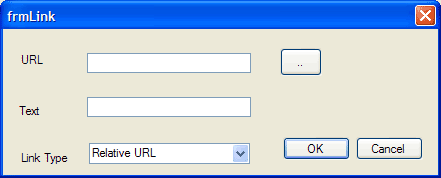
Create a form that looks like the screenshot below,

The text boxes are named, txtURL and txtLinkText. The button at the top is called btnAddLink and the combox box has been called cmbType and has the following items added at design time,
- Relative URL
- http://
- mailto:
Our form will start up with the first option (relative URL) shown. To do this, double click on the form to bring up the Form Load event. Add the following line of code,
cmbType.SelectedIndex = 0
Now to make it so that the combo box helps the user. Double click the combo box to bring up the SelectedIndexChanged event handler. Add the following code,
Select Case cmbType.SelectedIndex

   Case 0

      txtURL.Text = ""

      txtURL.Focus()

   Case 1

      txtURL.Text = "http://"

      txtURL.Focus()

      txtURL.SelectionStart = Len(txtURL.Text)

   Case 2

      txtURL.Text = "mailto:"

      txtURL.Focus()

      txtURL.SelectionStart = Len(txtURL.Text)

End Select
Finally, we need a public variable to store the path of the document we are linking from (when we are inserting a relative path). Add the following line of code to the general section of the code window,
Public myBasePath As String
Step 2 - Connecting The Dialog Box To The Application
Create a new menu item for inserting a hyperlink. Bring up the event handler code for this item and start with the following code,
Dim myForm As New frmLink

If ActiveMdiChild Is Nothing Then Exit Sub

Dim uFile As String

uFile = ActiveMdiChild.Text

Dim theBox As New RichTextBox

theBox = ActiveMdiChild.Controls(0)

Dim strText As String

strText = theBox.SelectedText

myForm.txtLinkText.Text = strText

If Microsoft.VisualBasic.Left(uFile, 8) <> "Document" Then

   myForm.myBasePath = ActiveMdiChild.Text

Else

   MsgBox("You must save the document before you can link from it")

   Exit Sub

End If

If myForm.ShowDialog() = Windows.Forms.DialogResult.OK Then

   Dim strLink As String

   strLink = "<a href='" + myForm.txtURL.Text + "'>" + myForm.txtLinkText.Text + "</a>"

   theBox.SelectedText = strLink

End If
Step 3 - Adding The Relative URL Functionality
The dialog box can only be loaded when the active child window is a file that has been saved. This allows us to calculate the path between the source file (the document being edited) and another saved document on the user's file system.
We created a button on the dialog box form. Go back to the dialog box and double click the button. Add the following code,
Dim OpenFileDialog As New OpenFileDialog

OpenFileDialog.InitialDirectory = My.Computer.FileSystem.SpecialDirectories.MyDocuments

OpenFileDialog.Filter = "Web Files (*.htm)|*.htm|All Files (*.*)|*.*"

If (OpenFileDialog.ShowDialog(Me) = System.Windows.Forms.DialogResult.OK) Then

   Dim FileName As String = OpenFileDialog.FileName

   Dim myBaseURI As New Uri(myBasePath), myTargetPath As New Uri(OpenFileDialog.FileName)

   txtURL.Text = myBaseURI.MakeRelativeUri(myTargetPath).ToString

End If
Study this code carefully. The key area to examine is how the relative URL is achieved. Test everything to satisfy yourself that this has worked.
Step 4 - Reusing The Techniques
There are a few other HTML elements that require paths to resources. Image tags and stylesheet links are also created in similar ways - a wee dialog box for each would enhance your application further.
Other items, not requiring URLs, but needing extra user input would include some of the following,
- Selecting or creating custom colours, converted to hexadecimal
- Inserting symbols (using entity codes)
- Generating tables or converting selected text to table format
- Creating stylesheets
- Inserting code from libraries managed by the user

