Visual Basic 2005 Guide
Databases - DataGridView
Introduction
There are a variety of ways to work with databases from Visual Basic. The demonstrations in this guide cover the basics of showing and editing data using Visual Basic to provide a front-end for an Access database.
For the examples below use the Access 2000 database, trek2000.mdb (approx 184kb).
Setting Up The Project - Adding The Database File
Start a new project and give it a suitable name. Save all of your files so that a directory is created for the solution. Copy the database file to the root directory of the solution.
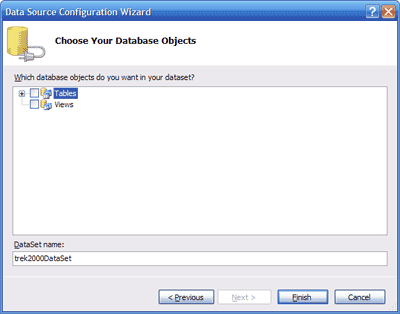
Now click on Project, Add Existing Item on the menu and browse to the database. When you do this, the following dialog box is shown,

If you expand the Tables node, you should see the two tables that are in this database. Select to add both tables by filling the checkbox next to Tables. Click on Finish and you will see two objects appear in the Solution Explorer window - more about those later.
Looking at the properties window, you should see that the form's File Properties are listed. Choose the Copy To Output property and set it to Copy If Newer. This means that the database file will be copied to the output directory of the project if you make adjustments to the file you originally placed in the root directory of your solution.
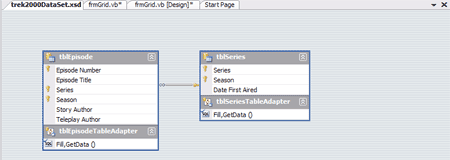
Double click on the .xsd file that has appeared in the Solution Explorer and you should see a schema for the database appear as a new tab window in the project.

Looking carefully at the schema, you can see the tables, fields and relationships in this database.
Adding A DataGridView Control
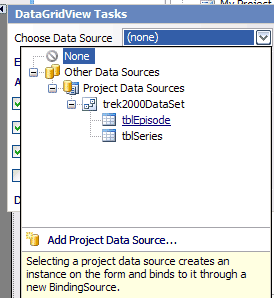
Return to the blank form and select a DataGridView from the toolbox. The following window pops up.

Select the Episode table from the list and then resize the gird so that all columns are shown. Leave the default editing/updating options checked but remember that there are options here, particularly if you want to create a datagrid that is used only for displaying data. Rename the grid dgvEpisodes and size it on the form as required.
Look at the code window for your form, the following line of code was automatically generated for you,
Me.TblEpisodeTableAdapter.Fill(Me.Trek2000DataSet.tblEpisode)
When you show the form in the IDE, you will also see that there are three controls added at the bottom of the window. Read the MSDN help to find out more about how these objects manage access to the database file.
This line of code fills the datagrid with data from your database - in this case from the Episodes table. Run the project to check that the datagrid is being populated as you expect.
Making The Form More Useful
At the moment, any changes that we make in the DataGridView are not written back to the database. We can also make sure that as much of our data as possible is visible to the user.
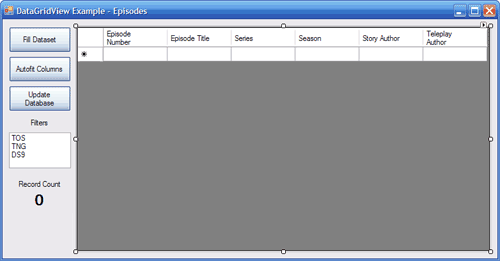
Our long-term goal is to end up with a form looking something like the screenshot below.

Start by moving the grid to the right hand side of the form. Set the form to startup as a maximised window and create the objects on the left hand side (button, button, button, label, listbox, label, label - in that order from the top). Select the DataGridView and set its Anchor property to Top, Bottom, Left, Right
The Fill DataSet Button
This button fills the grid with all of the data in the database. The only line of code needed for its event is the one that was generated for us,
Me.TblEpisodeTableAdapter.Fill(Me.Trek2000DataSet.tblEpisode)
The Autofit Columns Button
This button is used to run the code that demonstrates how to size columns to make all of the data visible. When making an application, you are more likely to do this for the user. We'll do this separately here though. The following code is required,
Dim tmpColumn As DataGridViewColumn

For Each tmpColumn In dgvEpisodes.Columns

   tmpColumn.Width = tmpColumn.GetPreferredWidth(DataGridViewAutoSizeColumnMode.AllCells, False)

Next
The Update Button
The key to working with databases is making sure that you write changes back to the database file at appropriate times. Here we'll do it when the user clicks the button. The code is simple,
TblEpisodeTableAdapter.Update(Trek2000DataSet.tblEpisode)
This would be a good time to test what you have done so far. Make a change to the database and click the update button. Close down and restart the application to check that your changes are still there.
The Filters
Add the listbox and add the three items shown on the screenshot above. These are references to the different versions of Star Trek.
Next double click on the database schema in the Solution Explorer window. We are going to add a query with a parameter. Right Mouse Click on the TableAdapter section of the Episode Table and choose Add Query. Choose Use SQL statements in the dialog box that pops up and click on Next. Choose to make a SELECT query which returns rows and click on Next. Enter the following query in the text box on the next page,
SELECT   [Episode Number], [Episode Title], Series, Season, [Story Author], [Teleplay Author]

FROM   tblEpisode

WHERE   Series = ?
The question mark is the parameter that we will supply to this query at runtime depending on the user selection.
In the code window for the form we created, select the SelectedIndexChanged event for the listbox. Our first job is to make sure that when we repopulate the datagrid, no changes are lost. We can do that with the following code,
If Trek2000DataSet.HasChanges Then

   If MessageBox.Show("Save Changes", "Database Example", MessageBoxButtons.YesNo_
, MessageBoxIcon.Question) = Windows.Forms.DialogResult.Yes Then

      TblEpisodeTableAdapter.Update(Trek2000DataSet.tblEpisode)

   End If

End If
The underscore indicates that I have had to put in a line break to be able to fit the code in this web page - you should not break the line at that point.
Notice in the code above how easy it is to check if changes have been made. Also check out the use of the MessageBox to get quick user interaction.
Next we have to repopulate the datagrid depending on which series the user wants to see.
Dim strFilter As String

strFilter = lstGridFilter.SelectedItem

TblEpisodeTableAdapter.FillBySeries(Trek2000DataSet.tblEpisode, strFilter)
The variable strFilter is used to store the parameter for the query that we created earlier.
Displaying The Number Of Records
We can display the number of records by simply reporting the number of rows in the DataGridView. We will need to update this any time that rows are added or removed. Fortunately, the DataGridView has events for this purpose. In the event handler, type the following code to update our label,
lblRecordCount.Text = Str(dgvEpisodes.RowCount - 1)
We subtract 1 from the RowCount because the DataGridView always contains a blank row for adding a new record.

