Visual Basic 2005 Guide
Getting Started
Going Further
Databases
HTML Editor
Future Directions
![]()


Visual Basic 2005 Guide
Making A Basic Arcanoid
Introduction
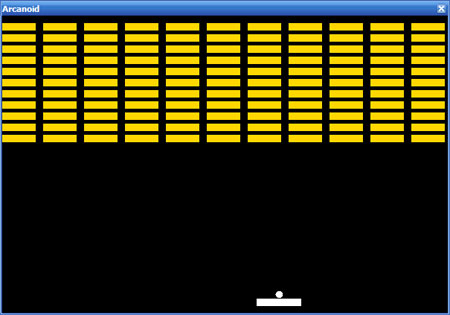
The game we are going to make is a simple version of Arcanoid, the bat, ball and tile game. The program will eventually look like the screenshot below. The ball will bounce off the edge of the screen and off any tiles it hits.
Step 1 - Designing The Form
Most of the items on the screen will be drawn at runtime using the GDI+ graphics library that was introduced in the previous activity. We still need to design a suitable form for our game though.
Start by adding a picture box to the form. Name the box, picGame and set its background colour to black. Name the form and set its FormBorderStyle to FixedToolWindow. Resize the form so that the picture box exactly fills the space available like it does in the screenshot above.
Add a timer to the form and call it tmrNoid and set its interval to 5. The timer will be used to force the picture box to be repainted showing changes to the game environment.
Step 2 - Global Variables
The following variable declarations need to be placed in the declarations section of the code window.
Dim paddleR As Rectangle

Dim ballR As Rectangle

Dim ballStuck As Boolean

Dim xspeed As Integer, yspeed As Integer

Dim tiles As New ArrayList
The paddleR variable is used to store the location of the bat/paddle used in the game. It uses the rectangle data type which has 4 properties (X, Y , width, height). Our program will monkey about with the X property to make the paddle move left and right.
The ballR variable is also a rectangle and is used to store the position of the ball.
The ballStuck variable allows us to have two states for the game, either the ball is stuck on the bat ready to start or is flying around the game screen.
The xspeed and yspeed variables are used to store the distance in pixels that the ball will move each time the timer fires.
The tiles are stored in an ArrayList. The ArrayList structure is quite useful to us because it is a dynamic structure to which we can add unsorted items and remove them when we like. It is worth reading a little about this in the MSDN local help, it may come in useful in another program.
Step 3 - Initialising The Game Variables
The following code goes in the form's load event and sets the initial values for our variables. This will determine the starting position for paddle and ball as well as filling the ArrayList with rectangles to store the tiles. The nested loop is used to create several rows of tiles in one go.
paddleR = New Rectangle(280, 380, 60, 10)

ballR = New Rectangle(280, 20, 10, 10)

xspeed = 0

yspeed = -5

ballStuck = True

Dim intcounter As Integer, intRows As Integer

For intRows = 10 To 160 Step 15

   For intcounter = 0 To 10

      tiles.Add(New Rectangle(intcounter * 55, intRows, 45, 10))

   Next

Next

Randomize()
Step 4 - Painting The Items In The Picture Box
All of the drawing takes place when the picture box is painted. In the code window, locate the picGame Paint event and add the following code,
Dim g As Graphics = e.Graphics

g.FillRectangle(Brushes.White, paddleR)

g.FillEllipse(Brushes.White, ballR)

Dim myRect As Rectangle

For Each myRect In tiles

   g.FillRectangle(Brushes.Gold, myRect)

Next
Notice how we iterate through the ArrayList using a modified for loop. This allows us to manipulate the tile rectangles without having to know which one we are dealing with.
Step 5 - The Other PictureBox Events
We need to add code to another 4 events that can occur in the picture box. When the mouse is in the picture box we want to hide the cursor - and show it when it leaves. This can be achieved with the following code.
Private Sub picGame_MouseEnter(ByVal sender As Object, ByVal e As System.EventArgs) Handles picGame.MouseEnter

   Windows.Forms.Cursor.Hide()

End Sub


Private Sub picGame_MouseLeave(ByVal sender As Object, ByVal e As System.EventArgs) Handles picGame.MouseLeave

   Windows.Forms.Cursor.Show()

End Sub
We also need to release the ball when the user clicks the mouse. We do this with the following code,
Private Sub picGame_Click(ByVal sender As Object, ByVal e As System.EventArgs) Handles picGame.Click

   If ballStuck = True Then

      ballStuck = False

      xspeed = Int(Rnd() * 10) - 5

   End If

End Sub
Finally we need to move the paddle when the mouse is moved. The following code does this,
Private Sub picGame_MouseMove(ByVal sender As Object, ByVal e As System.Windows.Forms.MouseEventArgs) Handles picGame.MouseMove

   paddleR.X = e.X - 30

End Sub
Step 6 - What Happens When The Timer Ticks
Most of the work in this program happens when the timer ticks. The bold sections are comments to indicate where the work is being done. All of this code needs to be in the timer's tick event.
If ballStuck = True Then

   ballR.X = paddleR.X + 25

   ballR.Y = paddleR.Y - 11

Else

   'move the ball

   ballR.X = ballR.X + xspeed

   ballR.Y = ballR.Y + yspeed

   'check for wall contact

   If ballR.X <= 0 Or ballR.X >= picGame.Width Then xspeed = 0 - xspeed

   If ballR.Y <= 0 Then yspeed = 0 - yspeed

   'check for bat contact

   If ballR.IntersectsWith(paddleR) Then

      'work out return angle

      If (ballR.X > (paddleR.X + 22)) And (ballR.X < paddleR.X + 38) Then

         xspeed = 0

      Else

         If ballR.X < (paddleR.X + 25) Then

         xspeed = 0 - Int((paddleR.X + 25 - ballR.X) / 30 * 8)

      Else

         xspeed = Int(paddleR.X + 60 - ballR.X) / 30 * 8

      End If

   End If

   'send ball up the screen

   yspeed = 0 - yspeed

   ElseIf ballR.Y > 390 Then

      'life lost

      ballStuck = True

   End If

   'check for tile contact and remove tiles hit

   Dim myRect As Rectangle

   For Each myRect In tiles

      If ballR.IntersectsWith(myRect) Then

         tiles.Remove(myRect)

         yspeed = 0 - yspeed

         Exit For

      End If

   Next

End If

'redraw the screen

picGame.Refresh()
OK, there's quite a lot going on here - try to keep up with the explanation. First we check whether the ball is stuck on the bat, if it is, all we need to do is move its rectangle to the centre of the paddle rectangle.
If the ball is not stuck, we move the ball the amount indicated by the xspeed and yspeed variables.
Once the ball has moved, we have to check for contact with walls. The xspeed and yspeed variables indicate the direction of and angle of movement by storing positive or negative values. When a side wall is hit, we change xspeed so that it indicates the opposite direction to the one which made contact. The same is true when the top wall is hit.
To check for contact with the bat, we see if there is an intersection between the ball and the bat. If there is, we need to do the complex job of working out what angle to send the ball back at. To allow the user some measure of control of the ball, we work this out by looking at where contact is made.
Next we check to see whether the ball is lower than the bat and make sure that the ball becomes stuck. We can place code here to deal with a life being lost in the game.
To check for contact with the tiles, we use another loop and look for an intersection between the ball and one of the tiles. Once contact has been found, the yspeed variable is converted to the opposite direction and the tile is removed from the ArrayList. Here is where you might deal with any scoring events.
The last line of code forces the picture box to be redrawn showing all of the changes in position of items.
Step 7 - Finishing The Game
This page only contains code for basic functionality. In its current form, some game play is possible but not enough to sustain attention. Even with something is basic as this, a few extra features would make the game much more interesting to play. Consider the following,
Scoring
There are several ways to score this game each changing the way that the game might be played. You could increase the score as time passes, adding a bonus for contact with a tile. You could only increase the score when the ball hits a tile. The score should be displayed on the screen. You could also provide a time limit for removing the tiles and give a time bonus at the end of a round.
Lives
Having a fixed number of lives for the player is a useful way to make it so that the user will finish the game knowing there is more to aim for. Displaying the lives on the screen is a must. The easy way to deal with lives being lost is simply to subtract a chunk from their score.
Levels
Levels add the possibility of progression in the game. You could adjust the size of the bat or ball, smaller is harder. You might also introduce different tiles that require more than one contact to remove. You could do this by creating a structure that stores the tile rectangle as well as the number of contacts. You would still be able to use the ArrayList. Other common features of Arcanoid are power-ups and bonuses. Creating special tiles or other items that help the user would achieve this effect.
Other Screens
The game would appear more professional if it had a start and end screens as well as a high score table that is saved between games.