Visual C# Guide
Simple Applications
Sudoku Application
Fractal Explorer
SFML Graphics Guide
Taking C# Further
![]()


Visual C# (Windows) Guide
Story Maker Program
This is a simple program for you to copy and adapt. It is based on the game that is sometimes called Mad Libs. People contribute random words to a story. I started off by thinking of the story I wanted to make so I knew what pieces of information to get from the user.
My story was,
Peter Parker was bitten by a radioactive spider and turned into Spiderman.
The words that are shown in bold text will be chosen by the user.
Step 1 - Create A New Project
Go to create a new project in C#. Instead of choosing the console application as you have before, choose Windows Application. Look careully in the Solution Explorer window. You should see that some files have been created. Firstly, there is the form that you can see in the middle of the screen. You should still see a file called Program.cs, that is the part of the program that starts things off - the entry point for our application.
There is a window in the bottom right called the Properties window. We use this to change the properties of visual components like forms, text boxes and buttons during design time - when the program is still being written.
Use the properties window to change the Text property of the form to Story Maker.
Step 2 - Design The Form
Make sure that the tab which contains your form is active in the middle of the designer window. You need the tab that says Form1.cs [Design]. Go over to the toolbox on the left of the screen and select the textbox tool. Drag in 4 text boxes and arrange them as shown in the screenshot.
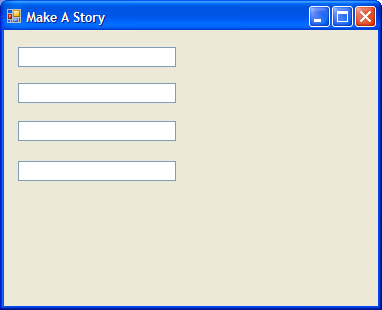
Name each text box from the top as follows,
- txtPerson
- txtAnimal
- txtInjury
- txtSuperHero
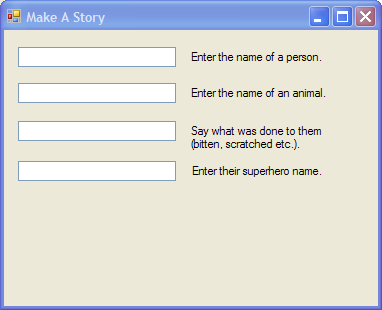
Now add labels to the right of each text box. Don't worry about naming these items, we won't be working with them in our code. Just leave the names as the designer sets them. Change the Text property of each label so that the form looks like the screenshot below,
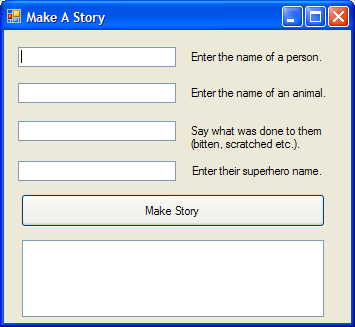
Now drag in a button immediately below the text boxes. Call the button, btnMakeStory and set its text to Make Story. Below the button, add a text box. Change its Multiline property to True, and call the text box, txtStory. Your form should now loook like the screenshot.
Coding The Button Click Event
Form-based applications tend to do nothing until an event occurs. This may be a keypress or a mouseclick on a particular item. We bring up a code window for the event by double clicking on the button. The following code pops up in a code window,
private void btnMakeStory_Click(object sender, EventArgs e)

{


}
All of the code that executes when the button is clicked is entered in this event procedure. We don't need a lot of code here. We want to work out what has been entered into each text box, add a few strings together to make the story and whack it into the big text box at the bottom.
string person = txtPerson.Text;

string animal = txtAnimal.Text;

string injury = txtInjury.Text;

string supername = txtSuperHero.Text;

string story = person + " was " + injury + " by a radioactive " + animal + " and became " + supername;

txtStory.Text = story;
Having A Go
On this page, you have seen how to retrieve and set text in text boxes and execute code when a button is pressed. Just like reading text form the console, the contents of a text box are a string and need to be converted if used for numeric values.
- Make a simple calculator type application. Include 2 text boxes for entering values to operate on, include buttons for all common arithmetic procedures. Use a third text box to display the answer and add buttons to clear the display and to allow the user to use the answer in a new sum.
- Write a program which includes 6 labels and a button. When the button is pressed, 6 random numbers should be selected such that they could be used for the lottery. Include code to ensure that there are no duplicate numbers in the set.